Amber, I have downloaded Pandoc and ran (or opened?) the exe file, and done the style marking and that seems straightforward. I see the instructions about Compile For, but I clearly haven’t got Pandoc integrated with Scrivener, and I can’t find instructions for that. Can you advise? Thanks, Karen.
Hmm, you shouldn’t have to do anything special as Scrivener will look in the places where Pandoc is typically installed and automatically add the compile settings. Did you run the installer with default settings? For me, running it as admin, it ends up in C:\Program Files. You have definitely restarted Scrivener after installing it? It does only run that check on start-up. The other thing to bear in mind is that the Pandoc->DOCX option is at the very bottom of the Compile For dropdown, you might have to scroll down to see it.
I don’t see Pandoc in my Program Files and when I open the .exe file I just get a blank black screen - no sign of installation happening. I looked for instructions for installing on Windows 10 and it led me to these instructions, which is beyond my knowledge. I’m used to installing programs and plugins but not going back to command prompts. Any ideas?
- First, ensure that you are using an administrative shell - you can also install as a non-admin, check out Non-Administrative Installation.
- Install with powershell.exe
3.NOTE* Please inspect install.ps1 prior to running any of these scripts to ensure safety. We already know it’s safe, but you should verify the security and contents of any script from the internet you are not familiar with. All of these scripts download a remote PowerShell script and execute it on your machine. We take security very seriously. [Learn more about our security protocols]
With PowerShell, you must ensure [Get-ExecutionPolicy] is not Restricted. We suggest usingBypassto bypass the policy to get things installed orAllSignedfor quite a bit more security.
- Run
Get-ExecutionPolicy. If it returnsRestricted, then runSet-ExecutionPolicy AllSignedorSet-ExecutionPolicy Bypass -Scope Process.Now run the following command:
That definitely looks more complicated than the normal installer. Here is the download page. Grab the Windows version that has an .msi extension, that’s the actual normal installer (I just tested it, as I needed to update my copy anyway). You click “agree” and then select the option to make it available to all users, which will install it to Program Files and set up the system for you, and that’s it. Reload Scrivener and it should be there.
Maybe you grabbed the copy that is meant to be for advanced or stand-alone installs where you want to set everything up yourself. I’ve never had to go into PowerShell to get it working.
1 Like
Quick question - Is it possible to mark tiered indexes within Scrivener in a similar manner by marking the text with a style too?
As an example, say I had Mary Smith and John Smith. I’d want the index to reflect
Smith
- John (pg#)
- Mary (pg#)
That would depend on the output format—first whether it supports doing that, and secondly how it does. Some use naming conventions to establish hierarchy, which is probably how it would need to be done if Scrivener’s compile Formats that support this, were modified to handle Word and LibreOffice hierarchies (if indeed they even support grouping, I couldn’t find anything obvious in LO for that).
1 Like
Fwiw, I have done it in Word, I’ll see what those docs look like when I open them in Libre. (Off to find old files in the old computer. I may be a while… ![]() )
)
It can be done manually in LO once the main Index Term values are sent from Scrivener:
How to automate that from Scrivener may be tougher though ![]() — Scrivener injects raw XML, so we’d need to reverse engineer the XML that LO or Word uses to identify the hierarchy…
— Scrivener injects raw XML, so we’d need to reverse engineer the XML that LO or Word uses to identify the hierarchy…
For LaTeX and Typst, it also requires some custom tweaking, but certainly automatable with a post-processing script…
2 Likes
@nontroppo : For LaTeX and Typst, it also requires some custom tweaking, but certainly automatable with a post-processing script…
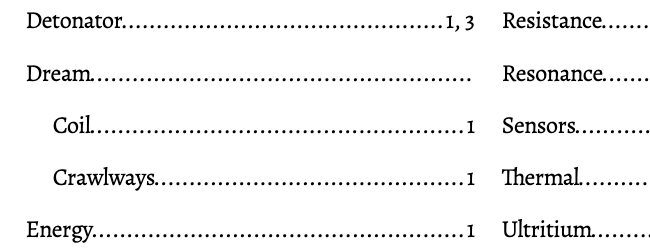
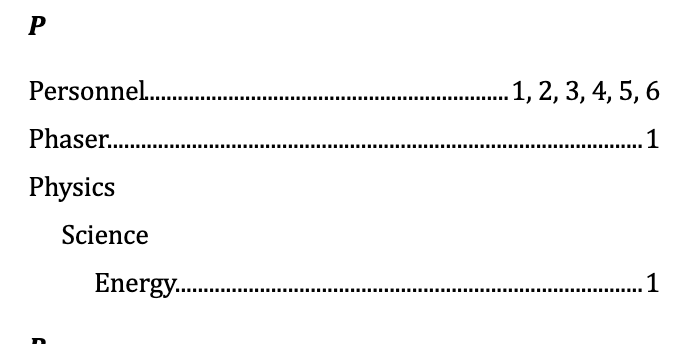
For LaTeX anyway, you don’t even need post-processing because all of the listing options are done via typing conventions. For example, this is from the Scapple user manual project:
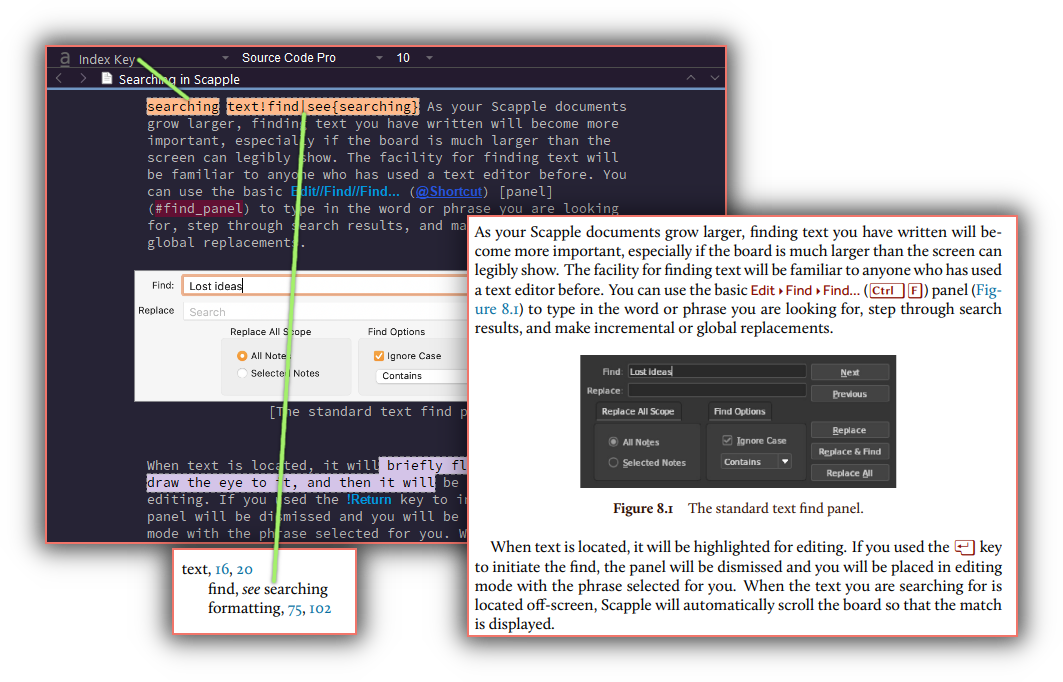
The two orange highlighted phrases are using the “Index Key” character style, which has LaTeX syntax wrapped around it. In the second example the “see also” format is demonstrated, as well as grouping (text!find), the output of which is shown in the snippet below. As you can see in the resulting page output, the keys themselves are invisible as they should be. Not depicted is the ‘searching’ listing itself, a bit further up in the index, and coming from the first orange word (I do kind of wish that using a see-also reference implicitly added the referred to key automatically instead than having to add both).
So that is all very straightforward to handle with compiler style presets and suffixes, and since it is simple styled text, it is very easy to work with efficiently in the editor. It should go without saying, but one does not think about any of the above while doing this. The “interface” is no more complicated than making words bold.
What I did when working on the Scapple manual is add a Project Bookmarked document that listed all of the indexing terms I was accumulating, pre-styled, so I could just copy and paste out of the inspector. When I made a new term I would prefix it with a tab in the editor, with the tab given a red highlight, so I would know it hadn’t been addressed it, as typically these would be thought of while addressing other terms. Once I finished with a term, I would swap the highlight to green and move on to the next red.
It was enough for an amateur, doing a short and simple software manual like Scapple’s, anyway. I don’t know if I’d want to scale that up to something like the Scrivener manual. ![]()
Geeky LibreOffice stuff...
This very basic prefix/suffix approach is also how the stock compile format is working, as indexing (simply) in LibreOffice is pretty easy. Here is what the XML looks like for that:
<text:alphabetical-index-mark text:string-value="word" />
This can also be performed entirely with a style prefix and suffix, to add everything around the marked “word”, along with the necessary Markdown to instruct it to inject this directly into the .odt XML output.[1] In other words the source text in Scrivener will look almost identical to the simple LaTeX example (obviously the more complex see-also and grouping stuff wouldn’t be the same).
Thanks to the tip given above by @nontroppo, I created a simple example and found the result to be pretty easy to generate, in terms of the syntax:
<text:alphabetical-index-mark text:string-value="Child"
    text:key1="Grandparent" text:key2="Parent"/>
Thanks to how XML works, it would be possible to pull that off with a single regular expression Replacement, as it wouldn’t be invalid if the key1 and/or key2 attributes are left empty. So let’s say for example we use the LaTeX approach, but with a “:” instead of an exclamation point. Presently the Index Key style has these prefix/suffix settings:
Prefix:
`<text:alphabetical-index-mark text:string-value="strip{{
Suffix:
}}"/>`{=odt}`
I then have Replacement looking for strip\{\{\s*(.*)\s*\}\} and replacing it with the found word in the middle to strip padding spaces ($1). The style itself adds the strip{{ and }} around the marked text.
We would only need to modify that then a little bit:
strip\{\{\s*((\w+):)?((\w+):)?(\w+)\s*\}\}
Now we are looking for two optional ‘word:’ statements that can appear before the primary ‘word’. This will handle ‘word’, ‘group:word’, and ‘major:group:word’, sorting each of the found components of the hierarchy into the right XML attributes, with this substitution command:
text:string-value="$5" text:key1="$2" text:key2="$4"
A tweak to the original style prefix/suffix, to remove the bits the regex is now generating, and it looks to me like it is good to go!
Sample compile format
Here is a prototype of the OpenOffice compile Format that supports hierarchies, that you can give a spin. It will expect you to structure hierarchies like “major:group:term”, “group:term”, or “term”, and mark them with the “Index Key” character style. It seemed to be working pretty well with a few simple tests.
Change notes...
Updates (2024-03-23) v2.1
- Added support for a few different hierarchical marking styles. One can now use
Major/Group/Term,Group:Termor the LaTeX-friendlyGroup!Termnotation. - Cleaned up the regex a bit.
- Added support for inline annotation and inspector comment conversion to native ODT comments.
mmd-openoffice-indexing-v2.1.scrformat (25.0 KB)
I might include that in the official release for a future update.
As for OpenXML (Word), I’d have to look up the specs. It’s a huge mess as I recall (as that schema is in general, a load of garbage to work with). It doesn’t have simple human-readable descriptions, but rather concocts the concept of an index entry from a massively complicated field system that is capable of doing everything from form inputs to boiling water for tea, presumably. Microsoft.
that said, the real implementation is a little more complex, as I wanted to add a regular expression to the conversion, to allow authors to space-pad the terms within the style highlight. It’s not necessary to do that with LaTeX since it discards extraneous spaces, but word processors can be a bit “dumb” about that kind of stuff, showing three spaces between words if you add them. WYSIWYG world problems. ↩︎
2 Likes
Wow, the LibreOffice stuff is great and thanks for the geeky description of how you add indexing and the logic of the style injection + regex replacements to make it work. That is such a cool example of the flexibility of Scrivener’s compiler…
1 Like
Yeah, it’s pretty cool what all can be done, but a lot of it is how nice it is to work with ODT in general. It’s not a bad schema. Compiling via .fodt is the way to go for stuff like this, since you can leave the compiled output open in a regular coding editor to see what’s going on, and what changes are made when revising it in LO.
This implementation is a little finicky in that a solution of this nature more or less injects editor data straight into the XML verbatim. You could probably mess things up by trying to pass “File>Save” through it, instead of File>Save, for example, but I didn’t actually try. Fortunately XML-safe is a a pretty small pool of characters to avoid, and won’t be commonly used in an index term.
2 Likes
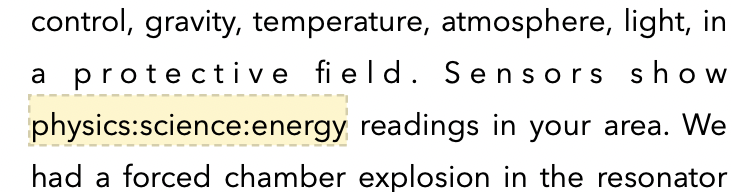
I’ve created a Pandoc filter that basically does what @AmberV’s compile replacements do for ODT, but with the added flexibility of supporting Typst + ODT + DOCX + LaTeX. It depends on the same two styles AmberV specifies: Index Key and Index Term — these should get compiled to \index{ancestor!parent!keyword} and \indext{ancestor!parent!keyword} (you need to wire these up in your compile format); the ancestor and parent are optional. The difference between \index and \indext are based on whether you want the term to be retained in the text. So if you write This [term] here. with [term] being an Index Term style, the output in e.g. Typst would be: This term #index[Term] here. with output like This term here. i.e. it adds the term to the text and uses a title case of the same word for the index. Using Index Key you’d get This #index[Term] here. and the output text would be This here.
For outputs other than ODT / Typst / LaTeX the filter will retain \indext terms and remove \index terms from the text, so this should play nicely with any of the zillion outputs Pandoc supports from Scrivener… LaTeX itself offers more complex options, but as these are not clearly supported by other output engines I didn’t implement them… The filter could also support DOCX [EDIT: now it does], but the XML is so fussy and annoying ![]() to work with (as @amberV mentioned), also Libreoffice has a nicer UI for editing index entries IMO…
to work with (as @amberV mentioned), also Libreoffice has a nicer UI for editing index entries IMO…
EDIT: V1.06 of the filter also supports DOCX output ![]()
4 Likes
I got this working after some twiddling but wonder why the MD part \index{multimodale Modelle} gets compiled to {XE:Multimodale Modelle} in Word.
In German I have to set my index terms case-sensitive. Is there any additional parameter/setting to change this? Or something I can change in the filter convertIndex.lua itself?
And I’m not exactly sure how to define a parent term (aimed at DOCX) in Scrivener and how to prefix/suffix it in my compile format?
Here is a sample Scrivener project that demonstrates the workflow:
IndexV1.11.scriv.zip (574.4 KB)
I’ve added a variable doTitleCase in the script to enable/disable the title case changes, redownload the script V1.11, set it to false to stop case changes.
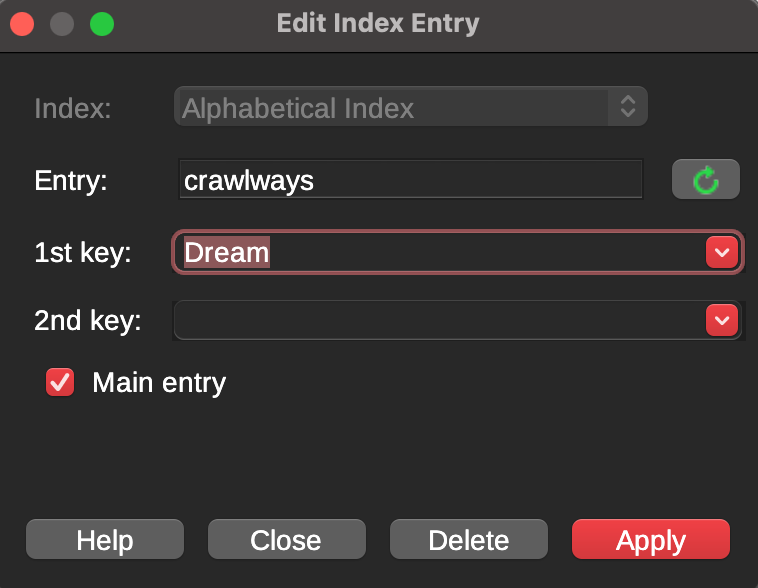
For Word, the way it shows index terms is expected, the {XE:Term} is how it shows the index fields, if you don’t want to see it just turn off whitespace visualisation:
For ancestors, you use colons, so this in Scrivener:
…becomes this in Word:
3 Likes
Thanks, indexing including parent items does work now, great, but I still wondered why an IndexKey/IndexTerm
modelle:multimodal
shows up as
{XE:modelle:Multimodal}
in Word: For the parent term the case is preserved, while for the item itself the case is changed to upper case?
In some languages, like German, for index entries the case is important and should be preserved - is there any way to achieve this?
… Some moments later …
Okay, I changed the following code in convertIndex.lua … ![]()
--local tcItem = titleCase(keys[3]) -- use title case for the index
local tcItem = keys[3] -- preserve case for the index
I tried to treat words without text before and after as index terms and that would not work, I always need to have surrounding text - is that true? Would it help to treat RawBlock elements the same way as RawInline elements in the .lua script?
Finally, I had a problem that for an Index Term in DOCX the parent item wasn’t stripped out so I changed:
if isTerm then
  --prefix = '<w:r><w:t>' .. item .. '</w:t></w:r>' .. prefix
  prefix = '<w:r><w:t>' .. tcItem .. '</w:t></w:r>' .. prefix
end
As I mentioned above V1.11 of the filter did already fix this:
You change line 30 to set doTitleCase = false and it makes sure no title case is performed. I fixed several other bugs and issues too…
Anyway its good you can tweak it, Lua code is relatively easy to understand ![]()
Index terms shouldn’t need surrounding words, so “This \indext{here}” becomes “This here”. Perhaps I am not understanding what you want to do?
Right, I noticed this bug and it should have ben fixed in V1.11 as well…
2 Likes
Sorry, that was too much information to process yesterday, so I overlooked your remark about the titleCase fix! Got 1.11 now … ![]()
Regarding the problem with terms standing alone in a Scrivener paragraph:
I tested a couple of different use cases and the IndexKeys/IndexTerms which stand alone in a Scrivener paragraph (no text “abcdef” before or “ghijkl” afterwards):
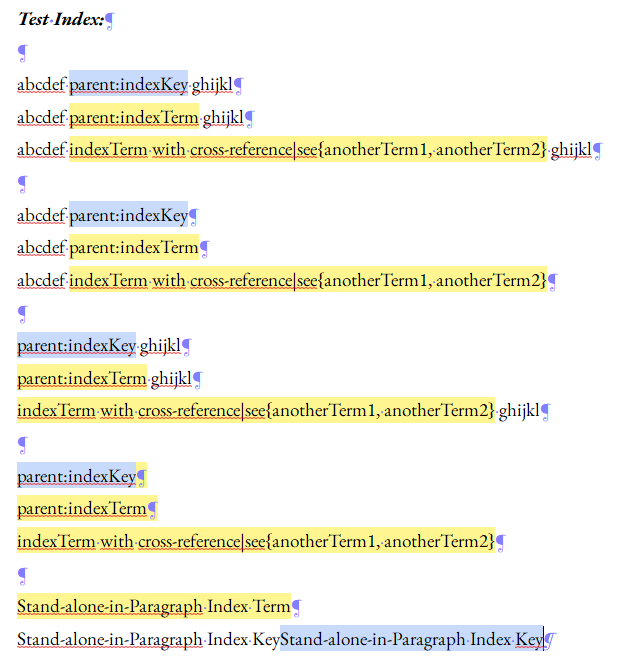
behave differently: They are not separate paragraphs in MD (no empty line):

and thus are in a single line in Word:
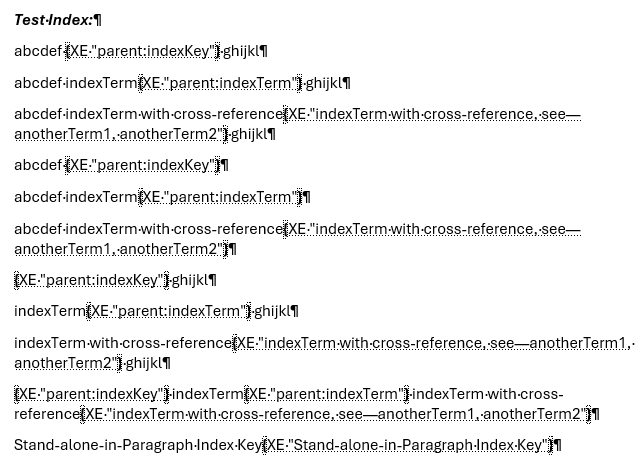
Also, the “Stand-alone-in-Paragraph Index Term” from Scrivener which is present in MD does not show up in DOCX.
1 Like
Ha, great catch. It seems \indext{} in a paragraph is a RawInline and by itself it is a RawBlock (but not \index{} which is a rawinline in both cases). The best way to understand this is to use Pandoc’s native output which shows you the abstract syntax tree – I use terminal, you enter the pandoc command, press enter, then paste your markdown, then press CTRL+D and pandoc shows you the output:
ε ➪ pandoc -t native

W \indext{TermA} X
Y \index{KeyB} Z

\indext{TermC}
\index{KeyD}

[ Para
    [ Str "W"
    , Space
    , RawInline (Format "tex") "\\indext{TermA}"
    , Space
    , Str "X"
    , SoftBreak
    , Str "Y"
    , Space
    , RawInline (Format "tex") "\\index{KeyB}"
    , Space
    , Str "Z"
    ]
, RawBlock (Format "tex") "\\indext{TermC}"
, Para [ RawInline (Format "tex") "\\index{KeyD}" ]
]
So the fix should be to parse RawBlocks (as I think you mentioned above, not sure how you knew about this it is pretty nerdy pandoc AST speak!).
I tried to update: V1.12
ε ➪ pandoc -L convertIndex.lua -t typst

W \indext{TermA} X
Y \index{KeyB} Z

\indext{TermC}
\index{KeyD}

W TermA#index[TermA] X Y #index[KeyB] Z

TermC#index[TermC]
#index[KeyD]
I just did a copy-paste of RawInline to RawBlock and made minimal tweaks, it works for typst output, but fails for docx (probably the XML needs wrapping in a paragraph). I don’t have time to debug, so stick to V1.11 for the moment, not sure what the fix will be, needs more debugging…
2 Likes
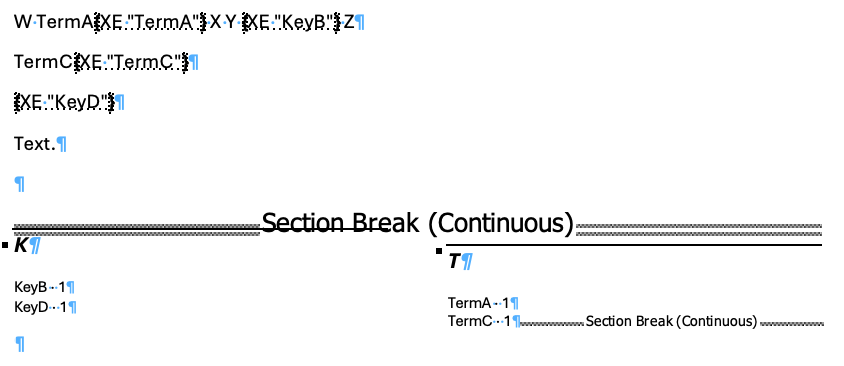
Adding XML for paragraphs fixed docx, so now:
W \indext{TermA} X
Y \index{KeyB} Z

\indext{TermC}
\index{KeyD}

Text.
…becomes
V1.13 of the filter.
2 Likes
hi, i had the same question…not sure if it is any help but i have been writing this non-fiction project for six years…always knew it would need an index but since i only knew how to create footnotes and place them at the end of the book i have spent six years doing that…so at least the index generator chez the publisher will have that to go by. footnoting is super easy and automatically numbers them
that said, now i am trying for my own purposes, to work out how to restart footnotes numbers chapter by chapter, i will keep searching in literatte but if anyone is reading this thread pls let me know if this is possible ![]()
and if anything has changed regarding indexes I would like to be able to generate one on a compile some day though I completely understand why that may not be possible regarding scrivener not being a layout programme and all