Hi BamaRider,
Yes, this will work fine.
By “backup” I assume you mean Scrivener’s automatic backup system. My second assumption is that you’ve got backups of all your projects in case something goes wrong.
My final assumption is that you’ve downloaded the Dropbox app and have it up and running and signed into the same Dropbox account on both your desktop and laptop. This is a requirement for automatic Dropbox syncing.
To start syncing a Scrivener project in Dropbox, use Windows explorer to move the .scriv project folder with all its contents to the Dropbox folder where you’ll be keeping your Scrivener projects.
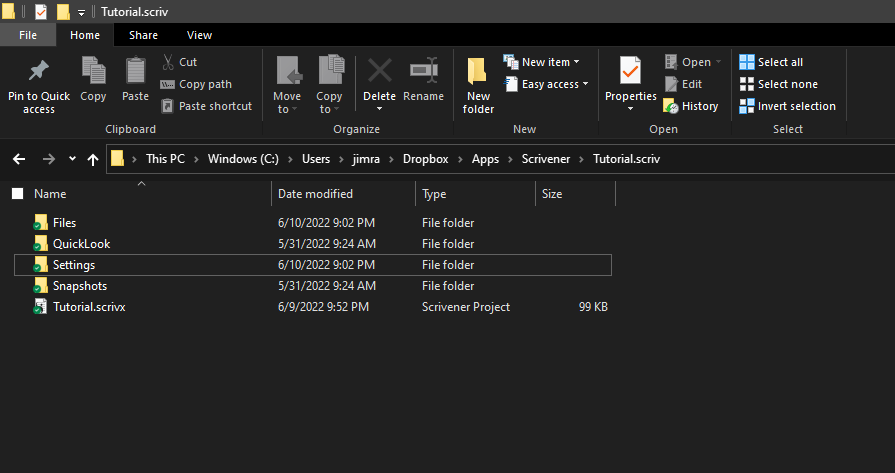
For example, my Dropbox folder for Scrivener is C:\Users\jimra\Dropbox\Apps\Scrivener. All of my syncing Scrivener projects reside there.
Here’s an example of a project folder Tutorial.scriv (the Scrivener tutorial) that I’m syncing. Note that the project folder resides inside my Dropbox folder and that the Tutorial.scrivx file and all the necessary Scrivener folders are inside the Tutorial.scriv project folder.
That’s really all there is to it on the set up end.
Operationally, you’ll need to establish simple syncing procedures to minimize the possibility of syncing errors. Here’s a post I wrote a while back with recommendations of best practices for syncing and for backups. Have a look at it before you dive too deeply in the syncing pool. ![]() It was written for Scrivener 1, but everything is still applicable except you’ll need to translate the menu options to v3.
It was written for Scrivener 1, but everything is still applicable except you’ll need to translate the menu options to v3.
I recommend you get a test project syncing successfully before you try it with your real work, by creating a blank project in your Dropbox folder and experimenting with it. Here’s some suggested steps:
-
On your desktop, use Scrivener to create blank project Test in the Dropbox folder where you plan on keeping your Scrivener projects.
-
On your desktop, open project Test, create a new doc and type some words. Close Test.
-
On your desktop, after you close project Test, you should see the Dropbox icon briefly processing your changes. Left click your Dropbox icon to confirm it’s synced the files from your project Test.
-
On your laptop, left click your Dropbox icon to confirm it’s synced the files from project Test.
-
On your laptop, use Windows Explorer to navigate to the Dropbox folder where you keep your Scrivener projects. Open project folder Test.scriv, and double-click the Test.scrivx file. This should launch your Test project in Scrivener.
-
On your laptop, confirm the words you typed are there. Type some additional words. Close the project.
-
On your laptop, after you close project Test, you should see the Dropbox icon briefly processing your changes. Left click your Dropbox icon to confirm it’s synced the changes from project Test.
-
On your desktop, left click your Dropbox icon to confirm it’s synced the newly changed files for project Test.
-
On your desktop, open project Test and confirm the additional words you typed are there.
-
Continue testing like this until you’re comfortable with how Dropbox syncing works.
Let me know if you have any questions about any of the above!
Best,
Jim
