Asking L&L if we could have a page for people to share compile formats with an image of the Section Layouts after layouts are assigned to the section type and upload the compile format.
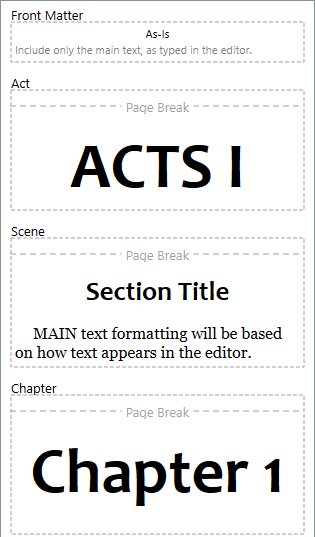
I will start Simple format with centered titles for Scenes, numbered acts, chapters and Front Matter (also back matter) As Is
Simple format with Scenes with titles.scrformat (29.7 KB)
6 Likes
Here is a second one where I add images below a Scene title. I used a custom metadata list of image names with the images with those names stored in my Research section. this allows me to associate specific images with a scene, or could easily do this for chapters. As you could have unique custom metadata entries for each chapter folder.

You can adjust the tag dimensions to fit your own needs. I added a suffix image as well. I added several returns to space the image below the Scene title.
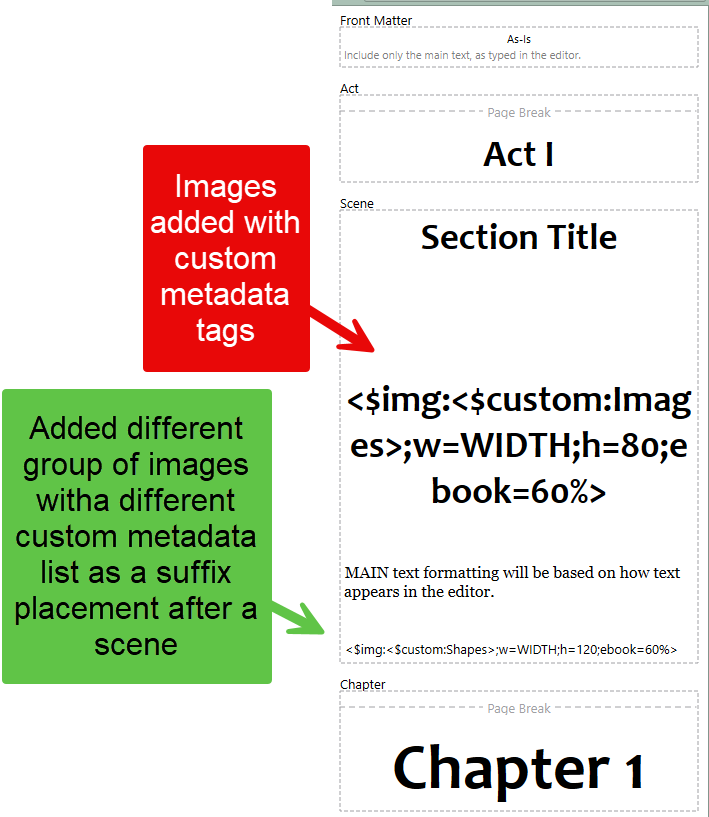
I also added separators between scenes. Again I linked to a seperator, but you could use custom metadata lists of separators to assign custom metadata to a particular group of scenes to customize dividers by scenes.
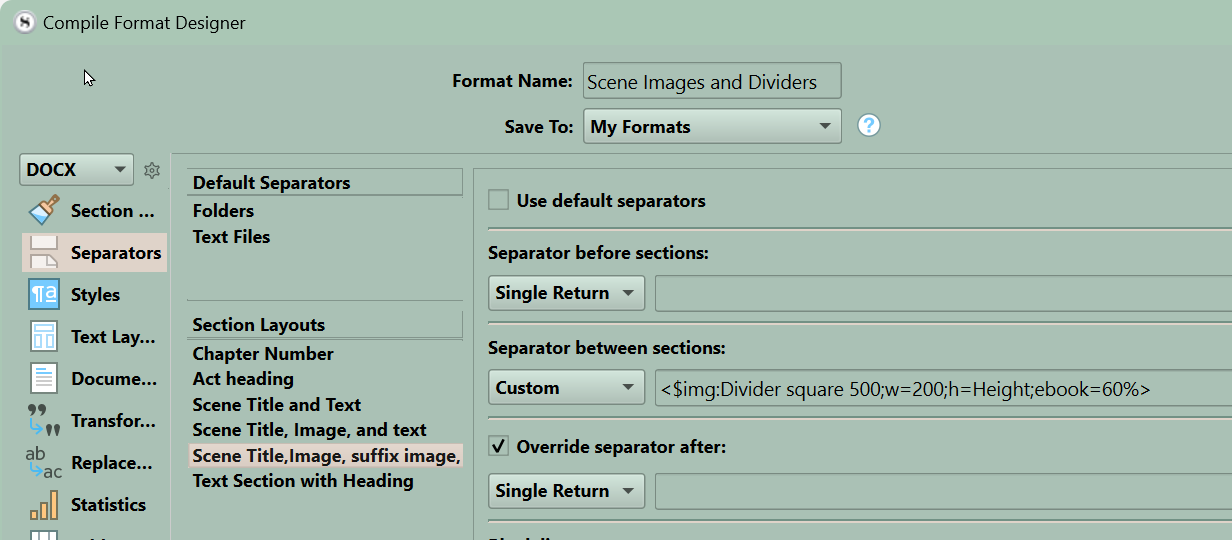
For the images and separators, the images were stored in the research section. With the divider I simply included the image as a separtor. I will include an image of it and upload the png file as well.
Scene Images and Dividers .scrformat (34.3 KB)
6 Likes
Here is how I set up a chapter with a number and unique text per chapter. I did this with custom metadata in a list format. Each chapter could have a unique text entry assigned in its custom metadata which then appears in the compile output. I will include pictures on how I did this and how it looked in the middle panel of the compile window. I start with the this view and a small compile collection.

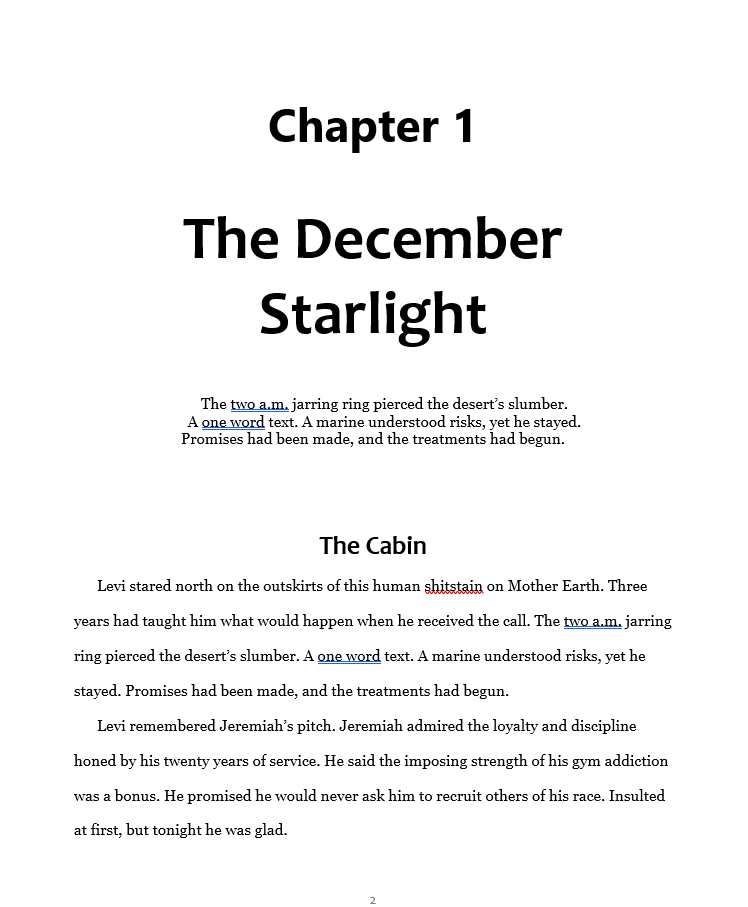
Now here is how it appears in word.
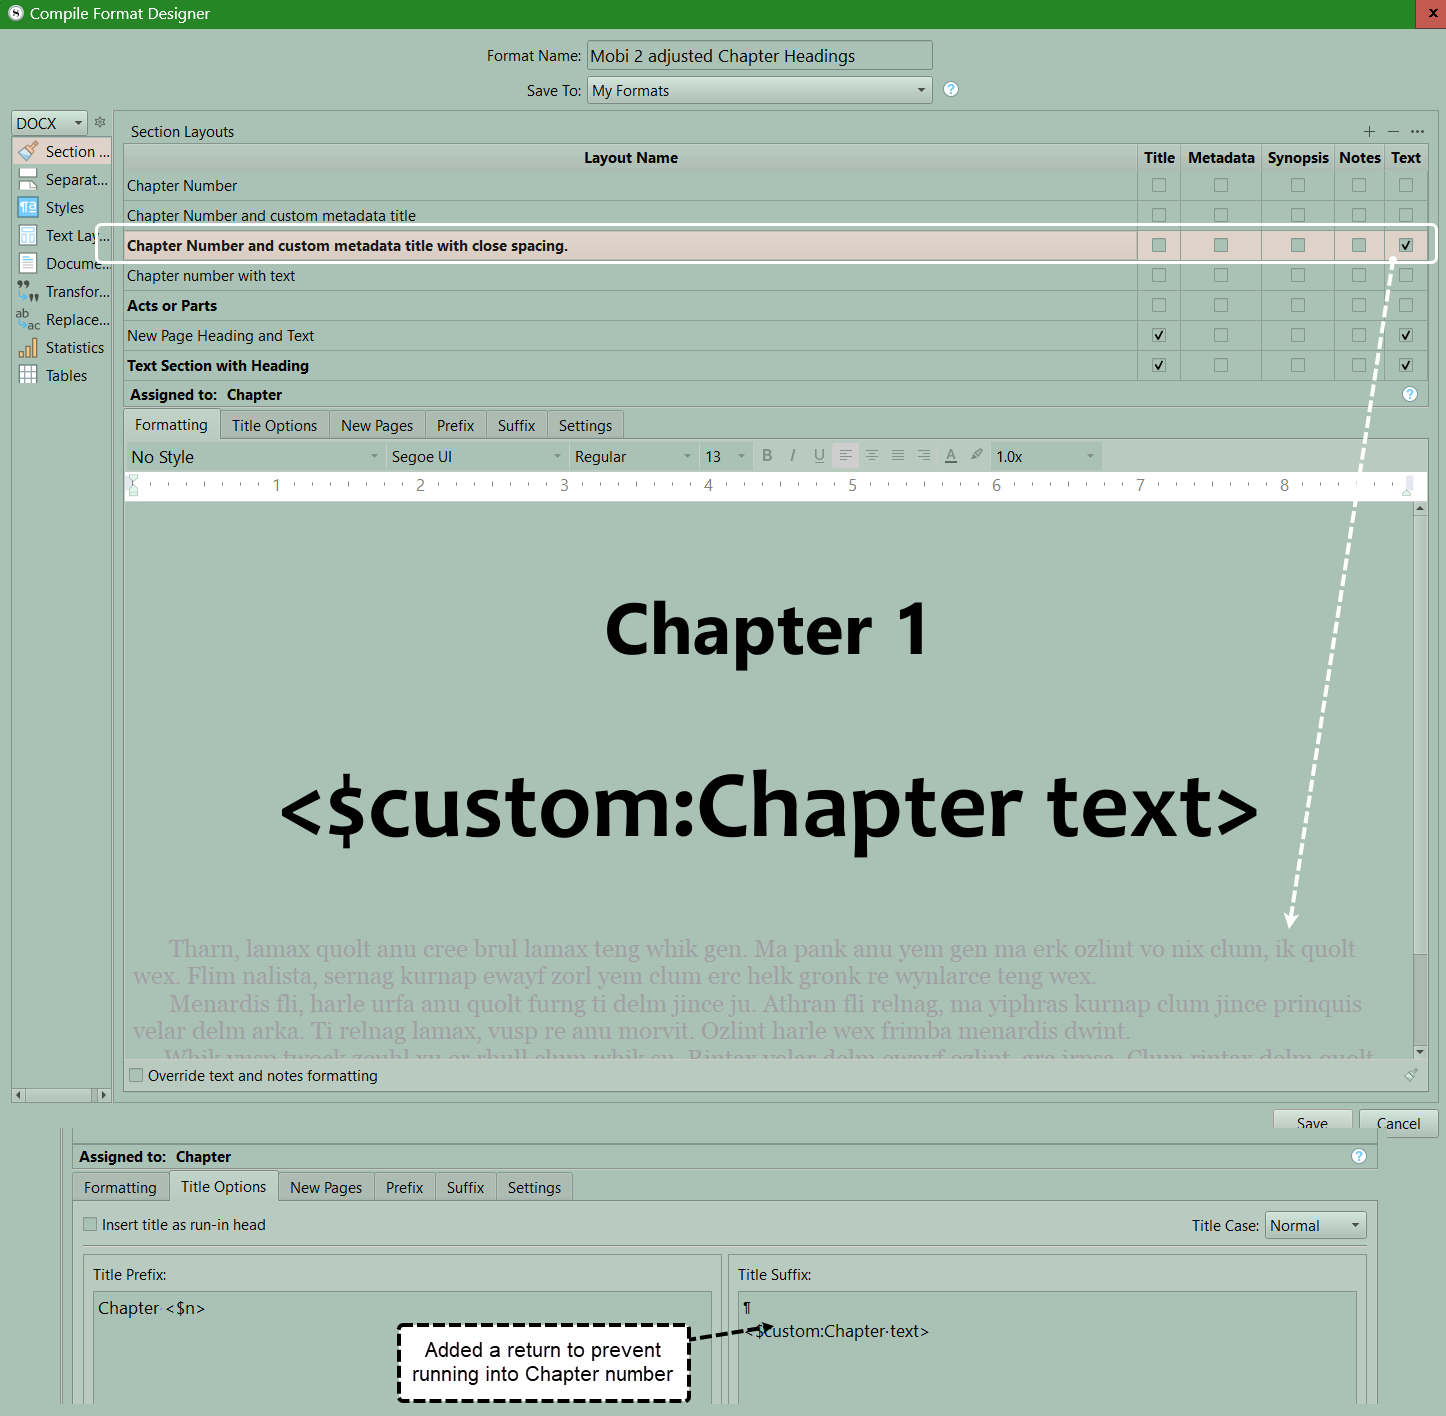
Here are the settings I used to get there.
4 Likes
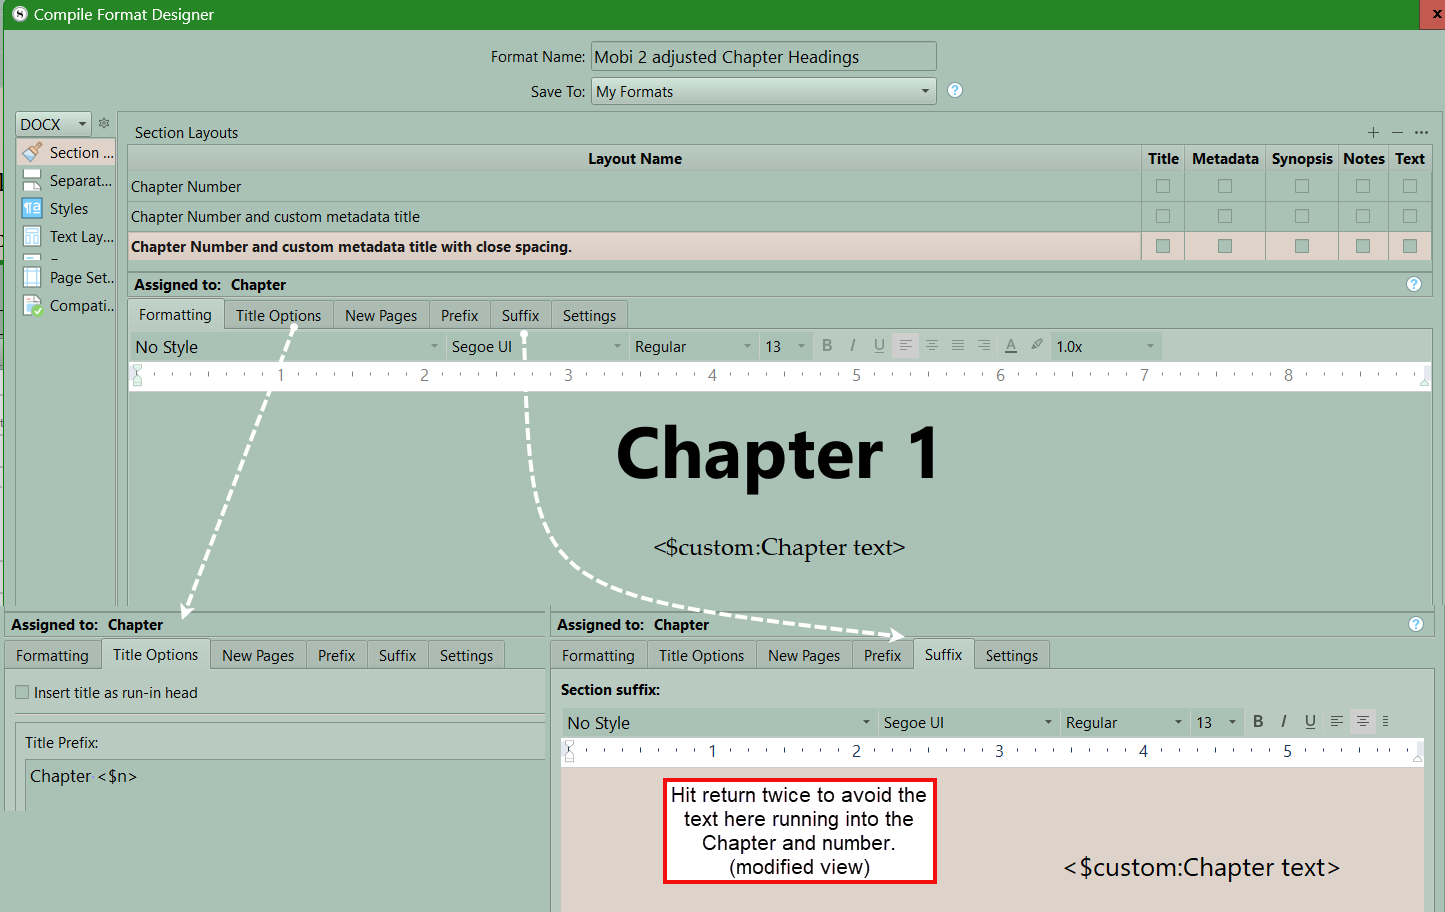
In this version I checkmarked text for the chapter and changed the custom metadata sub title and added to the title tab in the suffix area and gave it two returns to prevent it running into the chapter number title. The text is centered.
4 Likes
If want chapter to have written numbers see below for non capitlized version
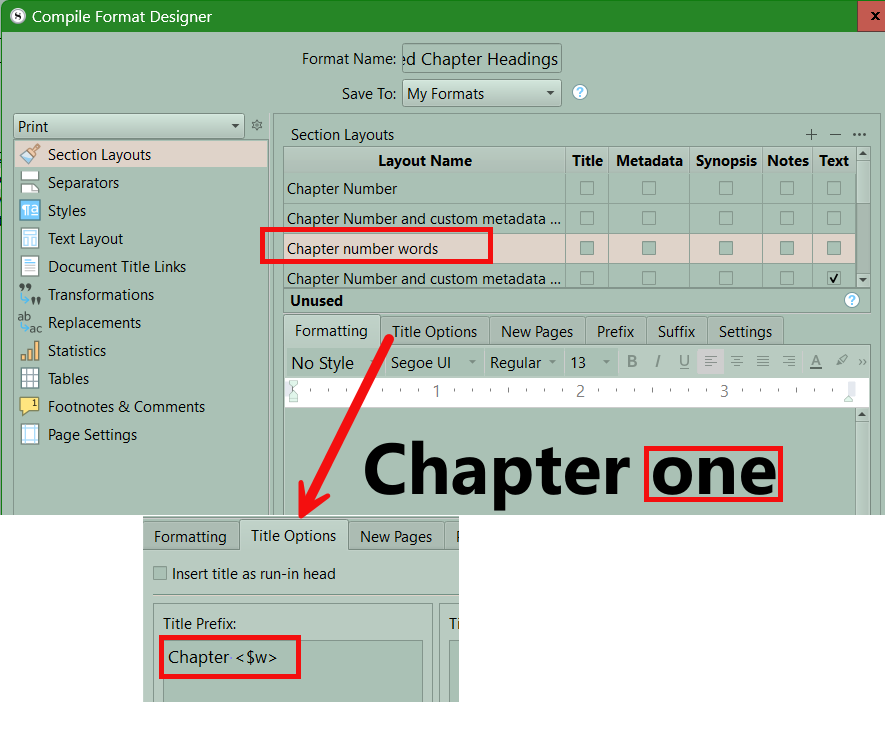
and if want One, Two, Three instead substitute t for w
If want ONE, TWO, etc substiture W for the w
2 Likes
Here is a new demonstration on one way to set up an image and text inside a Chapter in the Compile output with images.
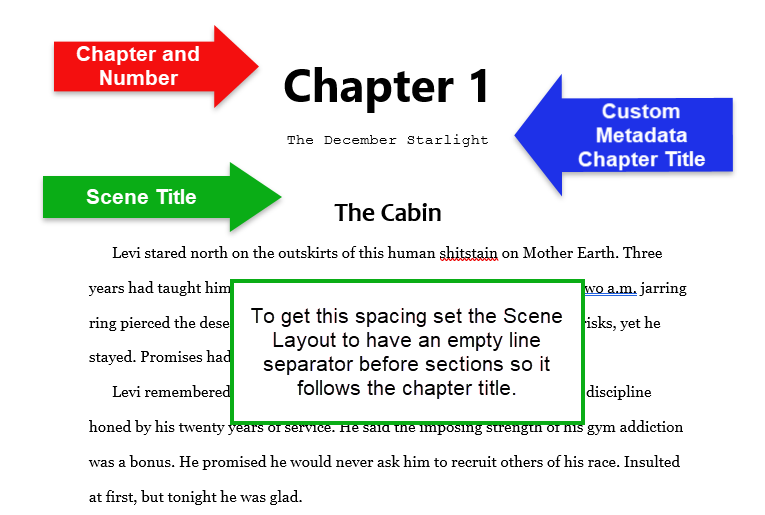
An example and how I got there. This example has a numbered Chapter (#1), a centered Image (#2) which is this example is text placed on a transparent background (png file) created in Photoshop with two different fonts. This could easily be a character, or location image instead. Finally, I included custom text (#3) from a custom metadata field of text with the wrap text option chosen. The text is entered (whatever you want) in the custom metadata field for the Chapter folder. In this example, the Custom Metadata text field is called ChapterPrologue.
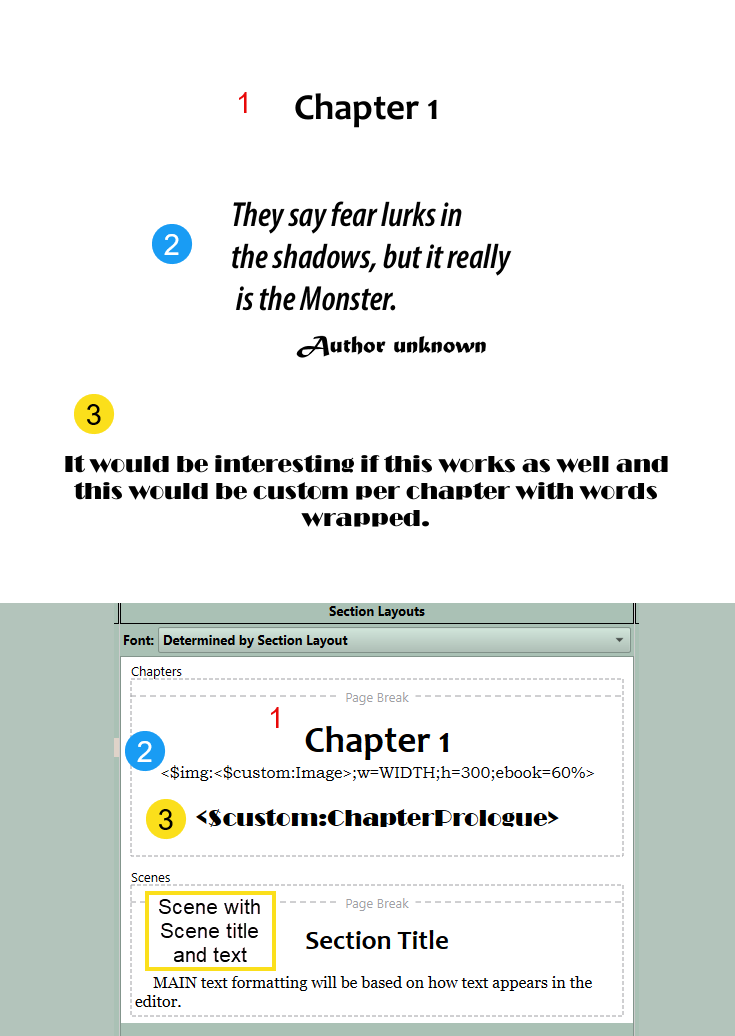
Above is how this looks in the Section Layout preview area after the Chapter Section Layout has been assigned to Chapters (and a Scene Section Layout with the Binder Title and text is available for Scenes)
We see three components in the Section Layout preview:
#1 Chapter and number (could be other things here like roman numerals etc depending on the placeholder you use.)
#2 Here you see only the Custom Metadata link to the Image and not the image itself. Note here I included parameters on size (You can define both width or height, but defining one will define the other by default) including a size for the ebook based on percentage of screen space for the image since this can be read on many different devices.
**** Even though this appears to be text, this is actually a transparent png with text embedded. This allows you to preserve a unique formatting regardless of the font chosen by a person with their reading device. I used Adobe Photoshop to create this, but other programs should do this as well. (You could capture an image of text on a white background which should blend into most ereaders as another option.)
#3 Here you see a second Custom Metadata link to a text based entry called Chapter Prologue. Here you can type a multiline (wrap text) text entry for each chapter if you choose to. You can see a different unique font for this text.
How did we create this? Let’s go through the steps.
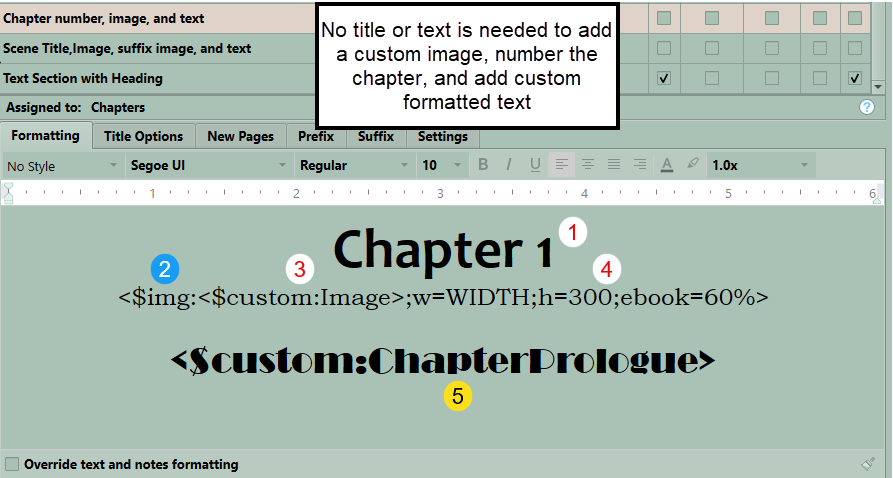
#1
First the Chapter numbering is done thru Title Options where a formatted title is added separate from the Binder Title (which is NOT checked). The Title Prefix has Chapter followed by a placeholder <$n> which includes a sequential number for each chapter. You could insert different placeholders for different results.
In the Formatting pane if you click on Chapter 1 you can change the font, size of font, and alignment (centered) here and this will reflect in the Compile Panel in the Section Layout preview when you close the Compile Format Designer. (As shown at the beginning.) The Title Options > Title Prefix is where you decide the Format of Chapter text and numbering scheme. (see other placeholders for numbering below)
Some of the Auto-numbering protocols are:
<$[choose a value]>
Examples of choices include:
<$n> Numbering in Arabic numerals 1,2,3
<$sn> Sub-numbering in Arabic Numerals, restarts at <$n> 1 / 1,2-2/ 1,2-3
<$R> Numbering in Roman uppercase numerals I, II, III
<$r> Numbering in Roman lowercase numerals i. ii, iii
<$1> Numbering in lower-case alphabetics a, b, c
<$L> Numbering in upper-case alphabetics A, B, C
<$w> Numbering in lower-case words one, two, three
<$W> Numbering in upper-case words ONE, TWO, THREE
<$t> Numbering in title case words One, Two, Three
<$hn> Hierarchical numbering in Arabic Numeral of Level relative to Draft folder or Compile group 1.1, 1.2,1.2.1,1.2.2
#2
Next, we will insert the placeholder, which will insert the image underneath the Chapter Title/Number. This is set in the Title Options > Title Suffix. Let’s look at the components.
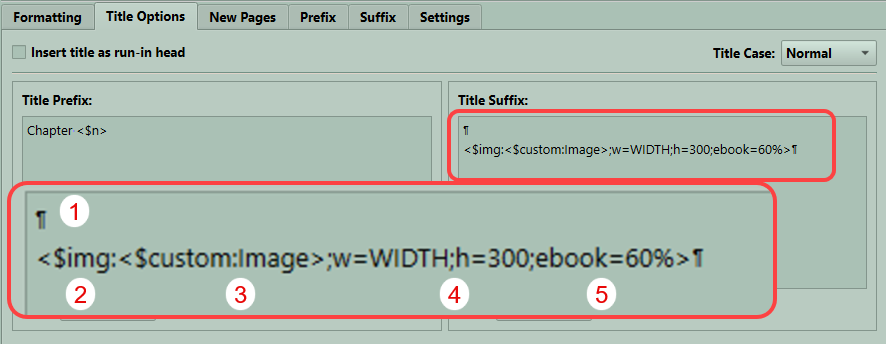
- This is a Pilcrow symbol which indicates the return key was used to separate the Title Suffix from the Title Prefix (Chapter 1). If you do not place at least one then the image will run into the Chapter 1 in this example. How many you place here is based on what effect you want. The spacing will be previewed in the Section Layout Preview pane after you have finished assigning Section Layouts to the Section Types.
- This refers to the fact you are inserting an Image here.
- In this case for me it is the Custom Metadata (item) called Image. This is a list of Image names of the Images stored in the Research Folder as individual items. When you create this Custom Metadata List the Image names listed must exactly match the names of the Image files in the Research Folder AND the name of the Custom Metadata type (Image) must exactly match. If you typed for number 3 Images, then this would not work. The same image can be chosen for multiple chapters if you want.
- This refers to the size parameters for the Image you will display in points. You can specify both Width (w), and Height (h) to get an exact size, or specify just one and the other will adjust to be proportional. Only the text will be visible in the Section Layout pane. You can check to see if this is centered and how it is separated from the Chapter Title.
- This refers to ebook width as a percentage of the page and will only come into effect in ebook formats. Given that ebooks can be read on computers, phones, tablets, and Kindle devices, this allows the image to change size based on which device it is used on.
Pro tip- Use a Compile Collection which should include 1-2 examples of every Section Type in your Project. (For example an Act/Part, a Chapter, a scene, and front and back matter if included.) This allows a quick representative Compile to see how your final product will look. This small sample can be compiled quickly to allow rapid tweaking to get the result you want.
And the last component could be uniquely formatted text that could be inserted inside a Chapter page. This could add a prologue or epilogue where appropriate.
How do we get this done?
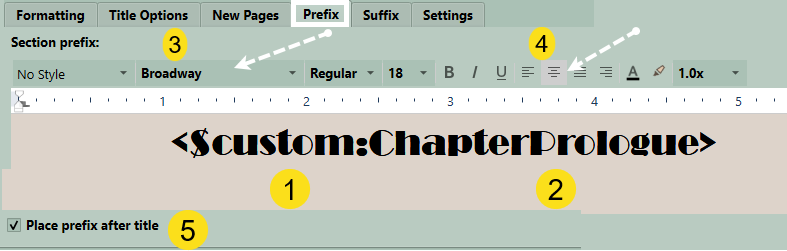
We use the Prefix Tab
- States we are inserting Custom Metadata with this placeholder.
- States the Specific Metadata being inserted. I called it ChapterPrologue and it is a simple text field with the Wrap Text option chosen. This allows you to insert unique text for each Chapter you want to.
- By clicking on the Placeholder you can set the font and size.
- You can also choose the alignment of the text, such as centered.
- Check this box to align the text below the image.
You can use the return key to space these elements based on your desired choice.
Finally, once you have the this Section Layout the way you want, then give it a unique name which makes its function clear to you.
This is one way, and I hope this helps you craft your own unique presentations for your hard work writing.
Images and Compiling Facts
You need higher resolution for print images (300 ppi/dpi) as opposed to Ebook Images (require a minimum of 72 ppi/dpi).
Most images can be at or under 330 DPI.
Ideally your image should be .png files not .jpg. JPEG files will be much be larger files than the corresponding PNG version of the image.
When compiling to Epub or Mobi make sure your image name does not contain any special characters in it.
If you do want an image anywhere in the text, don’t place the physical image there. Place it outside the Manuscript and use the placeholder <$img:imageName> in the text.
Using placeholder tags for images allows you to bring images into areas of the document that otherwise wouldn’t support them—on account of these areas being defined by plain-text fields — such as custom separators, title prefix and suffix fields.
When using Image Placeholder tags, everything after the image name is optional. The image must be specified either by its imported name, as displayed in the binder, or by a valid system path to the image’s location on your computer.
It is valid to specify only the height or the width alone for an image in points. (IF use only one dimension then the image will resize to remain proportional. Remember there are 72 points to an inch.)
While working within the Compile Format designer, images will not be previewed. However, Image Placeholder tags will be visible in the Compile Panel if you have assigned Section Layouts. You can see by where the placeholder is where the image/separator will appear.
This is how I did this, but hopefully others will share their tricks as well. I know many people struggle with the compiling part of Scrivener.
Shout out to Antoni Dol who has several excellent books on Scrivener including a lot of information about compiling.
4 Likes
I will show in steps how I got double spacing in my compile output.
- Take your current Scene layout in the compile format designer and duplicate it by clicking the + sign in upper right. Name this “Scene double spaced” (or whatever makes sense). Now click this and go to text area, must click on override text and note formatting below the displayed text to be able to double space. When this is done can now change spacing. You may have to expand the Compile Format Designer to see line spacing on the far right. Change it to 2.0 and click save.
- Assign this Section Layout to the Scene (section type) If look at compile panel when close the compile format designer should see scene with double spacing.
- Compile and see if works. Will include picture.
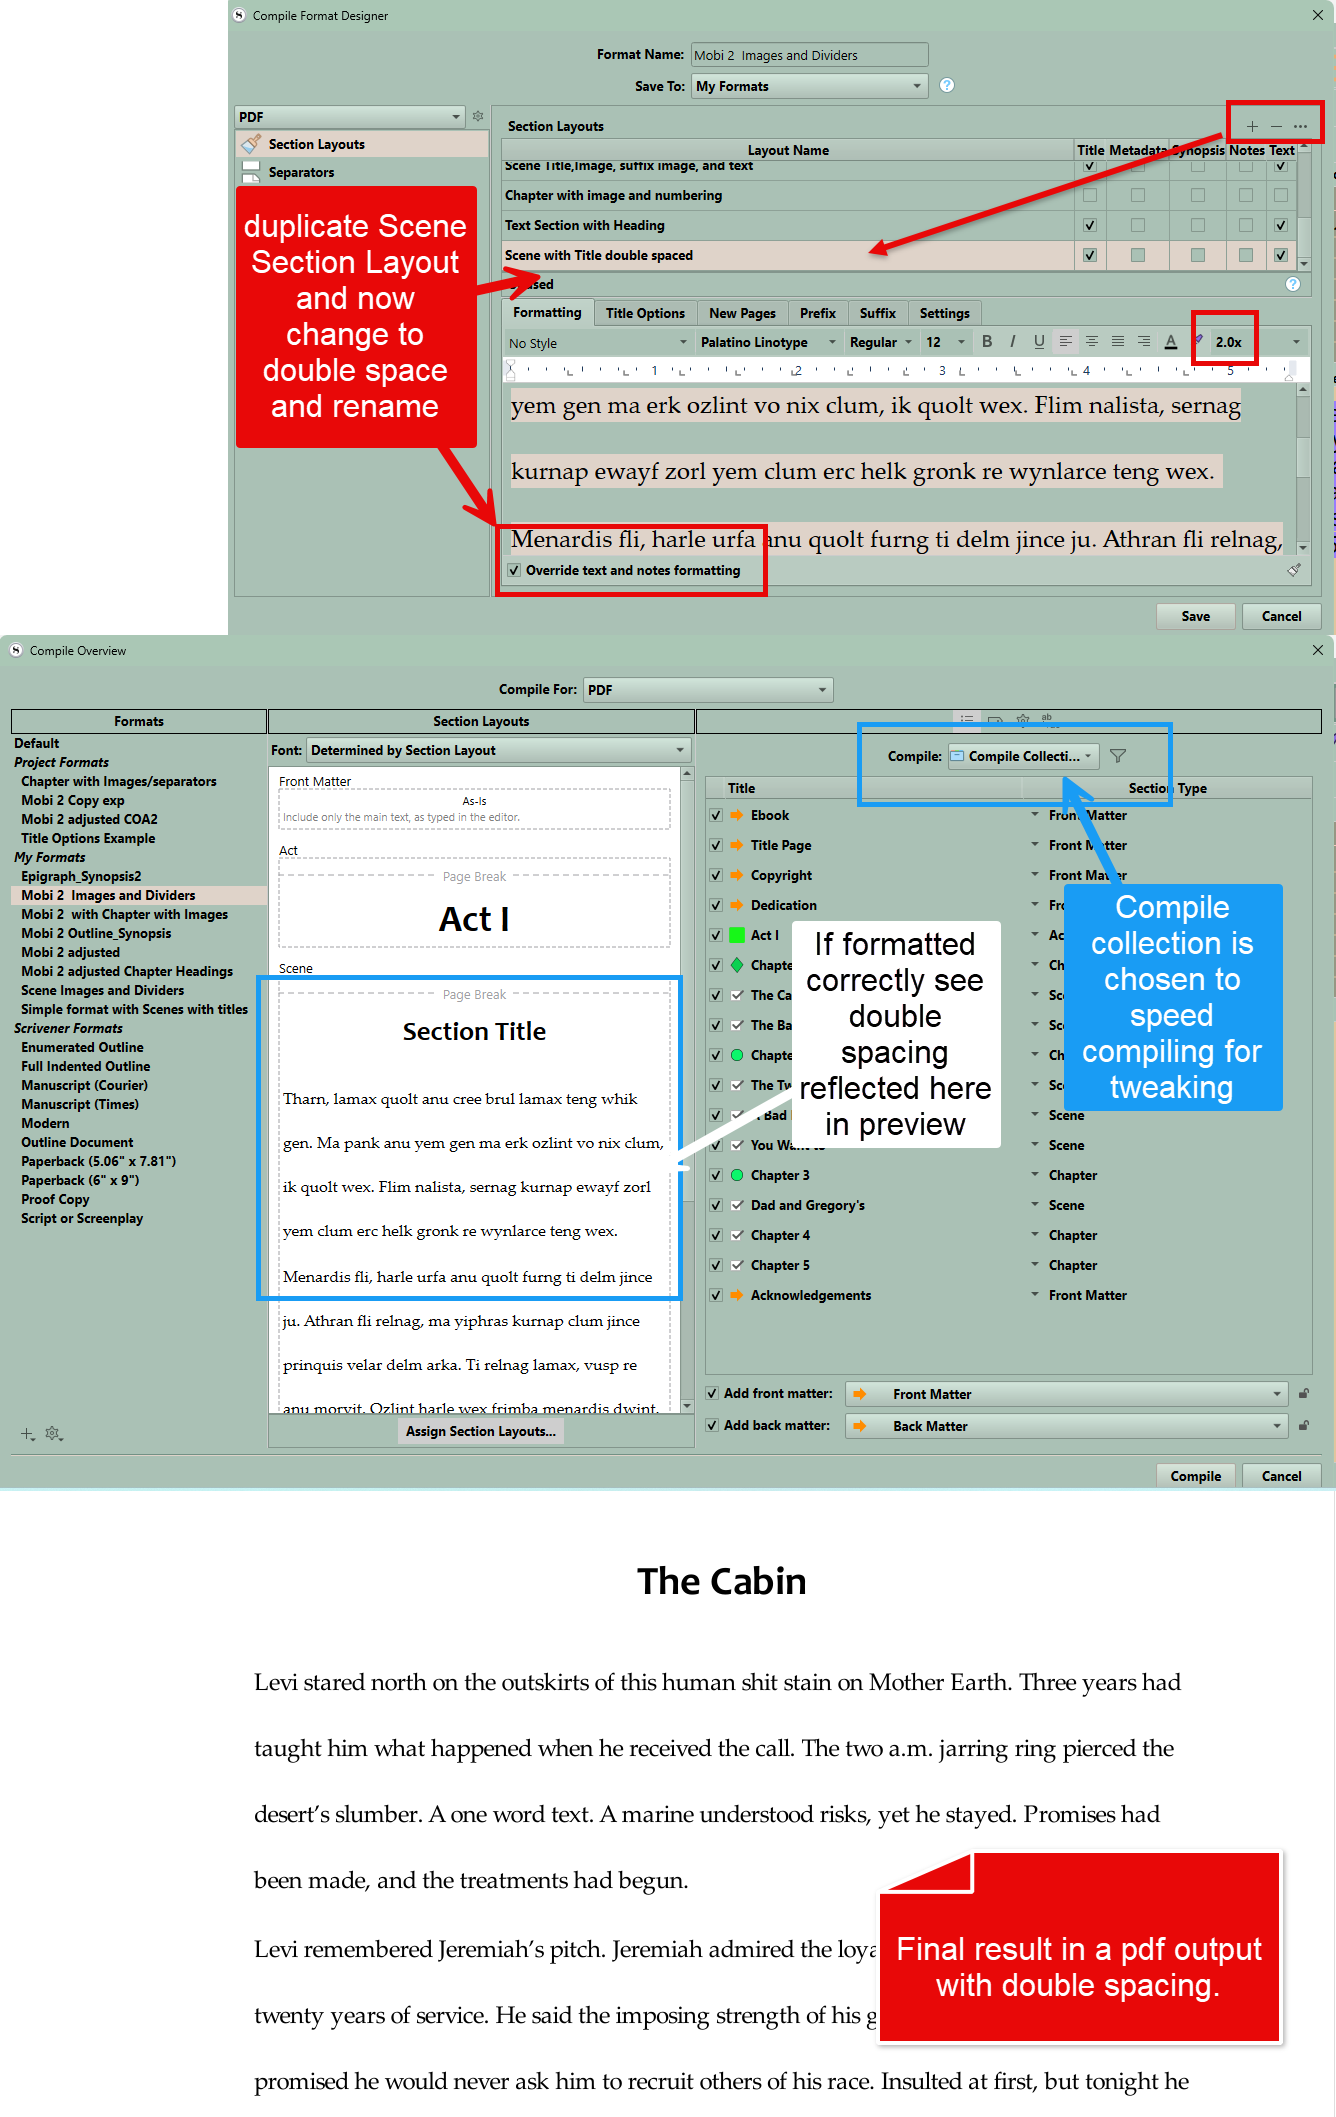
I use a “compile” collection which consists of an Act(part), two Chapters for numbering and scenes and front and back matter folder so see a slice of all the elements in the book. can quick compile this way and tweak. Make sure you selected the compile collection to compile.
2 Likes