Hi,
This is simple to do (it’s one of the basics of compilation). The explanation below is a little long, because there are a couple of basic Scrivener concepts which it’s helpful to know – in practice you can do everything in this post in 30 seconds, and you only have to do it once, so please don’t be put off by my verbosity…
To summarise:
- Make sure every document in your project has the right Section Type to explain what role the document has
- At compilation, allocate each Section Type to the right Section Layout to govern how it will look.
Explanation
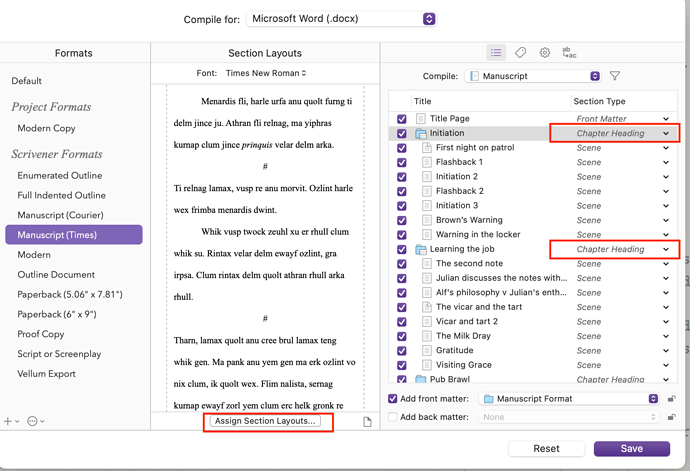
When you open the compile dialogue, you choose an output method from the dropdown list at the top (Microsoft Word .docx) and a Format from the list on the left (e.g. Manuscript / Paperback etc).
On the right hand side you’ll see an indented list of documents which replicates the structure in your binder, with a column, Section Types. You should see that all your Chapters have the same Section Type – make a note of that value (it really doesn’t matter what the name is as long as all your chapters have the same value. If they don’t, use the drop-down triangle to make sure they do.) (NB: the screenshots are from the Mac version, but Windows works the same way.)
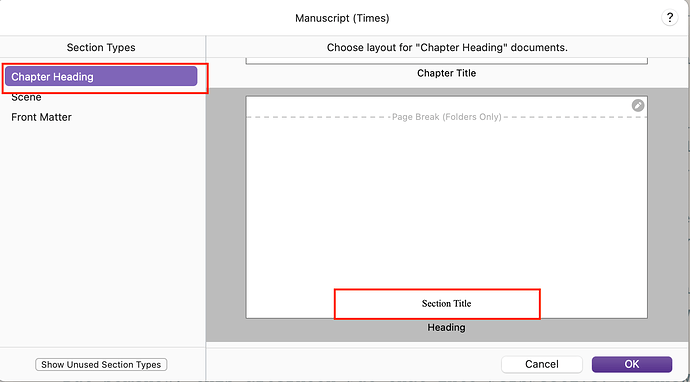
In the middle panel (Section Layouts), at the bottom, you’ll see a button marked Assign Section Layouts. Press that. In the new dialogue, you’ll see a list of the Section Types in your project – these are the same values that you saw in the indented list. Click on the Section Type which was allocated to your chapters. (Again, the actual name of the Section Type doesn’t matter – it just has to be the one which was allocated to your chapters.)
The list on the right has a series of ‘dummy’ layouts representing various common formats. Scroll through that list and you’ll see some with are clearly meant to be chapters - for example, one may just say “Chapter 1”, another “Chapter One: Section Title”, a third just “Section Title”. (“Section Title” just means that the actual name of the chapter will be included when it’s compiled.)
So, for your case (you only want the chapter name with no other text in the heading), you’d click on the dummy layout which only shows ‘Section Title’.
Next, do the same steps with the other Section Types in the list: select the Section Layout which looks the closest to how you want your scenes / prologue / appendices etc etc to look. When you’ve finished, click OK and you’ll go back to the main compilation screen.
That’s basically it: all you have to do is choose the right Section Layout for each of the Section Types in your project. Press Compile and see if it’s worked…
Each compilation format has a number of default layouts provided: it’s likely that you’ll be able to find one which meets your needs, especially if you’re doing something standard like submitting a manuscript to a publisher. But if you need something slightly different, then you can edit each layout as much as you want. That’s a little more complicated and this post is too long already…
(BTW: this is how you would deal with the question you posted about first paragraph indents in your other post. However, I wouldn’t change those, as they are there for a reason. It’s a publishing convention that the first paragraph after a Chapter / Scene is never indented, so that’s why the default is the way it is.)
Finally, I really would encourage you to read the Interactive Tutorial ASAP: it’s the single most effective way of understanding how Scrivener is put together. It only takes an hour or so, and you will save many more times than that because you’ll understand why things work the way they do.
HTH.


