Compile for Scrivener 3.x

Well, after fighting for months with Scrivener 1.x’s Compile, and having some truly wonderful people step in to help, I appear to be back where I started when it comes to Scrivener 3.x.

I imported a project which compiled perfectly once I stopped screwing up and tried to compile. It goes insane.

No Chapters. No page breaks between Chapters. The font jumps from microscopic to ginormous at random intervals throughout the output file. Sometimes the text stretches across the screen. Other times it is scrunched up in a very narrow column. It won’t put the cover that I used successfully before in.


Here are some clips of what’s happening.

Before going too much further into your exploration phase, I would highly recommend the migration tutorial, which is designed to help in the transition from version 2—with a special emphasis on getting your previous compile settings working in the new system. It’s not something that happens by default, but there are tools provided to make the transition as easy as possible.

Er, I never had Scrivener 2. I had 1.9. I’m on Windows, not a Mac.

Oh okay, here is the Windows tutorial in that case!

Okay, that’s got some supremely useful information in it. Did the registration email have that link in it? I don’t recall it, but could have missed it. (BTW, and several of the things I was playing with in the practice project don’t work… they’re grayed out. )

Alas, I’m afraid that the way I think and the way the folks who wrote Compile and its directions think are two totally different items. I know what I want. I just can’t figure out how to do it in Compile.

Well interestingly enough the compiler isn’t all that different from v1, it just has a new surface layer built on top of it that makes routine adjustments easier to make. If you want “Chapter One” included with your folder title name in the heading, or don’t want the folder title at all, you can just pick between some pre-built Layouts. In the past that meant having to learn a whole raft of things about the “Formatting” pane and what levels mean, etc.

Once you get past that layer though, the level system can be made to work the same, it’s just over in the project settings now, and the main “format” is where “all options” used to be—and instead of having to export and import presets constantly, the sidebar allows for easier switching between presets.

So the UI has changed, the names of things here and there—but I’m not sure what you’re feeling is so fundamentally different without further clarification.

Well, I upgraded from Scrivener 1 to Scrivener 3, and it broke compile. In Scrivener 1, i could compile for print and get the entire document I needed to print. In Scrivener 3, the only way I can get compile to do the entire document is to compile to PDF or Word. I got a support ticket last August; they acknowledged the problem, and I haven’t heard anything back from them. And yes, they were able to duplicate the problem. I’ve attempted numerous settings with no luck getting the entire document to print unless I compile to PDF. I do it, but it’s a hassle. If someone could explain what I’m doing wrong, or what setting I’ve missed, I would be extremely grateful. In the meantime, I’ve given up finding a solution.

I could probably do that, in a Zoom session. Not the hard way, in a chat environment like this.

Zoom, anyone?

I was hoping, when I heard about all the reworking and retooling, that Compile would be more comprehensible. To me, it isn’t, and never has been.

I was able to pull the .bin files for my former presets, but I am not sure where to place copies of them.

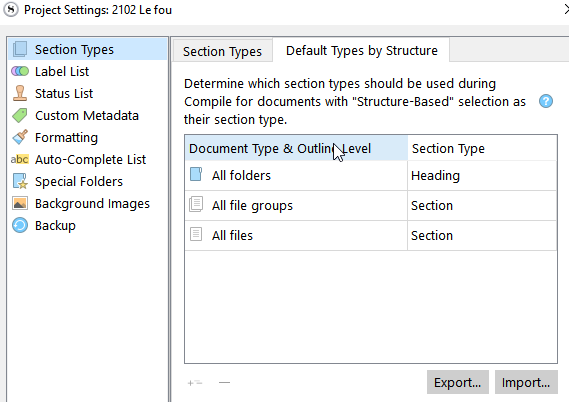
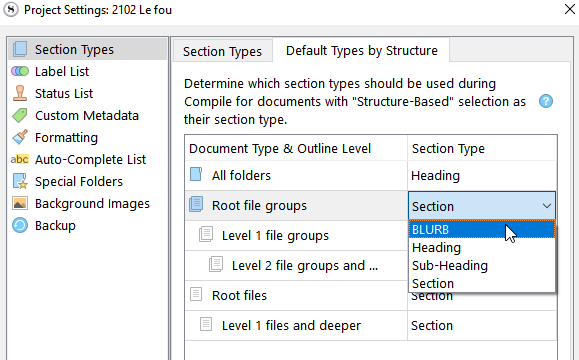
I tried using one of the built-in presets, and dang! The thing would do Chapter One, and put Chapter Two under it as a descriptor, then some text, then Chapter Three with Chapter Four as a descriptor,and then some text… on and on and on. So if I thought I had 36 chapter, I now have it labeled as 72 chapters.

I can’t seem to drag my cover into the project. Yet I could drag a photo in just fine in 1.9x.

I read about an “Add to Front Matter” feature – and can’t find it.

I have a specific separator (Delta symbol, done in 18 point type, centered) that I want to use between scene breaks, but Compile changes it to non-centered and 12 point type. It looks like I may have to add in “Print As Is” pages between each section with my custom separator.

It didn’t print the Chapter One, Chapter Two, etc. at the beginning of each chapter.

AND, the font size changes WILDLY throughout the manuscript. Compile for 3.x starts out with the print utterly microscopic – I have to move the size on my Kindle all the way to 14 to get a readable size whereas I usually have it set on 6 or 7. Then it will abruptly jump to ginormous, and I have to set the Kindle to 3 or 4 to make it manageable. One minute I’m reading a full page of moderate text, and the next there’s a half-column of tiny print. Or giant print. Oh, and it puts in paragraph indentations of an inch to an inch and a half instead of it being ,4" or .5".

And I don’t know WHY.

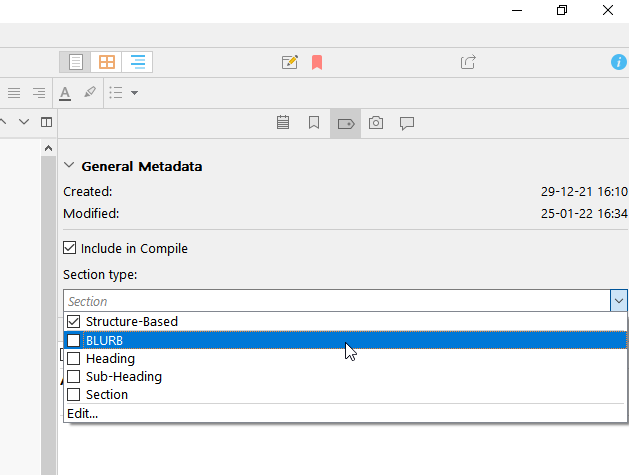
I haven’t changed the structure of the project. I’m using the same styles I used before, but I can’t get it to work.

This is why I’m so frustrated.

Well, I now have Zoom set up. I’d never done before.

When you say Compile 3 isn’ all that different… I think I must disagree. I managed to import one of my settings. It does not work.

There’s no place for me to define the levels.

Any documents with As-Is before going to 3.x have it. I can’t edit to add it now.

There are no page breaks between chapters. There MIGHT be 96 points between the end of one chapter and the beginning of the next.
There are no Chapter Titles , ie, Chapter One, Chapter Two, etc.

The paragraph indents are a full inch, not .4 or ,5 inches.

Anything centered is indented and then “centered” so it is offset on the page. The font size is not maintained on these centered items.

My preset has partially solved the issue of microscopic and giant print.

Can’t get a decent looking frontispiece on it.

Since I do not have Chapter Headings, I can’t attempt a TOC.

IS there a way to insert a special symbol of my own choice for separation between sections in a chapter?

Like I said… I thought I had this worked out. I had two presets, one which I used for the books themselves, and one for background stories.

Having them suddenly not work is frustrating. Not being able to make it work, even after reading the upgrade materials and the manual is even more frustrating.

There is, but you don’t need levels in version 3. Give every document a section type, create and format a section layout for that document type, and assign the layout to the section type. Here’s an end-to-end workflow:

structure, chapters, headings

As explained in the workflow at the link, page breaks are a Separator set for section layouts as needed.

Here’s a video explaining all of it again:

converting v1 or v2 to v3

It still makes no sense.

I thought I understood it, looking at the link. I can’t make it work. I’ve tried, over and over to select and edit and assign… I can select, I can’t edit. I can’t save my choices without compiling. The design doesn’t change when I change stuff.

I know EXACTLY what I want. I can’t determine how to do it.

I can’t add styles to make sure certain items are formatted the way I want.

This new Compile may make sense to people who do html and markup. It makes no sense to me.

Let me add a new item. Chapter Headers. It will have a page break before it. There will be 96 points from the top of the page to Chapter One. There will be 18 points between Chapter One and the start of Blurb.

Blurb will be another item. The first paragraph will not be indented. the remainder of the paragraphs will be indents at .4" or .5" There will be 24 points between Blurb and the start of Date & Location.

Date & Location will be formatted as they are in the editor. There will be 2 lines between Date & Location, and the start of Chapter Text. Date & Location is not always included in a Chapter.

Chapter text will be formatted at 12 points Time New Roman, with a .4" or .5" paragraph indentation. It will be single spaced and justified.

There may be section breaks in Chapter Text between different scenes. This is going to be a Delta formatted at 18 points with an additional 3 points space above and below it. There will not be extra lines on either side of this divider.

And then it starts over with the next Chapter.

I have front matter – a cover, copyright info, dedication, all in a neat file down in Reference. I have to reselect the cover every time I want to do output. No way to save it.

I want to put in a TOC.

I just don’t know how to get there. I’ve gone over and over and over the directions. To me, they make no sense. I try to work through them in my own file. I cannot get them to work. There’s no place to save.

It’s extremely frustrating. Oh, the audio on that video? It’s so soft I can’t hear it, even turning my speakers up to 100%.

A lot of the settings are accessible by double-clicking on a compile format in the list on the left side of the compile panel.
Have you looked there ?
That’s where you’ll find most (if not all) of the settings you need ; including this one. (Go to “section layout”).
From there, it is all pretty much like it was before. (I was confused at first too, there is a good bit of relearning to be done, but trust me, it all makes sense.) → Have faith in drmajorbob’s links/instructions…

Not that I’ve used this this much yet (I use styles to do pretty much everything), but unless I am mistaking, instead of levels, the formatting (what of it is not style related) is defined by what you set in section layouts. (Whether you want this or that chapter/document to have a title printed or not. Stuff like that.) During editing, you assign your documents to a section type in the metadata panel of the inspector (“chapter”, “sub-chapter” etc. – name it what you please). When compiling as per a compile format you choose in the list (left side of the compile panel), this section type is in turn assigned a section layout in the compile panel (by you, of course).
This allows you to assign the formatting and specifics you wish to a document regardless of your binder’s structure.

→ In the compile panel (main panel), holding the Alt key reveals the save button (where the compile button is/was.)

As for tweaking styles in a compile format (and that’s what led me to believe you haven’t tried double-clicking on a compile format from the list on the left side of the compile panel), it is so easy, there is pretty much nothing to explain.

That’s a lot of questions to try solving in text messages. A Zoom session would get it done a lot faster.

Zoom me

I will do so tomorrow. I have an meeting from 7a to 11a, and my husband has an online doctor appointment at 2p (Central). After that, I should be free. (I don’t think 10:45p Central is a good time to start something this complicated.

Yes, I’ve double-clicked on a compile format on the left side of the compile panel.

I use styles for all my formatting within the editor.

I understand what they CLAIM is to be done, but I can’t find directions in the manual. For instance, no where have I found mention of what you said – using the Alt key to display “save.”

I’m a d@mn good layout person, but the directions make no sense. And when I try to follow them, and what is displayed on my screen is not what is shown in the directions, I get frustrated.

I went into try to assign section type – no, I can’t add “Chapter” or “Blurb,” or “Date&Location” or Text" or “Divider.”

There is an edit option at the bottom of the dropdown section type menu in a document’s metadata tab (in the inspector)…

2022-01-25 16_19_19-Window

There you even have the possibility to work it based on the structure like before. (Levels and folder/files etc.)

2022-01-25 16_25_36-Window

.

I just did that :
→ use the “+” sign/button that is at the bottom left of project settings/section types.
2022-01-25 16_27_15-Window

. . . . . . . . . . . . . .

Here (2nd tab) I added levels using the same + button (bottom left).
Also, see how “BLURB” is now available as a choice.
2022-01-25 16_27_28-Window

. . . . . . . . . . . . . . . .

And now, back to the project itself, again, “BLURB” is an available choice.
2022-01-25 16_35_04-Window

So, in the end, I can assign the section type I created either through my project’s binder’s structure or manually per document.
I can even have a mix of both across my project as I please.

When comes the time to compile, I’ll let Scrivener know how I want each section type (like “BLURB”) to look by assigning them a section layout (from those available per my compile format) in the compile panel.

I will check. But none of the section layouts provided by Scrivener are what I want.

You can create your own section layouts. Create and name the section under Projects/Project Settings/Section Types. Then under Compile, you can edit the Section Layout from the Section Layouts column of the main Compile dialog. See section 23.3 of the user manual.