I have the text of my book in “Drafts,” as a nested directory tree – sections, chapters and passages as folders or files.
I have notes and other material for the book as a directory in “Notes,” organized the same way (sub-folders and files). The organizational scheme is the same – for each subdivision of the draft text, there’s a corresponding folder or file in that folder in “Notes.”
I want to coördinate the navigation, so that I can have two “panes” open (apologies if I’m using the wrong term – I mean, the window is split), with the book text one one side and the corresponding notes on the other, and, when I switch to a different chapter or section in one pane (the text of the book) the other pane automatically navigates to the corresponding portion of the “notes.”
I hope that was clear! Apologies if I’m asking about some obvious feature that’s detailed in the manual (in which case, I’d be grateful for a reference to the correct portion of the manual).
This works very well with the bookmarks feature in the inspector. When viewing the “document bookmarks” (rather than the “project bookmarks”) in the inspector, changing which document is in the editor will switch to its set of bookmarks, and it will load the last bookmark accessed into the editor within the inspector.
I’m sorry, I must be dense or something, but I’m having trouble understanding how to implement this (particularly the “last bookmark accessed” portion).
I’ve resigned myself to the idea that I must manually link the chapters (or, chapter sections – what I called “passages” above: “files” contained in “chapter” folders which are themselves contained in the composite book draft) with the corresponding portions of my “notes.” But how does that work with bookmarks?
For purposes of discussion, let’s say I’ve got a book with ten chapters (named “1” through “10”) and there are notes files for each chapter (also named “1” through “10”) . How can I fix it so that opening chapter 1 in the left-hand pane – by clicking on it in the binder – automatically loads the notes for chapter 1 in the right pane?
(I’d love for this to work for the entire directory structure – not just the chapters, but the subdivisions below and above – but I’m resigned to Scrivener probably not being able to do this.)
Thanks again for your help.
(ON EDIT:) More specifically, your use of “last bookmark accessed” worries me. I want to permanently link each chapter with its notes – not be dependent on what I happened to look at, last time I was in a particular chapter.
Have you used document bookmarks at all? They are set manually; there’s no way to take existing documents and automatically make them bookmarks for each other.
For each chapter file in the binder, you’ll have to open the inspector (if not visible), select the bookmarks pane, scroll the binder down to the notes that correspond with that chapter, and then drag the note from the binder into the bookmarks pane of the chapter file. Click on that bookmark, and it will load in the view/edit window in the inspector.
Then you can click on another chapter document in the binder. It’s document bookmarks pane will be different (and will start out empty). Drag any note documents into the bookmarks for that chapter.
Once you’ve accomplished that for all your existing chapters & notes, if you click on chapter 1, it’s notes will be automatically loaded in the inspector, so long as you have the bookmarks pane visible. If you have multiple documents bookmarked for a given chapter file, then the last one you selected for that chapter file will load.
Just try this for a couple of chapters and see how it all works. There’s no harm in doing it, nothing will be deleted or broken, and you can always delete bookmarks without affecting the files they reference.
Thanks for your help – and, apologies for my delay in responding – but it doesn’t work.
The notes load into the inspector, but not into the other pane, so I can’t see the full outline structure (it’s an imported Word Outline, with the outline divisions reproduced as a document structure – which is the only way to get Word to reproduce the Outline levels).
I’ve been trying for years to get Microsoft Word out of my life, but I have to keep using it solely because of the outline-formatting feature. I really want to use Scrivener exclusively – it’s vastly superior software – but I can’t get reproduce the outlining features of Word…so it’s looking like I’ll have to continue using both programs concurrently.
Thanks again for your help. (And, if there’s something obvious I’m missing – some way to load a particular document into the second pane whenever a corresponding document is opened in the first pane – I’d be grateful if someone could explain it to me.)
Okay, I missed that part earlier. The the bookmarks feature and its corresponding editor window is the only way I know to make the loading of one document in an editor automatically show the contents of another document (in the editor portion of the bookmarks inspector pane–not in another editor).
I’m curious though – if you’re trying to cut Word out of your writing process, why are you concerned about getting your outline reproduced in Word? Can’t you just create an outline in one document in Scrivener? If you could do that, and would be happy with the outline popping up in the inspector pane instead of the other editor, then you would get what you’re after. Maybe I’m misunderstanding what you are trying to do with the outline though…
To take different tack entirely, have you examined the first tab of the inspector yet? Document Notes are your “mirror world” note pad. You can almost think of every item in your binder (folder, PDF, movie and text node alike) as being Document-Times-Two. They all have a rich text sidebar notepad available to them. You don’t have to build a mirror, the mirror is built within.
That is, I would say, more the Scrivener way of handling the “everything needs a mirror note” concept. It sounds like you’ve developed a good system for how one might approach this problem using a word processor, in the past, and you’re working to try and port that process into Scrivener, but that might be going the long way around the bend.
But, if that’s not enough, I get it! I only use Document Notes for utility stuff myself, as a light scratch pad. I don’t make a full mirror architecture of my Draft folder—never really saw the need for that for how I work—but I definitely do prefer a well-developed note-taking and “meta” outline that exists outside of the draft.
Where we differ (I think) is that I tend to scatter those notes topically rather than slaving them to the master outline’s structure. This is where I wonder how much of Word’s stylesheet-driven outliner approach is being “imported” as a philosophy.
To provide a few examples, I sometimes have a “To Do” area of the binder where I create notes for things that I identify as needing further work, when I have time to get to them. I don’t have a “Chapter 3/Section 3.2/To Do” note, it’s flipped around. I have a “To Do/Section 3.1 - get this done” note. And by that same token I have an area for externally imported research, organised relatively to its own internal structure, in a manner that is conducive to the research itself rather than the WIP outline. Then there is an area tracking revision notes, copyedits that come in from others, my own notes on the process as I work, etc. Naturally, revision notes would be organised by what makes sense for organising a major revision—not the outline that is being revised: they are sorted into edition numbers, by the status (working/maybe/done) and so forth.
One big advantage to this approach, not already described—and I’m not saying it’s better than yours to be clear, but this is a clear advantage—is that the “meta” outline can represent an overlapping or multipurpose usage. I.e. a node in a topically organised area (Revisions/Ed. 10.2a/Fix terminology referring to Widget) can actually be relevant to 15 different outline chunks in the Draft folder. I don’t need fifteen different notes all saying roughly the same thing, split out to preserve a notion of the Draft’s outline.
And now here is where the Bookmarks feature that rdale has been helping you explore begins to shine. It’s a bit mechanistic and its overhead becomes a burden if all you’re using it for is to link one single outline item to another—but if one item can be related to fifteen, that overhead vanishes and actually becomes more efficient. I can click on the “Fix terminology referring to Widget” note, and in my Bookmarks list, see every item in the Draft that was pointed at it. I can use that to navigate, but I can also pull the inspector out wider and use that as a kind of self-contained binder almost. The bookmark editor is fully featured.
So how do those fifteen bookmarks get there? Well that’s one of the nice things covered in §10.1, Linking Documents Together, in the user manual—specifically under the Links are Circular subsection heading toward the end. As I’m working on the edits relating to this problem, I can call it up by name using the Quick Search tool in the toolbar, and from that results list, drop it in the Bookmarks list for the chunk of text in the Draft that I’m working on. The act of doing that not only links that chunk to the revision notes pertaining to that edit, but creates a back-link from the revision note to this section, automatically. (Here’s a tip: if you’re using one note persistently across multiple items, drag and drop it from the result list into the editor header bar with the Option key held down, and then shrink the Copyholder pane that opens down. Now you can actually edit that note as you work, and that icon in its sub-header bar can be dragged anywhere to make a link.)
This is all describing one specific way in which you can use some of Scrivener’s linking features. There are many other approaches one could take (like just using Document Notes). There are wiki links to facilitate building mirror outlines on the fly as you write; you can use Document Notes to create an annotated list of hyperlinks in the sidebar; there are Inline Annotations that make it possible to embed these annotations and links directly into the source material (and that can become a sort of meta list in and of itself, in that if you use a system of notation with annotations, you can build saved searches around them—for example typing in “TODO//” and then searching for that token, you can save a sidebar list that only shows areas of the draft that have todo notes within them—thus dispensing with the sidecar todo list entirely); there are even ways of interleaving the “meta” right into the Draft itself, by disabling that “Include in Compile” checkbox in the Metadata tab of the inspector, which is where Scrivener’s outline goes well beyond Word’s document-structure driven approach. And that’s just to name a few.
Primarily what I mean to get at here is to describe a few ways in which Scrivener can attack the underlying problem itself, using its strengths, instead of trying to emulate how one might do so in another type of software entirely. Perhaps there are some ideas in here worth adapting to how you work, or maybe how you work is the only way that works and you’ll have to continue experimenting with the software a bit to find a good solution.
I’ve been going around in circles with this maddening problem for months now (since switching my main writing projects over to Scrivener) and I keep hoping that I’m going to discover a Scrivener-based workflow that suits my needs, since, as I’ve said, I hate Microsoft Word but I need those Outline-format documents and i just can’t find a way to replace their functionality within Scrivener.
If I may, let me describe in greater detail exactly what I’m up to:
Microsoft Word outlines are incredibly useful to me – I go through them like Kleenex – because they use a hierarchical structure (nodes and subnodes) with easy reorganization, promotion, demotion, etc. of elements and also allow for selective viewing: a single click changes from “show all” to “only show up to level 2”—in other words, it’s not simply a flat file with a bunch of indents; it’s dynamic and can be “folded” or extended easily – but, more important, the outline “levels” are simply “Style” attributes. So you can have an entire book, formatted to print out properly, but the chapter headings etc. can be “Styles” with outline levels attached to them, so that switching from “Print View” to “Outline view” instantly reveals the structure of the document.
Obviously I’m aware that precisely this kind of hierarchical arrangement is reproducible in Scrivener – and I love it. But what about the second outline-format Microsoft Word file that contains all my notes and ephemera (some of which is organized according to a mirror of the main document’s structure, and some of which isn’t)? How do I reproduce that within Scrivener?
If I import that Word file (the single document that contains all my hierarchical notes) as a single document, all the formatting disappears – it’s no longer an outline; it’s just a list. The functionality is gone. If I “import and split,” then I’m back in business because the material comes in as a hierarchically nested group of discrete documents, which I can view and edit as I could in the original Word document.
It’s already worse than Word’s “outline view” in a couple of important ways: I can’t easily change the “levels” of what I’m viewing – I can only “Expand All” or “Collapse All”; there’s no “Show me only the first two levels” as there is in Word – and in Scrivener’s Outline View the text is stripped of formatting and arbitrarily truncated to a certain length, so longer entries get cut off with elipses – I need to have a second pane in “Scrivenings” view in order to see the formatting (color codes etc.) and to read the entire text. (I brought this up a few months ago, in another thread here, asking why Scrivener’s Outline View couldn’t show formatted text and show all of the text, and the L&L programmer who graciously answered me explained that what I was asking for just wasn’t consistent with the philosophy of the program.)
But let’s move past that – I can live with those limitations, if it means ditching Word and having everything in one Scrivener “project” (with all of the amazing benefits that entails).
So now I’ve got one hierarchy in “Drafts” that’s the whole book – with the hierarchical Book/Part/Chapter/Passage exactly reproduced – and I’ve got the notes in a folder in “Notes” in exactly the same Book/Part/Chapter/Passage structure. What I want, is to have two panes, one showing the book proper and one showing the outline, and when I navigate one, the other follows (so, I’m always seeing the book text on the left – either an entire chapter or just a passage; whatever I clicked on in the Binder – and the corresponding notes on the right – either in “Outliner” mode which shows the structure but not the formatting or the complete text, or in “Scrivenings” mode which shows the formatting and the complete text but not the structure).
(As I wrote above, I would love to be able to click a button on any “Outliner” that said, “show formatting” and another button that said “reveal entire text” – it would be so joyous – but, the program won’t/can’t do this.)
I accept that I would have to go through all fifty chapters or whatever and create the links manually. That’s fine; I’d only have to do it once! (It would be great if I could change the structure in the Draft and have the corresponding parts of the “notes” folder in “Notes” rearrange themselves the same way, but I understand this is a pipe dream.)
But how do I create these connections? Are they bookmarks? Links? Notes? The responses above (and, thank you very much, again) discuss pros and cons of all three…but none of them ultimately work.
How can I connect two Scrivener Documents or Folders (within the same Project), so that navigating to one of them in the left pane automatically loads the other one in the right pane? (This is the shortest possible version of my query.)
Thanks once again for your time and attention. If I were a rich man I would literally pay L&L as much as the programmers wanted, just to get these extra bits of functionality into the program. Then I could ditch Word entirely and be happy.
I’m pleased to report that I’ve devised a workable solution – thanks to AmberV’s suggestion!
Here’s what I did:
In Microsoft Word, I changed the Paragraph Formatting assigned to each of the “Outline Level” Styles, incrementing the indents by 1/4 of an inch – so, “Level 1” is not indented; “Level 2” is indented 0.25", “Level 3” is indented 0.5" etc. The purpose of this was to allow the levels to be visible even when the document is taken out of Outline View (since the Outline View indents are invisible outside of Microsoft Word). I then saved this temporary new version under a different name.
For each passage in the book, I copied and pasted the corresponding section of the reformatted outline (step #1 above) into the Notes pane of the inspector.
This kills two birds with one stone! Finally, I can see my outline material the way I want – it instantly appears, section by section, whenever I click on the corresponding passage or chapter in the book! (If I scroll through the text of the book, the correct outline elements appear and disappear, synchronized with what I’m reading.) And, as an added bonus, I can see the outline material fully – the text isn’t truncated, and all the formatting (highlights, colors, bold/italic etc.) is completely visible.
There are, obviously, some drawback to this “workaround” kludge:
The “Outlining” functionality is gone, meaning, all the work I did in Microsoft Word (promoting; demoting; rearranging etc.) cannot continue. Everything is pinned in place.
I had to do all of this manually, passage by passage – as well as re-formatting the Microsoft Word document – and it took hours.
Some of these problems would be eliminated, obviously, if I started this way (if I wasn’t importing a Microsoft Word outline), but I just can’t see that as being feasible, even with future books/projects: the ability to create and edit an outline – with nodes and subnodes; hierarchies; collapsed and expanded levels; visible formatting, etc. – is just too important to my workflow; I can’t anticipate the structure of a project, create that structure in the Binder, and then start writing elements into the “Notes” section of the inspector. In this case, I was able to take a completed outline and transfer it over, but the work I did to create that outline probably can’t ever be done in Scrivener, unless the program gains new, robust “Outline editor” functionality (and allows for a side-by-side “Outline View” as I’ve suggested above).
Nevertheless, I can’t thank you enough for taking the time to help, and for the suggestions! Thanks to you (both of you) I’m back in business and can finish my book.
Another possibility is a third-party outlining app which can export to OPML format. Scrivener can import these (manual section B.7, p. 829), sending the notes to Document Notes. The only drawback ( and it may be a deal- breaker for you) is the imported notes will be plain text, i.e. any formatting internal to your notes will disappear.
If you’ve already considered and rejected this option, my apologies for sticking my oar in…
As I’ve tried to explained above, the problem isn’t getting a completed outline – created outside Scrivener – into a Scrivener project. There are two ways to do it (each of which has non-trival problems; more on this below), The problem is that I want to create that original outline in Scrivener – I want to do all that work (jotting down ideas; moving them around; promoting and demoting them into a hierarchy; selectively viewing only the topmost categories, the entire tree, or everything in between; even switching to a “text view” – all things I can do in Microsoft Word) in Scrivener.
And, Scrivener provides a perfectly adequate system for this: the Binder and the Outliner, together. The problem (as I keep saying over and over) is purely presentational: in the Outliner View, I can’t see the formatting, and I can’t see the text beyond a certain arbitrary length limit. If I switch to Scrivenings View, then I can see the formatting and all the text, but the hierarchical presentation is gone; it’s now just a flat list.
Additionally (as I discuss above) there’s no way to “attach” particular outline elements to corresponding text in the Draft (so than navigating to one brings up the other and vice versa).
There’s a great system for importing a Microsoft Word outline into Scrivener – it comes in perfectly, as a folder with a preserved hierarchy, But I can’t use it effectively, because of the limitations in the preceding two paragraphs: I can’t see the Outline the way I can in Microsoft Word.
The “kludge” workaround I came up with last night, inspired by AmberV’s kind suggestion (which I described above) is to take the Microsoft Word outline, fiddle with its formatting (artificially adding indents) and then manually copying and pasting the material into the “Notes” pane of the Scrivener Inspector for each section of my book. It works, and I’m going to proceed this way – meaning, I can get my work done, finally – but it’s less than ideal because, of course, this is no longer an outline in any meaningful sense; it can’t be edited any more. It’s just a frozen snapshot of an outline created in another program, snipped into pieces. If I want to do any meaningful reorganization or re-thinking of the material, I’ve got to go back to Microsoft Word and start over, manually updating what’s in Scrivener.
What would solve my problem? A couple of very simple changes in Scrivener:
An “Outliner” that would
1A) provide an option to show formatting (colors, highlights, fonts, etc.) so that I wouldn’t need a Scrivenings view to see how I’d marked up my ideas;
1B) show the entire text, rather than cutting off each element after a certain arbitrary word limit (with elipses);
1C) would provide buttons allowing me to control how “deep” I was seeing: either “Only Level 1,” “Levels 1-2,” etc. all the way to “show all”
A navigation system that would let me “attach” elements from my “Notes” folder to specific locations in my Draft, so that (say) going to a certain chapter in the left pane would immediately load the corresponding material (that I’d selected manually) into an “Outliner” in the right pane – an “Outliner” that worked as I discuss in #1 above.
Since Scrivener can’t do these things, I’m using the workaround I just described: manually pasting the stuff into the Notes pane in the inspector for each chapter.
I’d like nothing more than to get Microsoft Word out of my life, and I’d be able to, if Scrivener just did these few things that it currently doesn’t do.
I want to stress that it’s absolutely brilliant software and I love it! It’s the best thing to happen to my writing in years…decades. But I need my outlines, and until Scrivener can handle them, I’m going to have to continue using Microsoft Word.
Again, thank you very much indeed to everyone who’s graciously weighed in on this topic.
For what it is worth: I do within-document outlining in Scrivener all the time (because I never found Outline mode in Scriv a good replacement for how I use outlining). Maybe the same would help with your workflow. Here is how I do it.
First of all, I long ago restyled Word’s Heading styles, as you have now done, so that I could see outlining in a nice way outside of outline mode.
But also, I have defined paragraph styles in Scrivener with exactly the same style names and formatting (basically just increasing levels of left indent, of course) as I have set in Word. This makes moving outlines in and out of Scrivener very easy (when needed). I have likewise assigned key commands to these Heading styles in Scrivener. When combined with key commands for moving paragraphs up and down, this gives me all the functionality in Scrivener that I actually used of Word’s outlining facility.
I used the outline view in Word quite a lot, back in time, before I found Scrivener, so I do understand the difference between the outline view in Word and what you can do with it, and the Binder and Outline parts of Scrivener. As far as I have understood, from reading your posts, you have developed a way of working, using Word, and you want to be able to do in Scrivener exactly what you have previously done in Word. And you can’t, because it’s two different softwares, with completely different approaches to writing.
Based on this I think you are doing yourself a disservice, because you are trying to make Scrivener emulate one specific function in Word, instead of starting from scratch with Scrivener and see what you can do.
Outlining in Scrivener can be done using both the Binder, the Outline view, the Corkboard view and Scrivenings. You have both the synopsis field and the notes field available in the Inspector. And in Scrivenings view you can format the text any way you want, without having to care about the output format. If you format the text directly, not using styles, you can emphasize different things with colors, different font size and type, etc, during the writing process and it will all disappear when you compile, if you want it to. In Outline view you can easily expand all or collapse all to the current level, set by you.
No it’s not, because you have the Binder as well, showing you both where you are in the text and the hierarchy, and the Inspector if you so wish.
I used to do outlining elsewhere, using mindmaps or some outlining app, but I’ve stopped doing that and now do the outlining directly in Scrivener. The only exception is the initial brainstorming phase, before there is even an embryo of an outline. That phase I do in Scapple or just pen and paper, except that I use my iPad and Apple pencil instead together with Notability or Paper by WeTransfer (former Paper by 53).
Scrivener is a completely different tool from Word, and new tools require new techniques. Learning new tools and new techniques takes time and require extra effort and willpower, but is rewarded in the long run. So my advice would be to forget Word, try to forget your current work method, and start from scratch, exploring all the possibilities in Scrivener.
Please forgive me if in this post I’m telling you things you already know, but I thought it would be useful to go back to basics and try to understand why you’re having the difficulties you’re having.
That’s because, on the face of it, (almost) everything you want to do in your list of requirement is right there in the binder. Hierarchy - yes. Full formatted text — yes. Access to the notes for each document — yes. Ability to move each unit up and down arbitrarily — yes. This isn’t just ‘something you can do in Scrivener’ — it’s actually what the program was designed to do from the beginning. It’s its main selling point and it’s much, much more powerful than Word’s rather limited outline feature.
(As an aside, the Scrivener’s Outline Mode is a bit of a red herring here — it shares the same name as Word’s Outline, but it’s not the same thing at all. Instead, it’s better to think of it as a spreadsheet for showing a project’s metadata (synopsis, word count, status, keywords etc). The equivalent of Word’s Outline is the Binder, not Outline Mode — Word doesn’t have anything like Scrivener’s Outline view and for the purpose of this discussion Outline Mode isn’t needed at all .)
When I look at your list of what you want to do, there’s only one thing (the buttons for the different levels) which Scrivener isn’t able to do easily. So either I’m missing something about what you want, or there’s some other source of confusion. So I thought it might be useful to do some screenshots of how one would normally set this sort of thing up. Please could you look at them and tell us how they are lacking what you want to do: then we’ll be able either to help, or agree that Scrivener can’t do it?
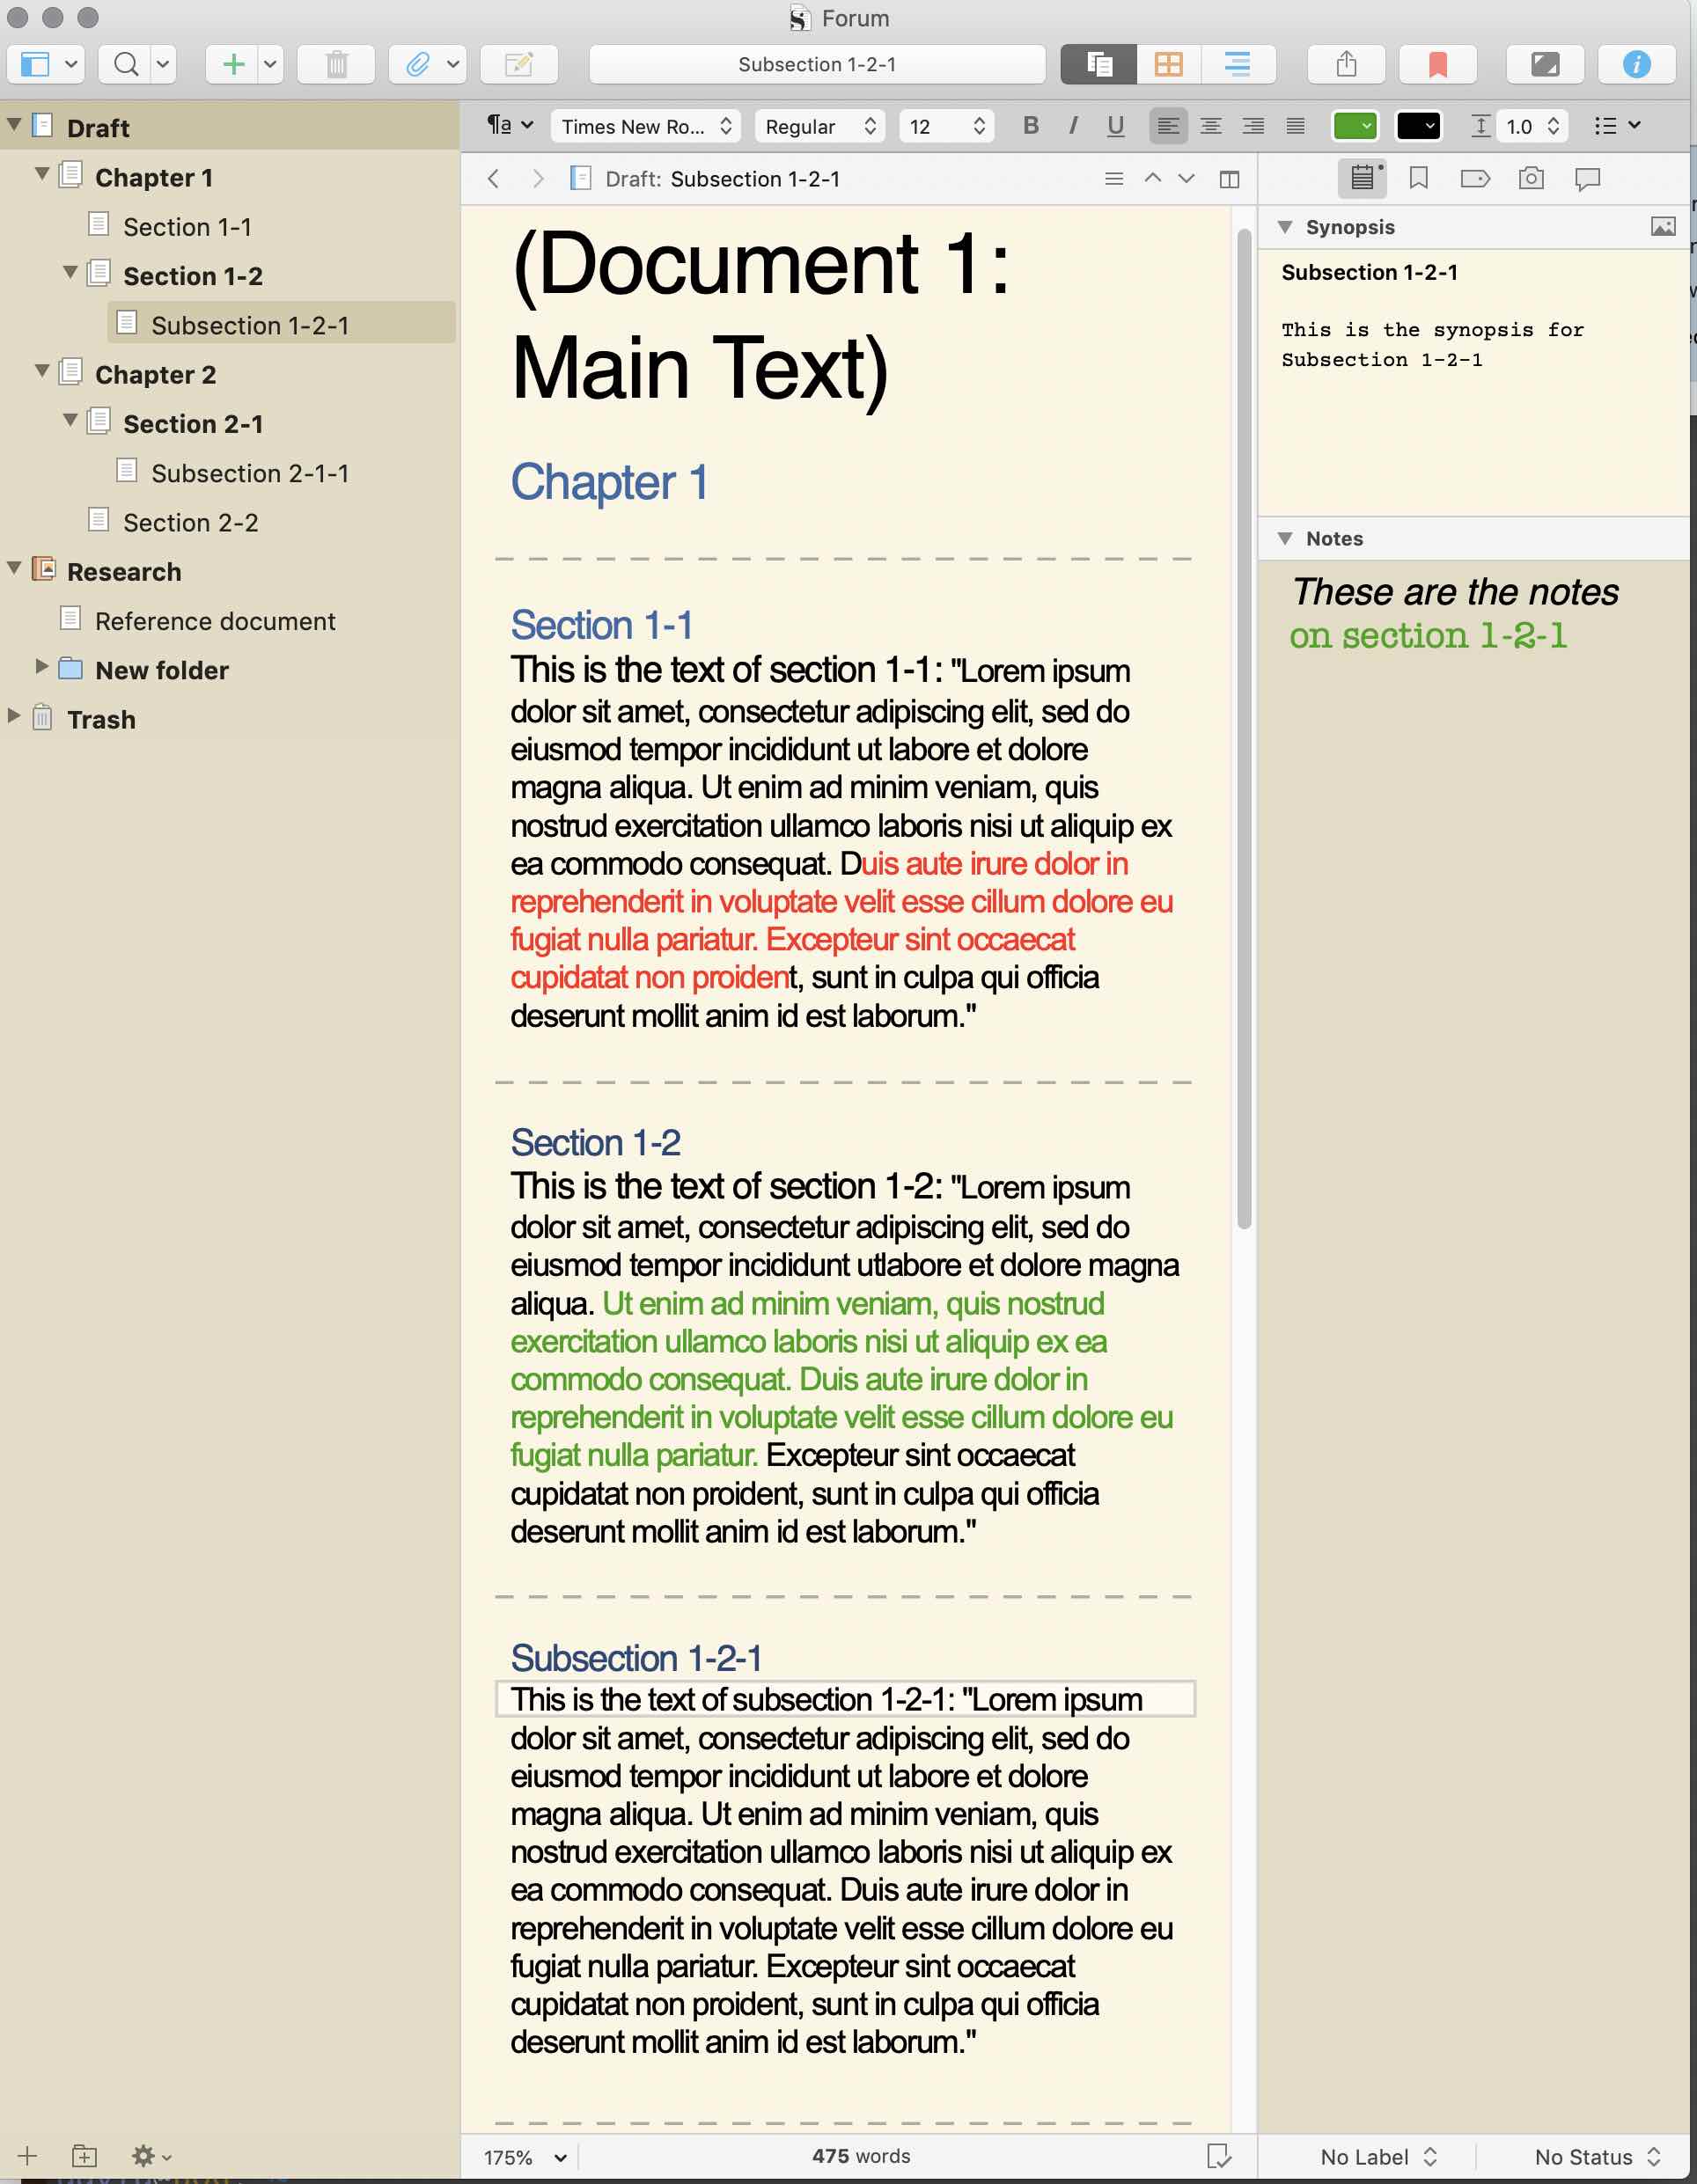
The first is the basic set up: Binder on the left in Scrivenings mode. You can see that Draft is highlighted, so you’re seeing all the text from every document and all the formatting. However. the cursor is actually in Subsection 1-2-1 (I’ve clicked inside it in the Editor, or used cmd-opt-up/down to get there with the keyboard) and the Inspector panel is showing the Synopsis and Notes belonging to Subsection 1-2-1. (You can see that the Binder has two selections - a ‘heavy’ one for the top level of the Scrivening and a ‘lighter’ one for currently selected document within the Scrivening —the Inspector panel follows the latter.)
Note that if I navigate to Section 2-1 (click on it in the Editor, or cmd-opt-down), the panel will change to show the synopsis and notes for Section 2-1. Unless I’m missing something, this deals with your requests 1A, 1B and most of 2. You’re seeing the hierarchy, you’re seeing the full text and you’re seeing the notes attached to each document. And of course, if you move any of the documents around in the hierarchy (drag and drop or with keyboard shutcuts), those notes will move with them without you having to do anything.
What about the second part of request 2: ‘attach elements from my notes folder’ to a document? You can do that too. In the second screenshot, there is now a folder in research (My NOTES FOLDER), with two documents in it. If you want, these could be your two original Word documents, web pages, or anything else compatible with Scrivener.
I have again selected a single document (Section 2-1) within a larger scrivening, so the Inspector panel is showing details for Section 2-1), but this time I have chosen the Bookmarks panel (second icon from the left at the top), and Document Bookmarks in the dropdown box. It’s showing one item: Reference Document, which is the document you’ll see under My NOTES FOLDER (I’ve dragged it from the binder into the Document Bookmarks list). The entire text of ‘Reference Document’, with all its formatting (and images if there are any) is shown in the panel below.).
Every time I move to section 2-1 in the Editor, the contents of Reference Document will be shown in the Bookmarks panel. I can attach any document in the binder to Section 2-1 in the same way, and I can attach it to as many documents as I want. For the purposes of the screen shot I’ve had to make the window small, but you can widen it, or you could open the document as a Quick Reference panel, or in the other Editor as you wish. (As an aside, if I click on Reference Document in the Binder, it will show you a list of the documents it’s attached to — in other words, these links are two way). As before — all of these bookmarks move around as you change the hierarchy, promoting, demoting, moving to other parents etc.
It seems to me as though this setup gives you most of what you want (and actually is far more powerful the very basic Outline tool in Word—I’ve not touched on the many other features which are available with this setup).
The only question is how do you get from your Word set up to here. And you say you’ve already done that (you’ve copied and pasted the relevant sections of your second Notes Word document into the Notes panel of the relevant documents). You therefore don’t ever need to go back to it — from now on the Notes panel moves with the document and you can forget about where they came from, though you can keep them in the Scrivener Project for reference if you want.
So, apologies again if I’ve misunderstood you but please could you explain how the setup I’ve described is lacking for what you want so we can find a way of helping?
Just to finish up on my too long first post, I thought it might be useful to show where Scrivener’s Outline mode does fit in.
Here’s a screen shot of the sort of thing you’d use Scrivener’s Outline Mode for (to save space I’ve cut the number of columns down to Word Count, but of course you can have many metadata column there)
Notice how it’s the same basic set up as the first (subsection 1-2-1 selected in a Scrivening based on Draft), but it gives you a way of looking at the all the metadata together. The synopsis there to give a short description of what the document itself contains — a couple of sentences or a paragraph is usually enough to remind you.
The point is, I can toggle between screenshot 1 and this one by simply clicking cmd-3 and cmd-1 — it’s just a different view on the same data and the full text version is only one short cut away.
Finally, putting all that together: you can show the Binder, the Outline View, the full scrivening text, and the panel, set up so that as you click on each document in the outline, the right hand editor moves to the selected document and shows the relevant panel. You do this by clicking the little box with an arrow on the bottom bar of the Outline.
You can set this layout up automatically by going to Windows > Layouts > Three Pane (Outline), though you may have to add the Inspector in yourself.
And just one more thing… Click inside the Binder or the Outline and press cmd-9 to expand the entire outline. Then click on any intermediate level document (Section 2-1) and press cmd-ctl-0. This will collapse the entire outline to the same level as Section 2-1. It’s not quite the Word ‘Button’ approach, but it does make it a bit easier to manage the different levels.
Please don’t go away! I’m very grateful for the replies, and I want to do them justice but I’m in a different time zone and haven’t completed my responses yet.
I’m new to scrivener and trying to incorporate another element every few days, especially now that I’m starting my second project.
I am wanting to understand the difference between some of the folders that appear in templates - Research, Resource, Notes - and how those are mean to be used (or how do some of you use them? Research & Resource seem redundant to me, but perhaps I’m missing something?) and why you would put something in one of those folders and not as a Bookmark in the Inspector?
I realize that I can delete or customize any of these folders, but don’t want to eliminate something that will probably be helpful.
Have read over several threads, and I think this is the closest, but in trying to follow all of the nuances of this thread, I can’t quite find the answer to my rather simple question.
First of all, Project Templates are only ordinary projects which have been saved in a particular configuration to give you a head start in a particular direction (Novel, Essay, etc). You could start with a blank template and get to any one of the provided Project Templates easily, and you can change any Template to another in a few steps. I mention that because in the end there’s nothing really special about anything in any of the templates — you’re not breaking or misusing one because you don’t use it in a certain way.
That means that if you don’t have a use for a particular folder you can simply not use it, delete it, or rename it and use it for something else. A caveat: the Research folder is one of three that are always in every project (the others are Draft/Manuscript and Trash) and you won’t be able to delete them.
So it really comes down to how you want your project set up. For the folders you’ve mentioned, here’s how I would use them, but it is totally a matter of choice:
Research: any document contained material that doesn’t belong in the main manuscript which I want to refer to as I’m writing — such as maps, newspaper reports, pictures of suspects, pdfs of useful information, notes I made in an other software on topics of interest etc. These are all collated in folders underneath Research.
Notes:(I call it Project Notes) I use this as a repository for things I’m going to want to refer to commonly during writing — in other words my Project Bookmarks. A list of stylistic conventions (‘use Sgt not Serge’, ‘Capitalise rank names’ etc), a list of the conventions I’m using for custom meta-data, short summaries of the Theme and Synopsis of the novel, and so on, and anything else I think I want to keep easily accessible at all times.
This works automatically because I’ve set the Project Notes up to be the designated Bookmarks folder (in Projects > Project Settings > Special Folders), so any document I create in there automatically becomes available in the Bookmarks interface (cmd-shift-b), or in the Inspector Panel (Navigate > Inspect > Bookmarks > Project Bookmarks).
NB: I can also select any document in any other folder (including Research) and make it a bookmark (right click on it in the Binder) and sometimes I do that when it seems appropriate, but it’s also handy to have a specific folder to see most of them together. It doesn’t matter which method you choose: they will both get you project bookmarks.
That’s actually a theme you’ll come across a lot in Scrivener: there is often more than one way to achieve something, and which you choose depends on what you what to achieve in the circumstances.
I don’t use a Resources folder: I assume it’s where the creator of the template keeps things like videos, pictures, sounds etc. I could be wrong of course. If you don’t see a need for it, delete it or rename it and use it for something else.
Summary: use the template the way that makes sense for you, and don’t hesitate to delete and rearrange as you see fit. Once you’ve set it up the way you like, save it as a Project Template (File > Save as Template) so you won’t have to make the changes next time.
 I have a “To Do/Section 3.1 - get this done” note. And by that same token I have an area for externally imported research, organised relatively to its own internal structure, in a manner that is conducive to the research itself rather than the WIP outline. Then there is an area tracking revision notes, copyedits that come in from others, my own notes on the process as I work, etc. Naturally, revision notes would be organised by what makes sense for organising a major revision—not the outline that is being revised: they are sorted into edition numbers, by the status (working/maybe/done) and so forth.