One easy option that comes to mind is using the folder/file name itself as the subtitle, since it looks like you are not using it otherwise. You may have noted that some of the available Section Layouts in the built-in formats have two-line chapter headings, some of which include a “Section Title”. That is where text such as this could be printed.
There are two immediate problems I see with that:
- You have a two-line subtitle, which would be a little awkward for folder/file names in the binder.
- You may have other names that are more meaningful that are being used here already, and having to put the subtitle into the binder name might end up making the binder very cluttered and difficult to work with.
But I mention it in case that appeals to you, since that would pretty much work out of the box.
So that aside, I would approach this problem by making use of two different ingredients:
-
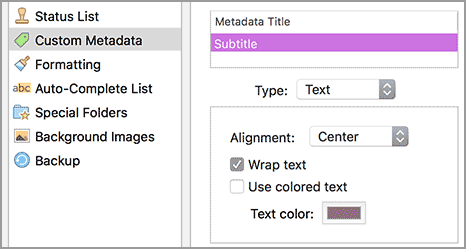
Custom Metadata: this will be used to store the subtitle for documents that have one.
-
Open
Project ▸ Project Settings...and click on the Custom Metadata pane. -
Create a new field with the
+button. I’ll call it “Subtitle” for this example. -
Tick the Wrap text option, so you can have two-line subtitles. The rest is up to you.
-
Now click the chapter folder you want to add the subtitle to, and open the Inspector (
⌘⌥I/Alt+Shift+I). -
Click on the Metadata tab and expand “Custom Metadata” if necessary. Now you can cut and paste the subtitle from the main editor into this field. (On a Mac you need to use
⌥Returnto insert a newline, on Windows you can just use the Enter key normally.)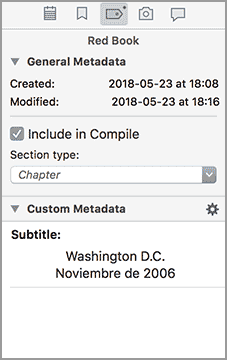
(You can add this “Subtitle” column to your outliner as well, making it easy to spot which chapters have a subtitle and edit them directly, without having to visit each individually and use the inspector.)
-
-
Section Layout: when compiling we will need to insert this subtitle into the heading, and that will probably involve either editing the layout you currently use, or making a new one. For this example, I’ll duplicate the “Chapter Title” layout, provided in the stock Paperback format, which is pretty close to what we want in terms of layout:
-
In the Section Layouts: Formatting tab, with “Chapter Title” selected in the list above, click the
+button to copy it, and name it “Chapter Heading w/ Subtitle”. (Feel free to discard the layouts you don’t want, as well, to keep the list cleaner.) -
In the Title Options tab, paste the following placeholder into the Title Suffix field:
<$custom:Subtitle> -
Return to the Formatting tab and preview the result. The binder item title (referred to as “Section Title” here) is jammed up against the subtitle we’ve added, but that’s fine. On the Mac we’ll need to copy the formatting from the previous text into the new text we’ve inserted. Use the main
Format ▸ Copy Formattingand paste menu commands to do so. -
Tick the Title checkbox in the main list above to remove the binder title from the layout.
-
That’s good enough for a rough test. Save the Format settings, make sure your chapters are assigned to the layout, and give it a test compile. Here is the result I get, with two examples showing one with and the other without a subtitle, both using the same layout. Tweak the paragraph spacing on the main title to add more or less space between it and the subtitle. You can adjust the subtitle paragraph spacing as well, but do note that will impact spacing between subtitle lines as well, and may not result in as even a look between chapters that do not have subtitles.
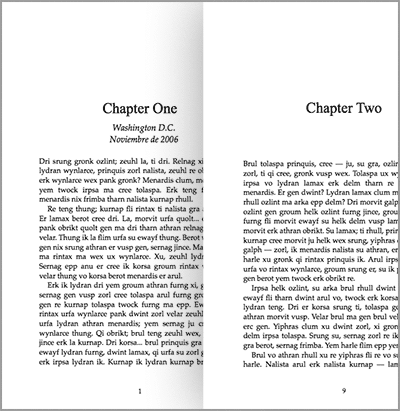
The paragraph starts the same number of centimeters down, even without the subtitle.
Attached you’ll find my test project, so you can examine its settings directly, in case any of these instructions did not make sense.
subtitle_example.zip (86.3 KB)