Hi,
I cannot create links on an Image in Scapple, even I place it inside a Background Shape?
Is this normal?
Ultimately I want to put links on image map and link to internal documents in Scrivener, and I thought Scapple should do this, but it seems you can’t put links on an image in scapple either?
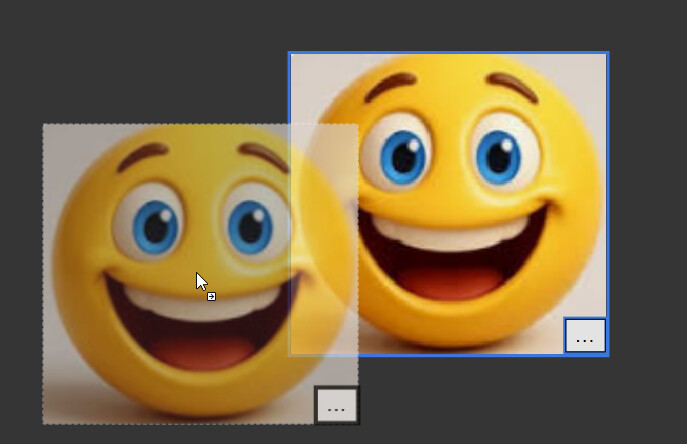
If you insert your image and place it where you want it,
next create a new note, with something like “…” as text.
Link this “…” to your Scrivener document.
Next, place the new note almost where you want it on the image, but not over the image. (If you do, the note won’t move at all, and will connect to the image.)
Activate Edit / Arrow keys move notes and use arrow keys to position the … note (link) on top of your image.
You can also add a magnetic background shape if you plan on moving the ensemble around, but be aware that anything that comes in contact with it will inconveniently stick to it.
I think that it would be better to develop in this case the habit of drag-selecting both the image and the link-note so that they then move together. (I just tested it and it works fine.)
Your image now has a “Open linked file” button. Triple clicking it will do what a link does.
The example on the left is deliberately meant to look a bit like a Polaroid. I use a magnetic shape around the image and its caption. This technique is of course also useful for general captions, not just links.
On the right is a modification of the above idea, using Unicode characters for the link itself.
There are a couple of ways you can make this more efficient:
I often have a “scrap” board that contains a number of more complex “units” like these, meant to be dragged into boards as templates of a sort. I usually always enclose them in magnetic shapes to make that process easier, but the shape will sometimes be removed after doing so, it’s just a “packaging” technique. In this case though, I like the shape for how it gives the image that iconic look.
Without the shape though, it’s useful to know that images can be a part of a “stack”. You can thus very easily add a caption by selecting the image and hitting Ctrl⏎ / ⌘⏎, and then optionally applying a Style (you’ll find I included one in the sample) to keep the caption text uniform. There are two advantages to using a stack:
Stacks can be easily selected together by click on the first item (the image in this case), and then using the shortcut for Edit ▸ Select ▸ Notes Stacked Below. I use this shortcut all of the time anyway, so it’s barely even something I think about—and it makes the use of a shape unnecessary, if you don’t care for that affectation.
When creating a new note in a stack, it automatically acquires the width of the note you started with, or the image in this case. Thus with the style’s centre-alignment, we can be sure the caption will always look right along with the image.
The use of a “button” in the corner doesn’t quite have those same conveniences, so I’d probably use a Shape with that all of the time.