It would be so helpful if you could edit text in the synopsis, i.g. mark it bold or in italics or underline it.
And it would be great if you could use the finding tool to find words in the synopsis. If you look for a word in the whole project Scrivener does find this word even if I only used it in the synopsis but if there is a lot of text it’s not so easy to find the exact paragraph the word is mentioned in.
Are you saying that your synopsis are multiple paragraphs of text? Or do you mean that the search term is one commonly used through much of your Scrivener project in general so therefore too many results come up? Sorry, I’m confused, and I want to understand what you mean.
Personally, I’m a fan of the synopsis being plain text (which is to say text that can’t be formatted with bold, italics, etc). Though that has always stood out to me since so many things in Scrivener are rich text (text that can be formatted) and the software on a whole is rich text focused.
The document notes is a rich text field. Would using it fit what you need? If not, then what about using document links? Sorry if neither of those fit what you need or if document links isn’t available on the version of Scrivener you’re using (I don’t have Scriv 3 for windows, haven’t use Scriv2 for windows or mac in a long time, and I’m still learning iOS).
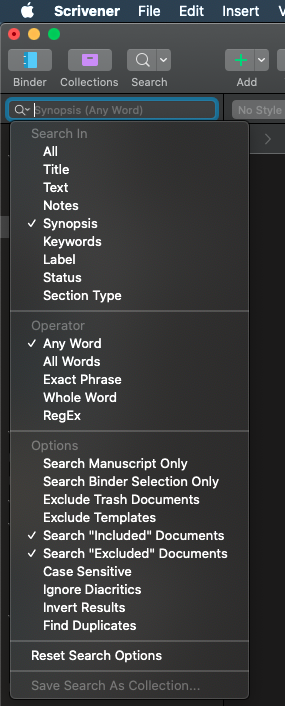
Though it does seem to be possible search by only what is in the synopsis, at least in Scriv 3 on mac:
Thanks, for your answer.
As a matter of fact, yes, my synopses contain several paragraphs of text so that I know what to write when I start writing the scene later. (I’m definitely a planner )
I compose my scenes in the following way: Time: Here I enter a date and time and also the duration. For example: So, 31.10.21; 14:30 - 15:00 Uhr (30 Minuten)
Some years ago I didn’t do that. And one of my characters would have had to be in two places at the same time … Situation: I describe the situation the characters are in at the start of the scene. If necessary I also write down something about the setting and other details that are necessary for the scene or which I have to take into account in later scenes. Goal: Here I write down which goal my POV has in this scene. As I colour-code my POVs I don’t need to mention them in the synopsis. Motivation: Here I write down his/ her motivation for reaching the goal, in order to set the stakes. Conflict: Here I write down the conflict(s) my POV will be confronted with. Normally this is more or less how the scene will proceed. I jot down more or less all ideas I have about the scene so that they won’t get lost. Scene ending: Here I write down whether the POV has reached his/ her goal or how the scene ends. If possible I try to insert a cliffhanger or some kind of catastrophy which leads on to the next scene.
It would be really nice if I could search for words like “conflict”, “goal” etc. within the synopsis via Strg + F. Or if I could set these keywords bold to see them better.
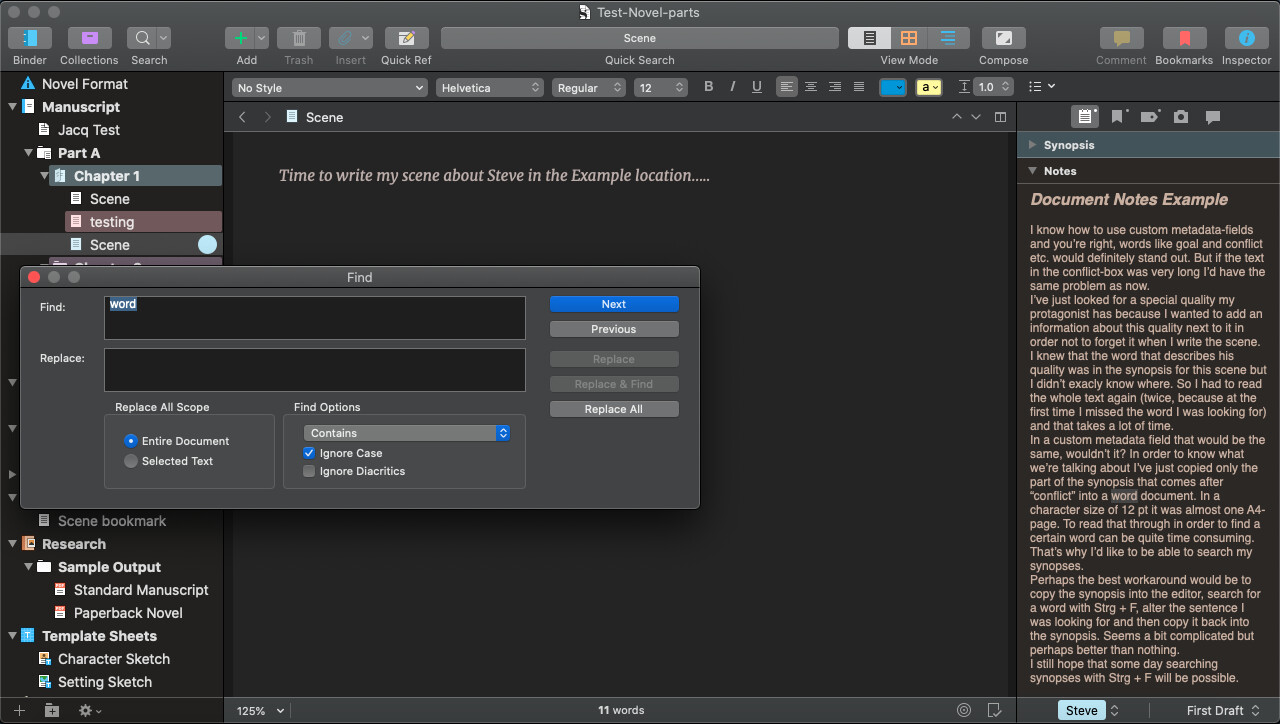
Often I have quite a lot of text in the synopsis field. If I do a project search, Scrivener shows me that my keyword is in the synopsis of this very scene (because the synopsis is the only field in the document in which I have written text so far. There is no text in the editor and no text in the notes field. So the word I’m looking for must be in the synopsis.)
But if I want to find the exact position of the word I am looking for I have to read the whole synopsis very carefully because Strg + F doesn’t work here.
Sometimes marking text bold or in italics would already help because very often I know that my keyword must be in the conflict or in the scene ending. But being able to search via Strg + F would be even more helpful.
And as you can see in this text it’s much easier to have an overview over the synopsis if the keywords like “goal”, “motivation” etc. are set bold.
I get where you’ve coming from: having the field name in bold definitely helps it stand out in a bunch of text like that.
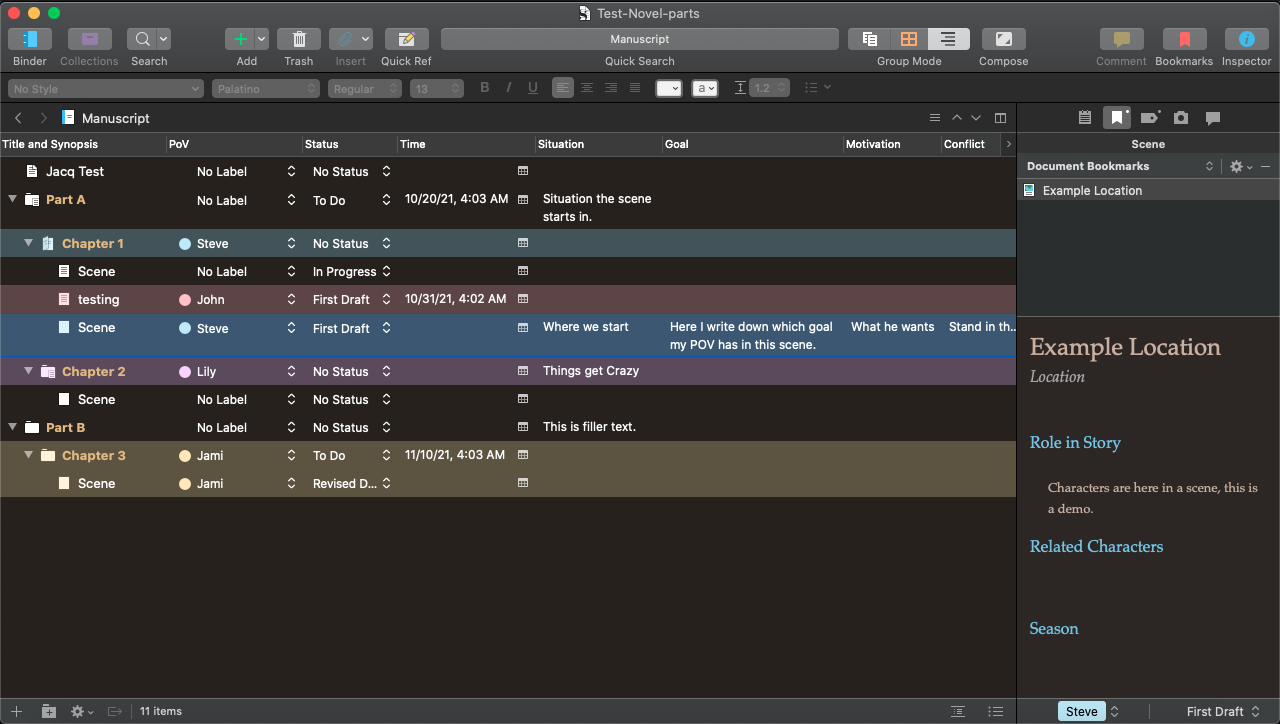
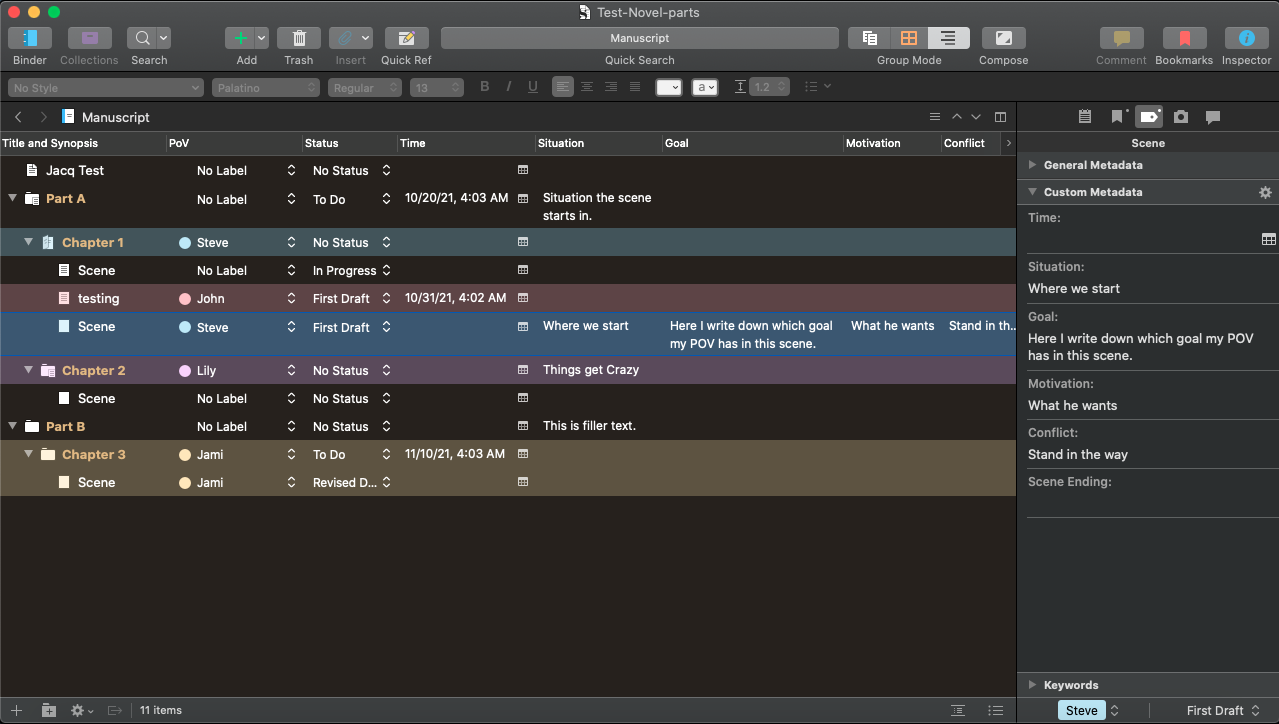
At the same time, have you considered making custom metadata fields mixed with using document bookmarks (and templates) for these various highly important pieces of info for planning your scenes? The time, situation, goal, motivation, conflict, scene ending, and anything else you could need. These custom metadata fields only support plain text, but I’m wondering if that will at least be less of an issue? Plus when you use a document bookmark, well it’s a full scrivener document that fully supports all the rich text formatting.
I know how to use custom metadata-fields and you’re right, words like goal and conflict etc. would definitely stand out. But if the text in the conflict-box was very long I’d have the same problem as now.
I’ve just looked for a special quality my protagonist has because I wanted to add an information about this quality next to it in order not to forget it when I write the scene. I knew that the word that describes his quality was in the synopsis for this scene but I didn’t exacly know where. So I had to read the whole text again (twice, because at the first time I missed the word I was looking for) and that takes a lot of time.
In a custom metadata field that would be the same, wouldn’t it? In order to know what we’re talking about I’ve just copied only the part of the synopsis that comes after “conflict” into a word document. In a character size of 12 pt it was almost one A4-page. To read that through in order to find a certain word can be quite time consuming. That’s why I’d like to be able to search my synopses.
Perhaps the best workaround would be to copy the synopsis into the editor, search for a word with Strg + F, alter the sentence I was looking for and then copy it back into the synopsis. Seems a bit complicated but perhaps better than nothing.
I still hope that some day searching synopses with Strg + F will be possible.
You are correct that custom metadata fields don’t support search/find that great (the scene itself will come up in the results of a search of that field, but individual instances of that word in the field won’t be highlighted). And I could only get the first instance of a word to be highlighted in an synopsis using search, which sounds like it does not fit what you need.
What about document notes? They use rich text and support search/find pretty well.
There’s also using document bookmarks, would would allow you to take advantage of document templates.
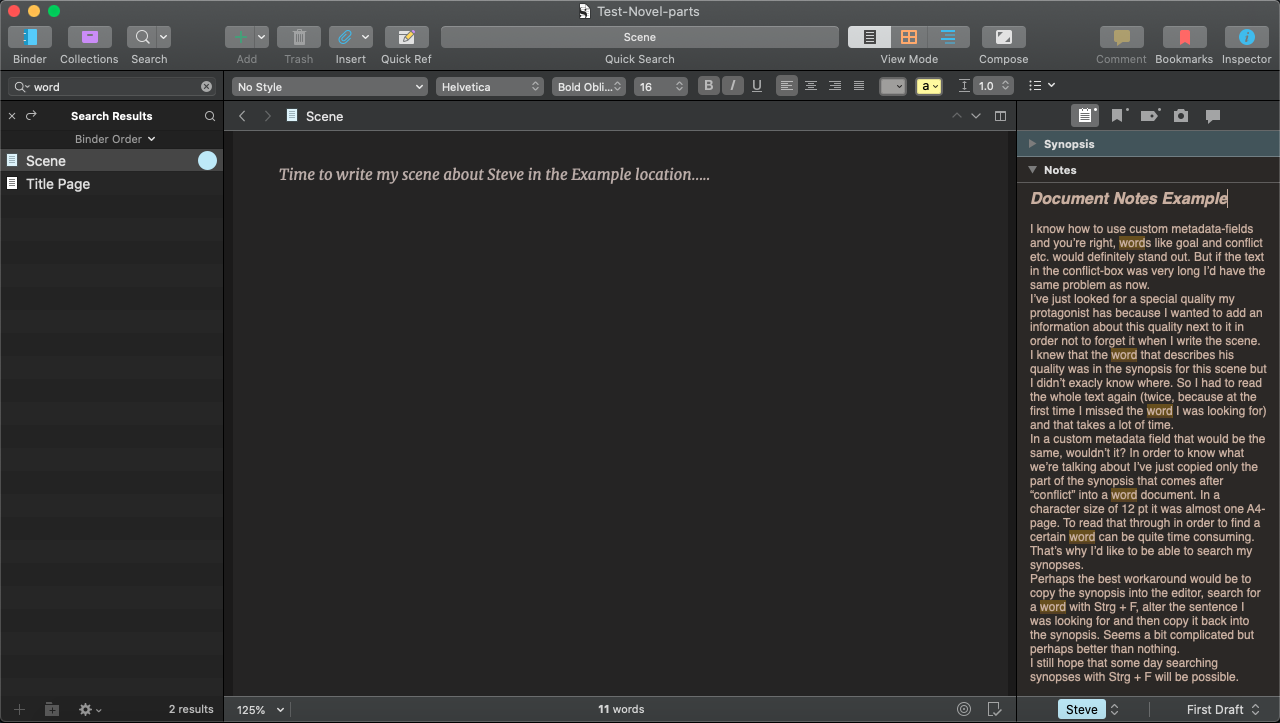
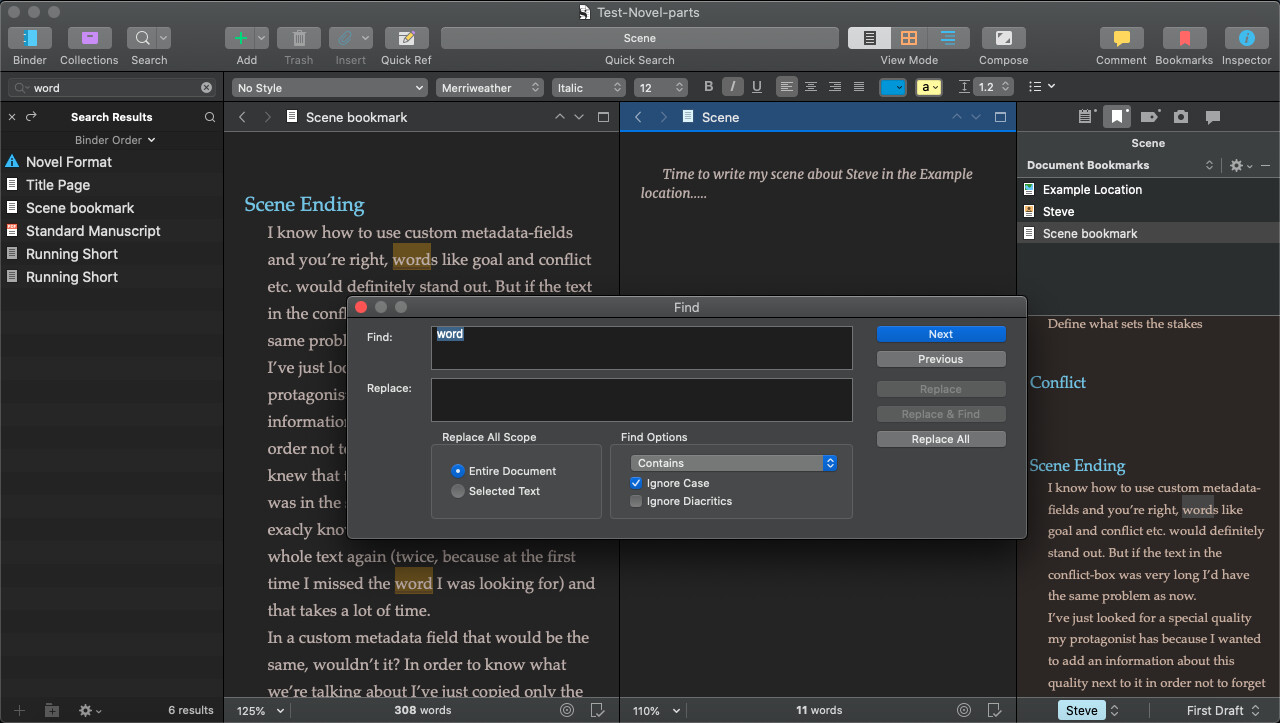
This screenshot shows using the project search for the text of any document, and using ctrl/cmd+F on the document while it’s in the inspector, so it’s both search & find at once and therefore a bit of a mess:
Sorry if those aren’t helpful? Anyway, good luck with your writing. I don’t speak for the developer, so I can’t say anything about even the potential for any changes to Scrivener.
It’s really amazing how you’re trying to help. I’ve considered document notes, but I need the place to make additonal remarks to the scene. Sometimes things need to be altered but if I look for the exact paragraph at once my workflow in another place is interrupted. So I just jot down some notes to alter the synopsis later. I also use document links in the notes section.
So I know that in the synopsis field everything is held ready to start writing. And the notes section is some kind of rough book in which the ideas have not yet been checked.
But thank you anyway. Perhaps someone who is in charge of possible changes to Scrivener reads this …
Just to clear up that one thing, if you search the forum for wish list requests on formatting in index cards you’ll find numerous cases where it has been stated there is no intention to change that aspect. So finding ways of doing what you want otherwise is the way to go, even if just means accentuating the words in how you write. Like “NOTES” is a lot easier to see than “Notes”, for instance.
For each scene document, I have a separate, corresponding scene notes document. I chose this approach because my scene notes get quite verbose, and keeping them in their own documents allows me to take advantage of Scrivener’s document viewing capabilities.
So my binder will look something like this:
Draft
Scene1
Scene2
Etc.
Scene Notes
Scene1 Notes
Scene 2 Notes
Etc.
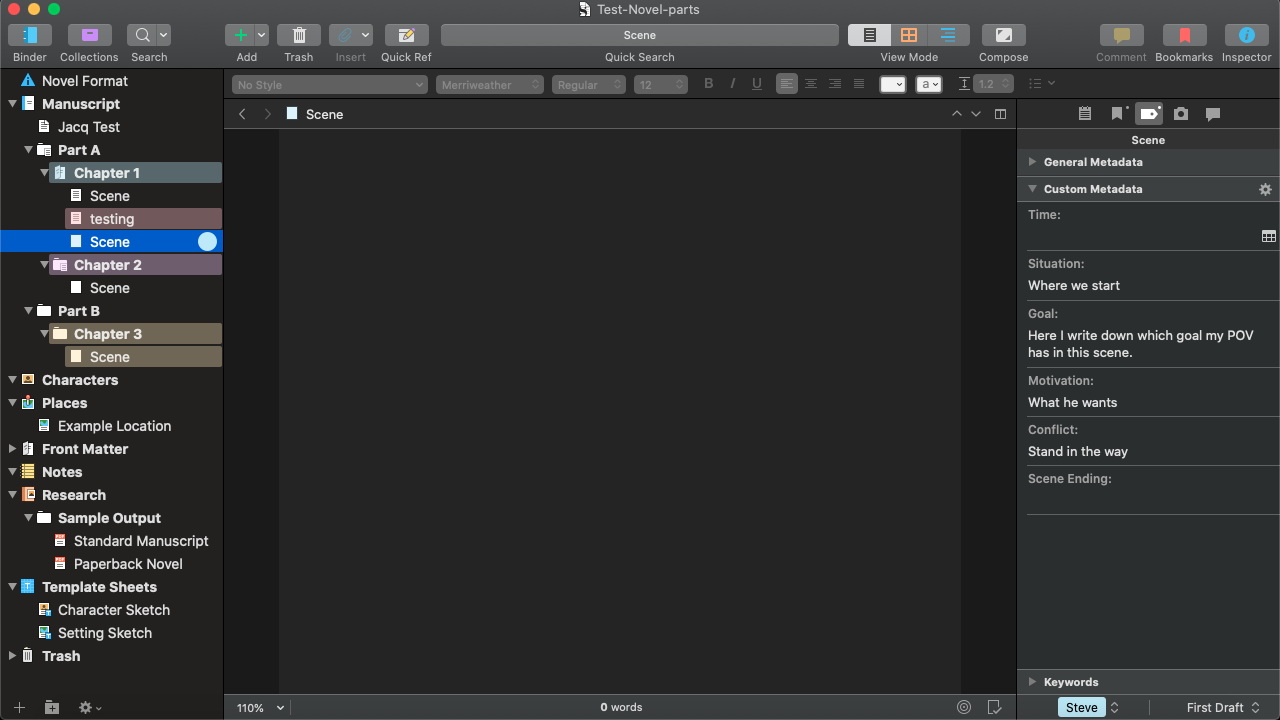
In the Document Bookmarks of each scene I’ll have a bookmark to that scene’s notes. This allows me to view a scene in the editor and that scene’s notes in the inspector, exactly as depicted in the inspector of Demon’s screenshot above. The scene notes in the inspector’s bookmarks pane are fully searchable.
But since the scene notes are in their own documents, there are other viewing options available as well. For example, I can view the scene in the left editor pane and the scene’s notes in the right one. Or I can view the scene’s notes as a Copyholder. Or put them in a Quick Reference pane as a separate window. Which viewing method I choose depends on the scene or whether I’m working at dual monitors or just on my laptop. But with this approach I’ve got lots of options.
Just putting this out there as an alternative way to solve the problem, that would give you what you want, but with far more flexibility.
Hi @JimRac,
I’ve just tried something similar. But I put the scene notes one level below the corresponding scene. The scene doesn’t become a folder but the notes are on a lower level anyway.
Manuscript
Scene 1
Scene 1 - notes
Scene 2
Scene 2 - notes
And of course the scene notes shan’t be compiled. So I disabled that option in the inspector.
Thank you!
Pamina
Good deal, that’ll work as well. Only downside I can think of is that your notes will be mixed in with your scenes in Scrivenings mode, which may or may not be an issue for you.
ETA: Another downside is that your notes word counts may be included with your scene word counts in the Outliner, depending on how your Binder is structured. Again, maybe not an issue for you, depending on your writing process.
The nice thing about Scrivener is there’s usually more than one way to get things done.
This is the main reason I love the document bookmarks feature. Which I’m pretty sure came new with Scrivener 3? If it was in 2, then I wish I had found it back then!
Well, that and it doesn’t restrict to a 1-to-1 relationship. If one bit of information is related to many scenes, I store that info in a document, and then have all the related scenes bookmarked with that document of info. Makes changes to said info much faster, since then I only need to change it in 1 place.
But yes, Scrivener usually has many paths to the same goal or end. Which to my understanding is intentional by the dev, as every writer has their own unique process. I’ve seen youtube videos about people using Scrivener to organize their podcast episodes; it’s very flexible software.
This is where the Navigate ▸ Open ▸ with Compilable Subdocuments menu command can come in handy. And the fact that this menu command exists (along with the ability to opt out any item from compiling) is evidence that having an outline that consists of both notes and export material is part of the core design. It’s also worth noting that all of the statistics tools have settings for not counting text in document with the Include in Compile checkbox disabled, too—and most of these settings are enabled by default.
Document Bookmarks are great! For me it comes down to the kind of note that I want to jot down—how I will be intending to use it and how readily available I want it to be—as well as whether or not that note may not end up useful to multiple sections. Given how flexible all of this is, things can easily go from one method to another as well, just by dragging stuff around in the binder and making bookmark links.
To return to the idea of putting notes into the outline itself: I love this particular aspect of how Scrivener works, and consider it one of the major advantages over other software designs, where content must more strictly either be in or out of what “prints” in the end. Being able to write notes to yourself as seamlessly as you would write for the reader is a massive reduction in friction over almost every other approach. We support those as well, as we’ve explored above—but they aren’t mandatory, as in most software.
Here are some tips for making this way of working even better.
Using Document Templates for Notes
If you don’t already have a templates folder in the binder (it will have a square blue icon with a “T” in it), then:
Create a new folder and call it “Templates”. Drag it to the top level, maybe between Research and Draft.
Go into Project ▸ Project Settings, under Special Folders, and set the Templates Folder at the top to this new folder. Okay OK to save.
Now click on the Templates folder and create a new text item beneath it, calling it “Note”. Here are some ideas for how it can be set up:
In the lower right corner of the editor, in the footer bar, you’ll see a document page with a checkmark in its corner. Click that button, and it will change to an “X” icon in the corner. This indicates the item will not compile by default.
This is the only setting that really matters! It might seem like we’ve done a lot of setup for one checkbox, but it does allow us to do neat things beyond that (below), and even if it were just for this one checkbox, not having to remember to always tick it whenever you make a new notes document is worth the peace of mind, in my opinion.
Optional: I like to visually see which items are notes at a glance. Use Documents ▸ Change Icon and pick something distinctive that you like for this. I used the “Yellow Notepad” option, under “Notes”.
Optional: having notes in Scrivenings doesn’t actually bother me, I find that very useful in most cases. However having everything look the same is a bit confusing. So type in some boilerplate text like “Scene notes…”. Select the text and give it a different font and appearance. Maybe indented Courier Prime works for you—or a different colour. Whatever you want. In the end, keep this text selected. That will come in handy later.
Go crazy with that if you want. It doesn’t have to be text that you mean to delete when you start typing. You can set up some subheadings and a place to insert the time and date, whatever you want, it will all appear in the new note document when using this template.
At this point you may have something that looks a bit like this:
Now for usage. When we want to insert a new section of notes into the outline, we use the Project ▸ New From Template ▸ Notes menu command. See what happens? Since the text was left selected in the template, that is actually remembered for new items created from it. We can just start typing and overwrite the boilerplate naturally.
Saving into a Project Template
With Document Templates out of the way, we can think about creating a starter project template that already has all of this set up. My own personal starter template, from which all of my new projects begin, has a template folder and “Note” doc. template set up much as I have just described. For me, this is just a “feature” of Scrivener I always have around. In some projects I end up changing how it works, in others I even end up with multiple kinds of notes. But they all start from this one beginning point.
How I do that is create a new Blank project, make the changes I want to it, and then use File/Save as Template... menu command. From that point on I make modifications using my own blank starter, rather than the one that comes with the software.
How to Organise Notes and Switch Between Them
Sometimes I’ll put these notes as subdocuments to the section they pertain to itself. I really like this approach because doing so makes them readily available while I’m actually writing in that section. For example, as you’re typing along and think of something tangential to add as a note:
Press ⌘3 / Ctrl+3. This is the Outliner view, which may be empty the first time you do it.
Use the aforementioned menu command to create a new note and double-click on its icon to load it, after you give it a name.
When you’re done, press the “Back” button (⌘[ or Ctrl+[) to return to the list of notes for this section. At this point you can press the same Outliner shortcut to get back to where you were writing before.
See how hitting that shortcut a few times toggles between notes and text? That’s why I like working this way. And another nice side effect is that I can use ⌘1 / Ctrl+1 to enable Scrivenings—and now my notes are all inline at the bottom of the section. Hitting that shortcut again removes them so I can focus on the text alone.
@AmberV, please correct me if I’m mistaken about this, but I believe your point here about Include in Compile settings and statistics does not apply to word counts in the Outliner. So, unfortunately, interspersing notes with scenes in the draft folder will be problematic for folks like me who use Silverdragon’s method of monitoring pace by applying Outliner word counts against the Save the Cat beat sheet. Hence my advisory to the OP.
That’s correct, there are a few tools in the software that err more towards being an estimate than accuracy, such as the outliner columns. Those also are less useful if you write using a lot of inline annotation, as I do.
The Selected Documents tab, of the Project ▸ Statistics... panel, is often the most useful way to get an accurate count of any arbitrarily sized chunk of the draft, should you need one.
I would love it if I could just make the synopsis text a little bit larger, as on my 34" main screen it is really tiny? Other than that, I don’t care about formatting there…after all it’s just a synopsis
 )
)