I’ve upgraded to Scriv3 and love it, and am excited to discover that it makes a clean eBook file that can be set up completely inside Scriv, even with chapter and triple-jump graphics. Although my newer manuscripts were created in previous Scriv, I had to compile them out to some other eBook software, but this is a step I can now eliminate. So, right now, I am pulling in my older manuscripts that were originally created in the garbage-riddled MSWord, and Scriv3 is saving me a TON of time.
I’m glad to see the option for replacing formatting (specifically italics) in imported manuscripts, but even though it has a selection for the whole document, that’s just the chapter I’m in, not the whole project (split into chapters), unless I missed something. *Is there a way to globally replace italics with the emphasis (or any other) style?
Since there is always a problem with losing formatting–namely the italics, which are really time-consuming to replace manually-- I am hoping that we can have a global replace feature for the italics.
I haven’t been able to find any information on this feature, if it exists.
As an Indie author and publisher, I do the work of 10 people, and since I’m dealing with my catalog of 61 books, this would cut my workload WAY down.
Appreciate any feedback, information, etc.
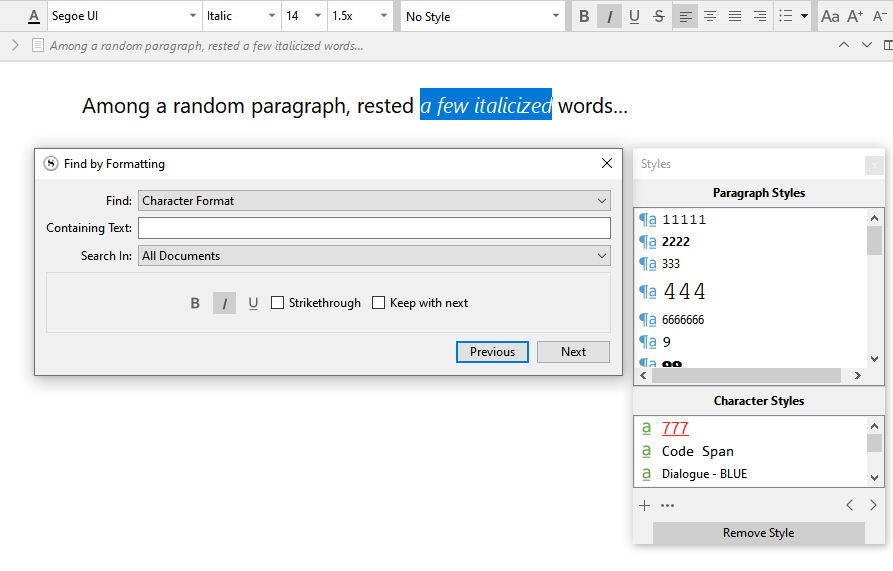
You can set a character attribute style (or use the predefined Emphasis – your choice really).
Then use Edit/Find/Find by Formatting...
Then apply that character attribute style to the text’s segment that is auto-selected for you.
Then hit “next” in the Find by Formatting panel.
Technically, the character attribute style should overwrite the italicized status from the format bar.
You have to manually apply the style.
That’s why I’ve set my panels like that, side by side, for convenience.
No automatic way to bulk do it, that I know of.
But all you have to do is cycle:
Click on “next”
Click on style
Until you bleed or are done.
I suppose that should you have been on a Mac, you could have done it all at once. Making your whole draft be a scrivening, then using :
But not under Windows.
Although you can still do a whole document at once. But not the whole project/draft. (Sadly)
So, in that case, to do it for a whole document at once, you’d have to cycle:
Select document (Or search for the whole project and just use “next”. – Start at the top of your binder. And in which case you can ignore the next step.)
Click in the editor at the beginning of your document.
Click next in Find by Formatting.
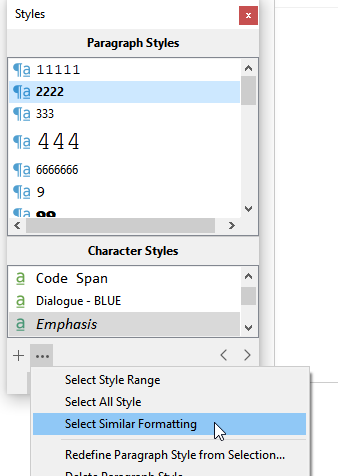
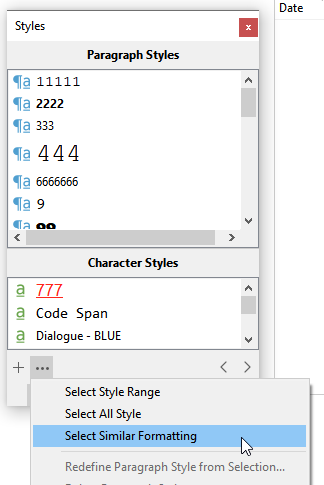
Select “Select Similar Formatting” at the bottom of the style’s panel.
Click on “Emphasis”
Select next document (or click “next” enough times in the Find by Formatting panel if you are set to search the whole project) → repeat.
→ Whether you opt to do a single document at a time, or rather search by formatting for the whole project, both approaches have their down side. For e.g. : searching your whole project won’t take you right away to the next document… It’ll rather take you to every single occurrences within the active document first. So you can’t just click blindly…)
Given the risk of user error (in which case you’d end up removing the style assignation) I personally would go with a single document at a time, not trusting Find by Formatting to handle my navigation across documents.
For some reason, when I tested “Select similar formatting”, it wouldn’t select all occurrences of italicized text. But I think it was just a glitch. (Still perhaps keep an eye out for that for your first few documents… – make sure you are not missing any before assigning “Emphasis” to them.)
It would still be a manual step for each search result. Sadly. My topmost wishlist item would be for find to select all matches (not just highlight them). Then we could style them all at once.
At least on windows the Emphasis character style is italics so clicking would see no change try clicking another style to see text change. does work in windows.
The Edit ▸ Select ▸ Select Similar Formatting menu command (and the same command shown in the screenshot above from the Styles panel) does actually select the text, not just highlight it. So this is indeed the most efficient way to convert batches of formatted text to styles. This works in both Mac and Windows (the note above is referring to how you can’t load an entire chapter or larger portion of the book into Scrivenings mode and do this in one shot, you have to fix one binder item at a time).
As for better seeing what you’re doing, I would temporarily change the Emphasis style to something visually distinctive, like not italic and using a text colour. Now you can easily see by eye if something got missed by the selection command. Personally I like something more obvious for the editor anyway, since styles can be changed to something more conventional when compiling. But even if you prefer conventional, this tip will still make large-scale conversion easier.
Okay, i finally got the “select similar formatting” to appear (not grayed out) by moving the chapters left to root…(CTRL+left arrow). But even with scrivenings mode on, it only changes in the current chapter/doc, not in the manuscript as a whole.
If i bring it into one FOLDER/FILE/DOCUMENT/CHAPTER, that defeats the purpose, as after the global replace, i still have to separate into chapters again, manually.
I want to change the styles globally, so i don’t have to go (for instance) to EACH chapter heading and select it, apply the new style.
I initially import and split the word docs/.rtf, or .odt docs so that they pull in as separate chapters.
I’ve edited in LibreOffice (don’t use Word anymore) to globally replace what I can, but no matter what, those styles (like chapter headings) appear as “no style.” So i can’t even use that simple method of selecting by format.
So…still not sure how you or anyone else gets it to work. Unless they are talking about files created IN scrivener in the first place.
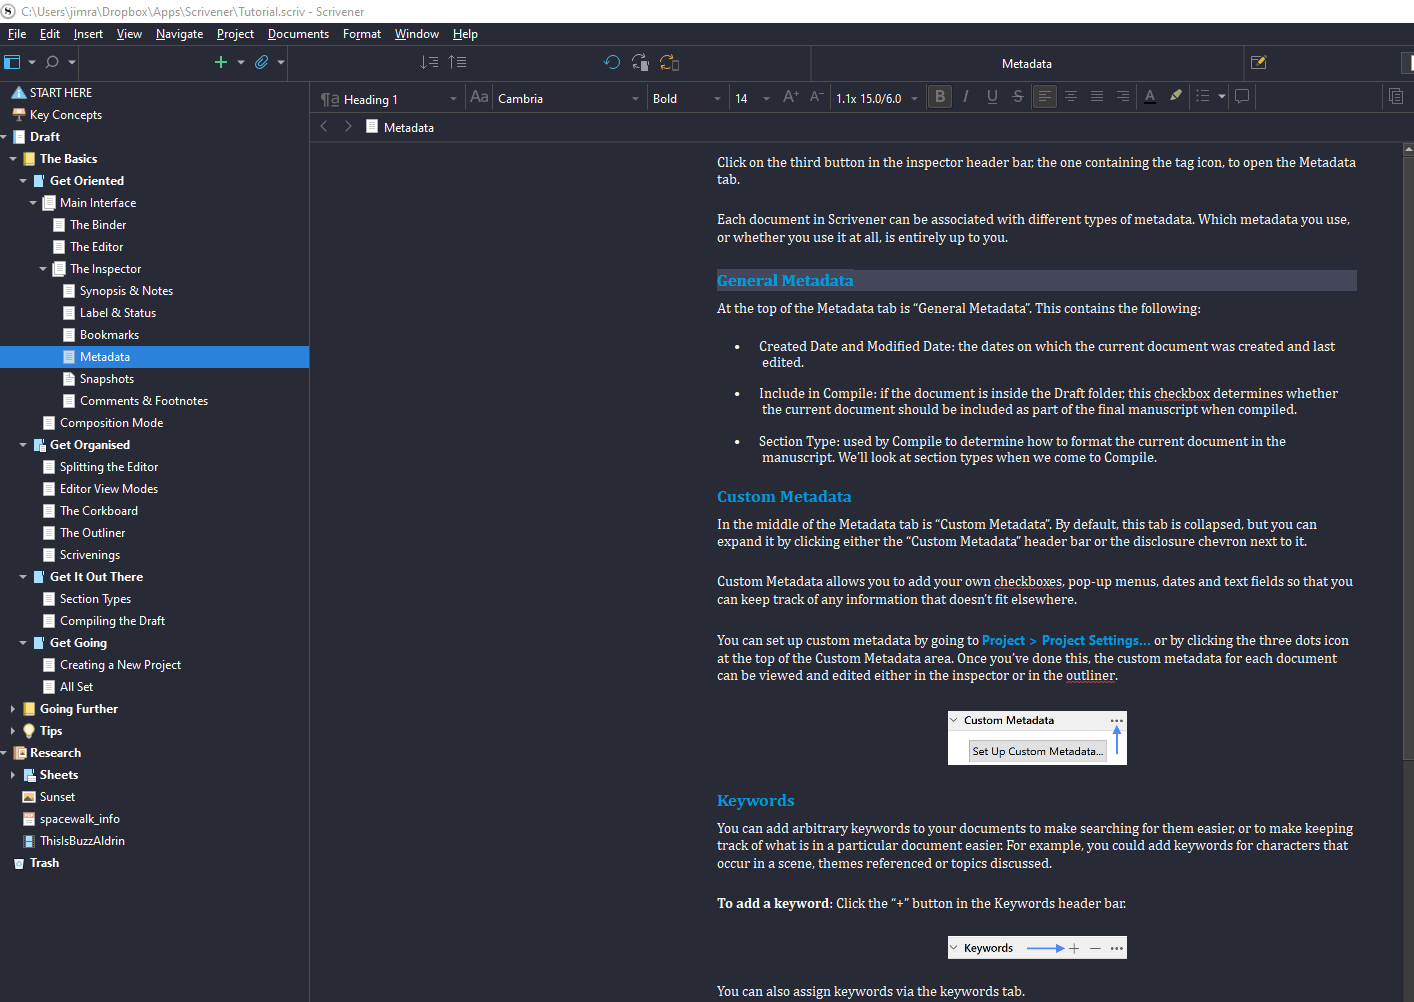
In this screenshot, the cursor is placed on text “General Metadata” (blue Heading 1 style), which has the current line highlight. Note that the document Metadata is 5 levels in from the root Draft folder.
Yes, I am getting this same result. It’s a problem with Scrivenings on Windows, that some (all?) features do not cross the Scrivenings document boundaries.
So “select similar formatting” isn’t going to help you replace italics with the emphasis style globally, but it will help you do it document by document.
Maybe do a few trial runs with “select similar formatting” and also with “Find by Formatting”, then make a determination which you’d rather use?
Yeah, I’ve already done all the experimenting. It just doesn’t do what I need it to do. I have suggested that as a feature, just thought maybe I’d missed something.
Currently, I am tediously going through each book, each chapter at a time, applying a chapter heading, selecting the body text, and applying that. It’s tedious and time-consuming. But still much better than my previous system of using several different programs to set up my books for digital publication. A few more of these features would certainly help. Scrivener still creates the cleanest files in compile, and saves me all kinds of other time.
Thanks for your input.
Myself, I would leave the heading out of the text editor as you’ve already got it typed in once in the binder. The compiler can insert the heading for you, using the correct style. The same goes for body text styling. I would defer that to the compiler if I needed a specific style assigned in post.
In my opinion, some of these things may feel a bit tedious because the design intent is more aligned with letting the compiler do these bits of manual labour for you, and as such there isn’t a wealth of feature set built around styled headings and body text in the writing interface.
That’s not to say you have to do things that way, of course, and maybe you have good reasons not to—but it explains why Scrivener can feel a bit lacking, if you approach it the way you would Word or similar.
Thanks Amber, for that info! I’m in the middle of some of that stuff…when I get a stopping place, I’ll check all that out, see if I can streamline things better. Appreciate it!