The problem now is that I can’t use a custom layout type within a custom layout type. My title chapters are already custom, so when I add a new custom section type to account for the desired formatting of an opening quote, it just overrides the existing custom formatting and messes up my chapter header.
Well, each document has only one Section Type, and each Section Type has only one Section Layout, but Scrivener doesn’t care how many of each you create. You can create new ones to handle as many unique situations as necessary.
Yes, to extend from the above with an example, one of the nice things about the new system is how you can format individual pieces of your outline with much greater detail.
Here is an example I give for an approach that will work with epigraphs, though the example being shown here is for a post-chapter heading image, the idea is almost identical: instead of putting the opening quote at the top of the first scene, or into the chapter folder section, you break it out as its own section and create an “Epigraph” section type for it.
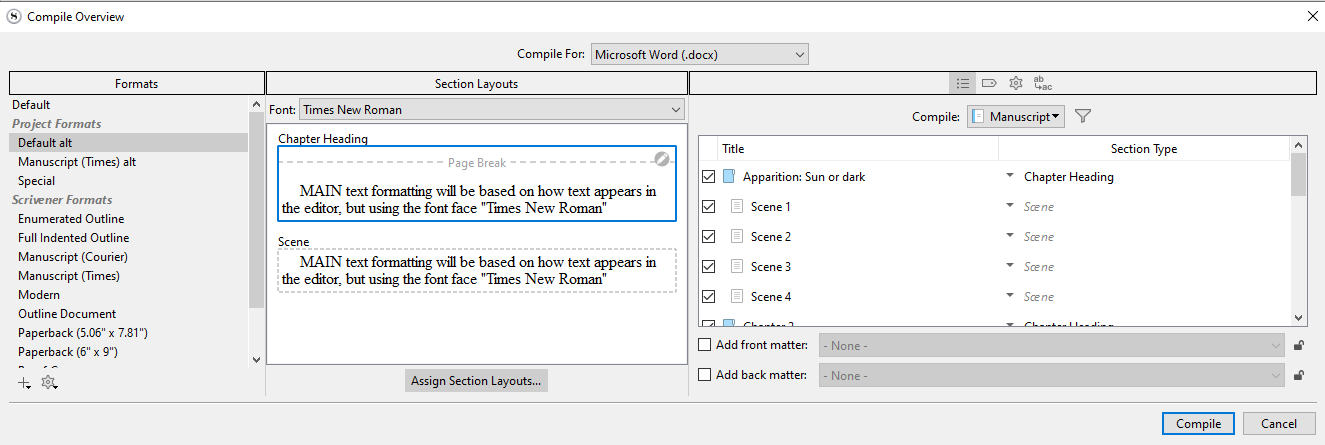
I’ve returned to using a combination of the default layout and a custom version of such. However, I’m not getting a page break in the output before each chapter. Neither the default nor custom version of the default generate a page break. In the editor I see a dotted line across the top of each page where a chapter starts–which I take to indicate a page break–but it doesn’t output upon compile (and I don’t see the page break symbol within the layout within the compiler).
So I’m trying to edit the layout using a custom version of the default layout. But I see no way to add a page break to the “chapter heading” section of my layout. How do I do this?
The dotted line you are referring to merely indicates the end of one part of your outline and the beginning of the next. It is not in any way synonymous with any kind of formatting, and indeed may become entirely devoid of effect upon compiling. It is merely a visual cue for you to see where sections start and begin.
For example, if you flip to the menu and shortcut appendix, in the user manual PDF, almost all of the paragraphs (or menu entries in hanging indent format) you see here would have dotted lines between them, as the binder outline at this point of the manual is a near 1:1 mapping of the entire menu system.
So I’m trying to edit the layout using a custom version of the default layout. But I see no way to add a page break to the “chapter heading” section of my layout. How do I do this?
Have you compared its settings, in the Separators tab, with the original? That should be the most straight-forward way to do it.
I’m still having some problems i hope you can help me solve. The latest issue is that the system isn’t allowing me to edit a custom layout. My process is as follows:
Using the inspector I’ve created a new section type called “Chapter Heading alt.”
Then I’ve gone into the compiler and created a duplicate of my “Default alt” format and called it “Special.” (So a copy of a copy so that I can refine my chapter heading choices even further.)
When I choose Special I see three layout sections in the middle pane: Chapter Heading, Scene and Chapter Heading alt (whose contents say “as-is”). The pencil icon is visible for all three. However, when I click to edit “Chapter Heading alt” nothing happens. And the tooltip for it has no name and instead shows two quotation marks as if to say that section has no name. Except it does–it’s “Chapter Heading alt.”
Any idea why I can’t edit “Chapter Heading alt”?
EDIT: What I don’t understand about all of this is where to define what is actually in “Chapter Heading alt.” I can only create new layouts–and nowhere in the compiler do I get to choose something called “Chapter Heading alt”–but this changes the entire manuscript instead of just selected chapters.
To make sure I’m understanding you correctly, you have at this point:
Set up your project to use “Default”.
In order get more flexibility, you duplicated that Format and called it “Default alt”.
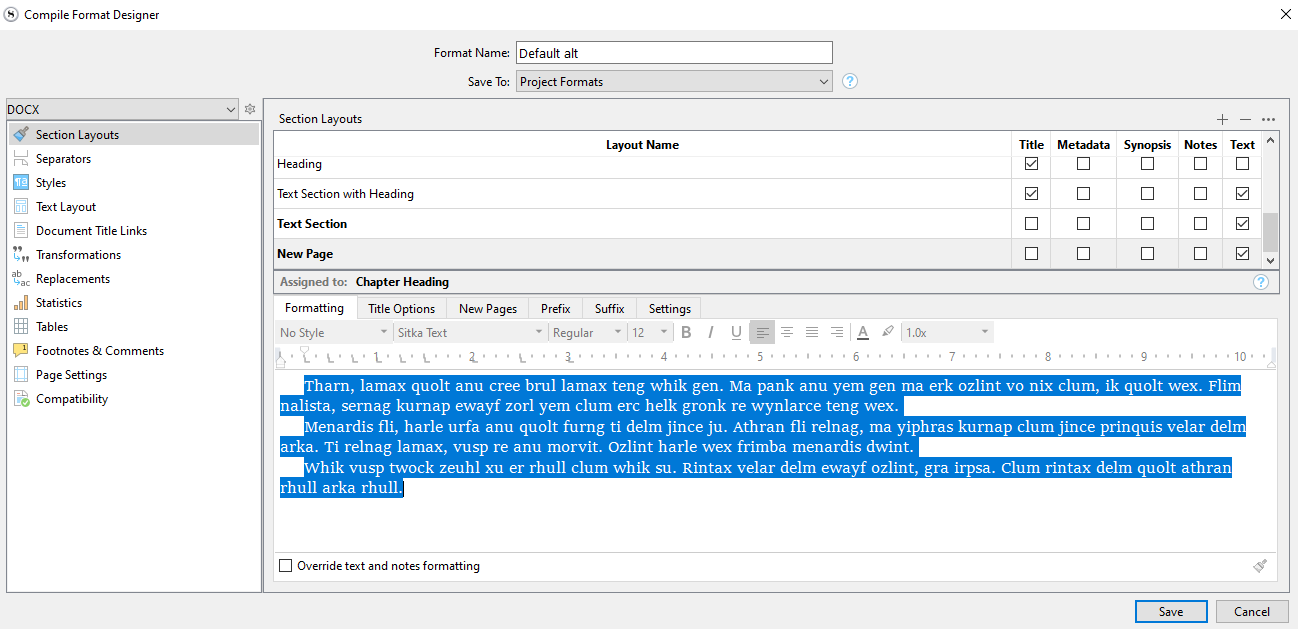
You were able to edit these layouts from the middle preview column with the pencil icon.
To experiment further, you duplicated “Default alt”, and called it “Special”.
Now for some reason this one doesn’t work when you click the pencil icon, and acts like the layouts have no names?
If that’s what you’re seeing, and that condition persists between reloading the compile pane (and then reloading the whole program just to get that out of the way too), then it’s some kind of persistent bug. We could take a closer look. But otherwise it might be some transient bug that took some odd string of actions to get to but is no longer obvious to reproduce. I couldn’t anyway, by following the steps described above.
So ultimately I would not try to learn from what you are seeing at the moment as nothing of what you are describing sounds like designed behaviour.
In the lefthand pane of the main Compile screen, right-click on the name of the Compile Format and choose the Edit (or Duplicate and Edit) option. Then, in the Section Layouts tab, you can edit existing Layouts to your heart’s desire.
If the issue is defining which sections have the “Chapter Heading alt” layout applied to them, you do that via the “Assign Section Layouts” button at the bottom of the center pane of the main Compile screen.
You’ll also need to make sure that the sections with alternative formatting have a unique Section Type. Section Types are assigned either in the metadata tab of the Inspector, or via the righthand pane of the main Compile screen.
I believe I understand what you’re saying, but I can’t actually edit the layouts in that middle tab. For example, if I choose a given header style that features just a section title, I can’t add anything to it above or below that. I can only style the EXISTING copy.
When I click the “Chapter Heading” section I go to this screen but I can’t, for example, add a title or anything else to that text in the bottom middle panel:
I do have the section set as a unique type per chapter via the Inspector. I’m trying to define what that unique type looks like in the compiler and that’s when I run into the problems described above.
To point out one thing, this Section Layouts pane you are showing here is essentially just like the old Formatting pane, in version 1. The only difference is that instead of adding formatting settings to individual indent levels and folder/file types, you’re creating a list of options, of Layouts.
The basic fundamentals beyond that difference are the same. The checkboxes in the grid to add different types of data (title, text, etc.), and the way those checkboxes add sample text to the lower area that you can then format. You can’t edit the sample text directly.
OK, but what I’m trying to do is keep the chapter number AND chapter title on some chapters, while for other chapters I want only the chapter number. I can’t seem to figure out how to do that within a single layout.
So some chapters will be:
Chapter X
The dog runs fast
While others will be just:
Chapter X
I almost had it with a variation of the default template (basically, just using “as-is” but it does weird things like not inserting a page break BETWEEN chapters. So I’m trying to create a heading section type that does both things above AND gives me the page break between chapters.
It seems that with some section types for headings I can change the page break functionality with the far-right control (where it says “1.0x” etc., but for some reason with my current section type it’s greyed out (maybe because it has no “title” like “Section Title” in the copy?).
An interesting idea, and I considered that a while ago, but I need to be able to see what each file refers to, so I label them “Chapter 2,” “Chapter 5” and so on when they don’t have unique names like “The Mad Hatter” or whatever. If I get desperate I may still do that though, lol.
My solution is to use the Synopsis to indicate what’s in each chapter. If the Binder title is left blank, Scrivener will autofill it with the first few words of the Synopsis.
The comment on letting the title be dynamic (empty) aside, which I think is a fine solution for this kind of thing, it’s worth pointing out—just as a point of theory and future reference—that there is nothing at all wrong with having two different Layouts if you need different treatments! I must confess to not really understanding the avoidance of doing so, expressed above, or trying to do multiple treatments with one single layout. You aren’t charged extra by how many you use. Might as well make as many variations as you need.
Most of our stock Formats in fact have multiple Layouts for precisely the conditions you describe wanting:
One with just the numbering (and sometimes a generic prefix like the word “Chapter”).
One with the above, but the item’s Title added, usually on a second line.
One that consists of just the Title, and no numbering
So they are already there, might as well have an “Unnamed Chapter” section type, for example, and assign it to the first kind of heading, listed above, while “Named Chapters” use the second layout.
That all said, yeah I would leave unnamed elements without titles (it’s a handy trick for sections of text as well, as some might want headings while others are just meant to print as continuous text). In version 1 that was a little awkward to do because you would get this gap in the outline with nothing but an icon, and if you had a lot of those it was a guessing game as to what you’d click on. But in v3 it’s almost a natural state for something to be without a title.