My project had grown to ~250MB, which seemed excessive. The only way I could find to identify the culprits was to trawl the .scriv folder with a utility (Agent Ransack; and no, I can’t bear to use Windows Explorer’s search), which turns up various content.rtf files in folders with coded names. (Ditto with e.g. .mht)
Then to find the file in Scrivener, I have to open each rtf, look for unique text and then search in Scrivener.
I did find the item (an image) in the research folder that had turned into 193MB of RTF (!), so it was worthwhile, but is there a quicker and easier way to list files by size?
And/or, is there a way to reduce image sizes? Rescale image only seems to affect presentation.
I’m not aware of a list of images containing their file size inside Scrivener. I think the best way is to peruse the documents in de Binder to identify those with images and replace the larger ones with lower resolution versions.
You may consider using Linked Images or <$img> placeholders for your images instead of dragging them into the Editor.
This will help you find big files. Then knowing that, you can view the files found and see what files they correspond to in Scrivener. Don’t edit the Scrivener files outside of Scrivener, though.
As suggested by @AntoniDol I tend to use LinkedImage placeholders and I ensure using graphics tools that the size of the image files are as small as possible given the target publication location.
I always put all my image files in one folder or group of folders so easy to find. when you open a folder in explorer you can sort files by size. If size is not listed right clicking on column bar with the file name will allow you to add options such as date modified and size. Ordering by size will allow you to choose images to resize and reduce project size. However, images which can greatly increase project size will not impact text search. If want more organization, use collections with set search criteria to help organize a large project.
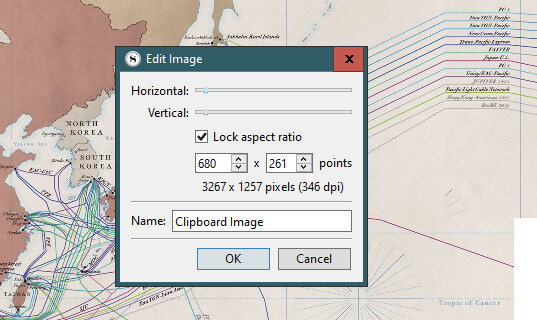
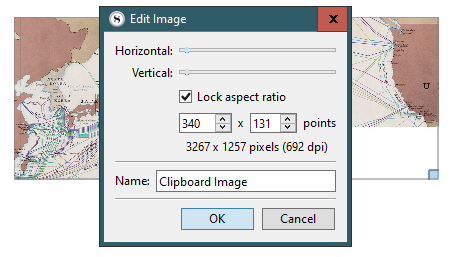
I second the advice to make sure your graphics are of an appropriate size in an image editor. As you noted, Scrivener only changes the display size, and it does so by adjusting the print dimensions in the image metadata itself, or what we could think of as the DPI setting. For most things you will never need more than 300 DPI, and that is considered a “more than enough” maximum, in that you’d generally only see images actually using all of that in a high quality coffee table book. From your second screenshot, where the image is scaled to display at a point that would fit on an average page, you’ve got almost 700 DPI, well more than twice of anything you’d ever need. And that means wasted pixels, which translates directly to an image being way larger (in terms of disk space) than it needs to be.
By all means keep the high resolution stuff available, because once you downsize an image you never want to make it larger again, but for what goes into a document, or Scrivener in this case, you want something that fits the output.
This thread may also be helpful: 477 page document is 52MB, can I get this size down?. In this post I describe how one can go about fixing their images, and by doing so, convert to a more flexible and easy to maintain workflow.
In short I can’t offer any advice to make what you have currently any easier to manage, than that. It sounds like you’ve already figured out what it takes to do this when you’re working with embedded images. It’s a pain, and Scrivener offers no tools to make it any less painless. You do have to use the file system and third-party tools, and that does mean a lot of awkward back-referencing and differentiating between RTF files with lots of small images vs RTF files with one or two massive ones.
So more in the interest of going forward: there are mainly four different ways to include images in compiled output, each with their own particulars:
Embedded: it’s simple, you just drag stuff into the editor and it is there. It has significant downsides though, many of which you’ve encountered:
You are trusting the “host” to manage your graphics correctly from input to output, and you shouldn’t. Graphics formats may change, compression may happen, resampling might happen, colour profiles may get damaged or lost, etc. Need CMYK? Forget about it. You are limited by what the host supports, which often means no SVG, no EPS, maybe no TIFF and other standard design formats.
Editing the image is a bother. You have to right-click and save it to the disk somewhere, edit it, delete the copy in the editor and then insert the update in its place.
Large scale changes of necessity (say your designer gets back with you and asks for all of the images 300 DPI) compound the above problem multiplied by however many images you have.
Storing graphics in a text file is inherently inefficient because the “code” of the image must be converted to text (Base64). Everything being larger than it needs to be means you run into efficiency caps earlier.
Tangentially, massive RTF files are slower to work with, and image corruption can mean troublesome recovery diagnostics.
Linked to the disk: using the Insert ▸ Image Linked to File... menu command, the result is a simple and short directive in the text file that points to that location. While you see the image represented as a graphic, none of its bulk is actually in the file, keeping it swift and easy to back up.
If the image on the disk moves or has its file name changed, the link breaks and you have to restore it, or fix the file system.
On the plus side, having all of your core graphics available on the disk directly means being able to solve problems just like this one, so much easier. You sort your image folder by size, and you’re done. You know which images are bloated and can fix them right then and there with an image editor.
Linked images are also advantageous if you need multiple versions of each image depending upon the output. You might need black and white for print, or colour and slightly lower res for ePub.
Since images are all kept outside of the project, it keeps your total project size down, way down, meaning frequent backups of only your text is more feasible. More backups is always a big plus!
Linked to the binder: fundamentally this is very similar to the previous method, only instead of locating a file on the disk, you drop the image into the binder somewhere, and use Insert ▸ Image Linked to Document, or even just drag the image from the binder into the editor, to create a link to it.
With Scrivener managing the content, this negates the one big negative of linking in general. Renaming the image in the binder or moving it into another area will not break the link.
With images on the disk you can readily edit them with a graphics editor, or even run batch operations to clean them up and get them sized in an optimal fashion. With binder linked images you can only open them one by one, and they’ll all have a generic “content.jpg” name.
But that said, it’s still a whole lot easier to hit the shortcut to open an image in an external editor and be done with it, over the whole export-edit-delete-insert routine with embedded images.
Of course with the image actually still stored in the project, it also negates the frequent backup bit, but if your total image payload isn’t massive that can be okay.
There is an interesting combination of features that can combat that however. If the image is imported as a shortcut or alias, then it isn’t actually stored in the project, but is referred to in a way that is more resiliant to file system changes than a text path. You’re linking to a link to a file.
Image placeholders: these can work like either linked to disk or link to binder images. The placeholder syntax allows you to either point to the images path on your drive, or to a binder name. They uniquely also allow you to provide a separate size directive to ebook output from print.
You don’t get a thumbnail, which for some can be a big downside. I’d count myself among them, I really like having a figure to write around, it helps me compose better than just staring at a code. Yeah I can open the image in another split or Quick Ref, or another program entirely, but that’s more juggling than just staring at it in the context it is meant to be within.
On the other hand, placeholders are text, which means they can be manipulated by things that manipulate text, unlike all other image tools. Recall the example of the folder name changing and breaking your image links? Not a problem if you can run a global search and replace to fix all of the old paths to the new path.
By extension, text can be manipulate by Replacements when you compile. Shorthand can be used to refer to full paths, reducing the need for particular management of them in the placeholder, and keeping them more readable. You can also more easily swap out images for purposes, if “image_name.jpg” can turn into “image_name-pdf.jpg” or “image_name-epub.jpg” depending on your compile format.
For some, typing is easier than messing with menus and commands. Those that like Markdown-type writing styles may find working with image placeholders to be equally convenient and preferable. (And of course, those actually writing using Markdown can and should use its native syntax for image referencing, though Scrivener’s Markdown integration includes compatibility with all of the above techniques.)
Thank for the details options: I haven’t examined them all yet but will work through it carefully.
(I did try insert Image Linked to File, but then found what whilst I could zoom in I couldn’t also scroll sideways to see the enlarged details - it’s OK that it lives as an external file )
Amber that was a fantastic explanation on images and I copied it to my compile learning folder on my scrivener learning project. This would be great for a blog post due to the level of the detail.
While I do agree that you should avoid trying to make a small image larger after you have downsized it. You should always keep a master copy in case you want to make changes later.
But if you deleted the original image and you need to enlarge a downsized image this is what you do. In something like PhotoShop increase the DPI for the image by a significant margin then expand to the size you want making sure that it is crisp because of all those extra dpi that you added to the resolution. Of course the file will now be huge. But then what you do is take a screen shot of your new larger, but still crisp, image. The screen shot will retain the clarity of the image but reduce the file size. You can now use this larger image as an original and make sure you archive it.
But, it is best to always keep an archive of your original images in order to avoid such digital slight of hand.
For all raster formats, when you downsize, you discard information. Simply increasing the DPI doesn’t bring that missing information back – it changes the display ratio.
If I have a 850x1100 pixel image at 100 DPI, it will display at a size of 8.5"x11". If I have it at 200 DPI, it doesn’t change the number of pixels (amount of information) there, it simply packs them more closely together – the same image now displays at 4.25"x5.5". But the image is still the same size – I haven’t increased the number of pixels or the size of the file.
If your trick actually works, it’s because you still had a sufficient number of pixels left in your downsized file to look good at a different DPI.
Enlarging the pixels is a technique I use now and then to increase the raster size of software screenshots. However I just increase the raster in the original image with the interpolation setting off. With crisp stuff like software, that tends to have a lot of rectangles in it, things usually upscale much more nicely than curves and details.
Now what is truly annoying is that more vector formats are not widely supported in these environments. Stuff like the illustration in your original post really honestly shouldn’t be a raster! But we’re forced into that because SVG and even PDF don’t embed well through word processor workflows.
But I digress.
Yes, always keep originals. I’ve been burned more times than I would care to admit, by thinking “I’ll never need the layers on this one in the future.”
I notice that it’s not crisp or clear the way my original headshot is.You’re using interpolation algorithms to try to fill in this missing data. Depending on the image, that may be acceptable — but it’s not the same as having the original data there to begin with.
Save the high-quality originals, make copies to resize down. I’m not a graphic artist but this is the same thing every graphic artists/designer that I have ever known or worked with over the years says. Interpolation is last-resort.
I am comparing your final product with the smaller image you started with. Your upsizing technique uses interpolation algorithms to try to smooth out and fill in the missing data (last I knew Photoshop allows you to choose between several depending on the nature of the image that you are using, because some work better than others in various circumstances). The final effect of your upsizing is extremely blurry and not at all clear or crisp – as is expected from that radical of an upsize.
When you downsize a picture like I did with my profile pic, you lose data/bits out of the file (even when using a non-lossy format as compared to a lossy compression format like JPG.) There’s no editing program that can magically bring them back when you upsize, not even Photoshop. It has to try to guess – to interpolate – the values of the missing pixels based on the values of the surrounding pixels, usually by performing some sort of averaging or blending. As a result, you lose sharp edges and clear definition when you upsize. The more radical the upsize, the more noticeably off the results of the interpolation will be.
Comparing your final result with my original 1000x1000 PNG image – it’s very clear to see. Even my profile pic at its normal size is more crisp and clear than your upsized result.
This is first year graphics designer information. There’s no such thing as a free lunch, not even with photographic data.
In that example I increased the size 10X significantly more than the OP.
And you ignored the 2nd heavily pixilated image. You didn’t say anything about that.
Nor was I going to invest a lot of time on it.
I don’t have the newest version of PS still using CS6. But latest versions have new built-in technology as explained in this video that claims to be able to improve low quality images.
 )
)