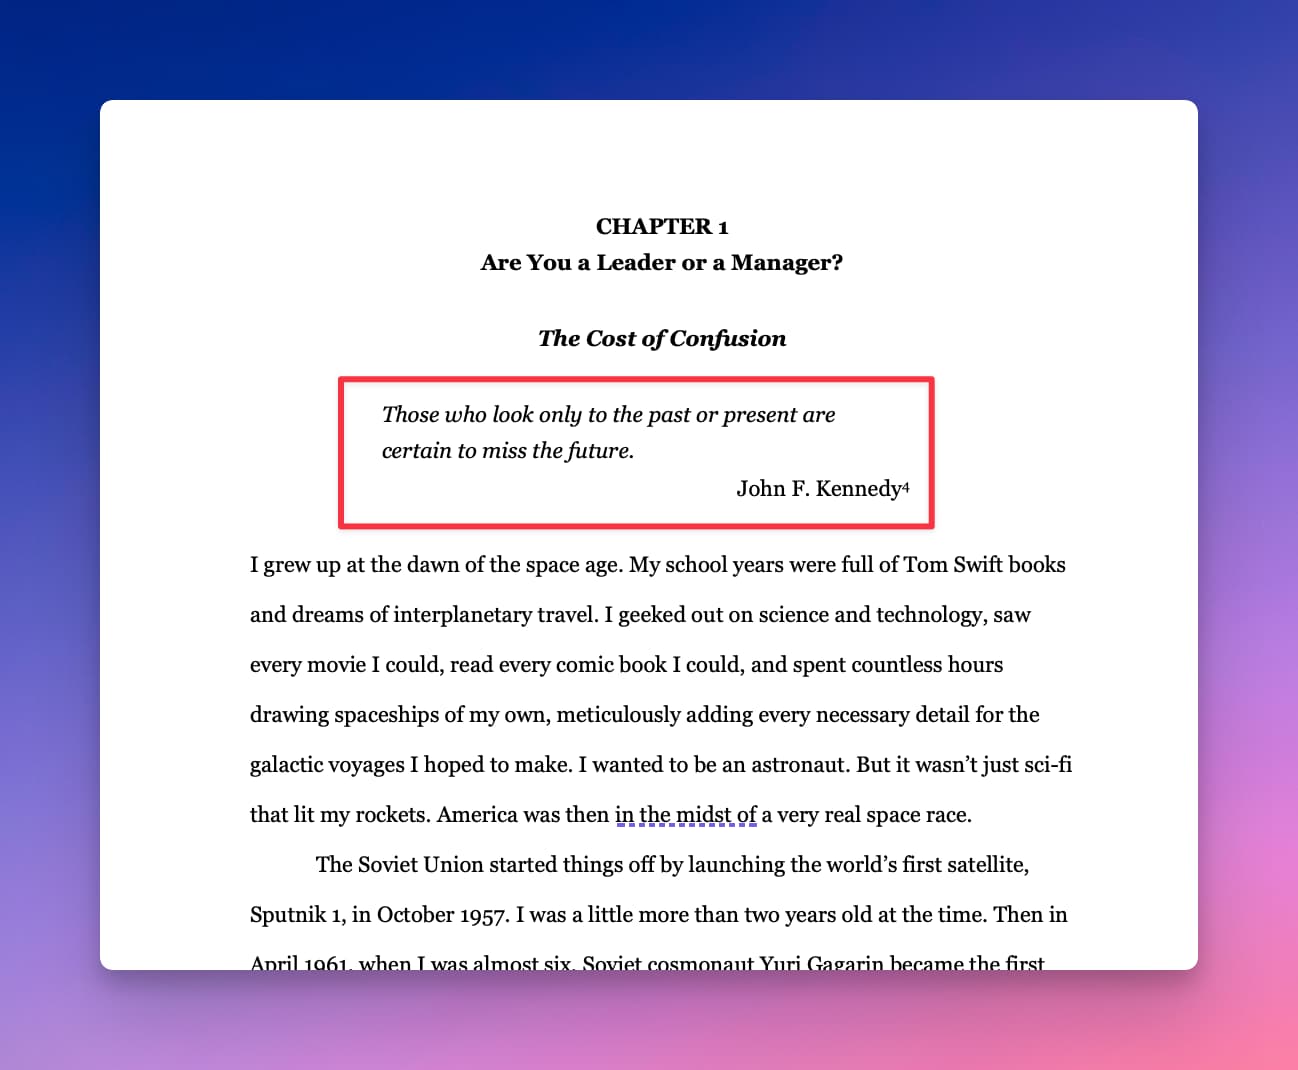
I typically include an epigraph (a quote with attribution) below the chapter title. How can I do this in Scrivener, such that it’s formatted correctly in manuscripts, print copies, and ebooks? Here’s what the manuscript looks like. The part inside the red box is the epigraph.
I’d use styles.
One for the epigraph, one for the attribution.
Styles are not reformatted at compile. Unless you tell the compile format to.
Otherwise, there is a “Preserve formatting” function in the Format menu. That is a selective compile as-is function.
I prefer styles, as they offer the possibility to reformat all of these at once, should you eventually wish to.
2 Likes
There are many ways (e.g. what Vincent suggested). I put them in a separate text files. Basically the first ones in a chapter folder, assigned to my custom section type “Epigraph”. No styles or other formatting in the editor, but my compile formats handle that later.
4 Likes
As for the box itself (in case it is not just so we clearly see what you meant) there is no way to have that at compile. (Or at least that I know of. Not using LaTex and whatnot.)
Other than using a single cell table in the editor, Scrivener to my knowledge doesn’t handle stuff like that.
1 Like
Depends on the output format and if that’s the final stage or just a preparation for further modifications. It’s simple if you go the Markdown, HTML, etc. route (and most likely that’s true for Latex, too).
For instance, you can edit the section layouts and automatically add a prefix and suffix, like “<redbox>” (or something actually useful) and out comes:
<redbox>Excepteur sint occaecat cupidatat non proident, sunt in culpa qui officia deserunt mollit anim id est laborum.</redbox>
3 Likes
I feel I should add that those two approaches perfectly work together. You can use the default Blockquote and Attribution styles “for the look” and still shuffle around all the scenes or sections below your epigraph (since it’s not part of other texts).
1 Like
Sorry, my bad. That red box was just a screenshot annotation to highlight the epigraph. Thanks.
I kind of like this approach. Do you have the compile format handle both the epigraph and the attribution?
I’m taking this approach, but I’m stuck. How do I toggle this off in the Compiler so that I can configure how I want the epigraph to appear in various documents?
If you want to change up the formatting of them per section, then “As-Is” is exactly what you want, as that lets you control the formatting from the editor. Turning that off would mean forcing all of them to have uniform look. Typically that’s what you would want, but in this case you would want to pass-thru editor formatting.
Also, if you’re using styles, you’ll probably need more than one pair. Depends on what you need here, whether there will be 25 different variations (probably no styles in that case, just freeform it) or if there will be two or three you could have a set of styles for them so the formatting of these can be more easily managed centrally.
2 Likes
How can I turn that off? I’d like to experiment with having the compiler do the formatting. Thanks for your response.
That implies one binder document per formatting.
Not sure that it’s a great idea. You’ll clutter your binder with otherwise unnecessary files.
My two cents.
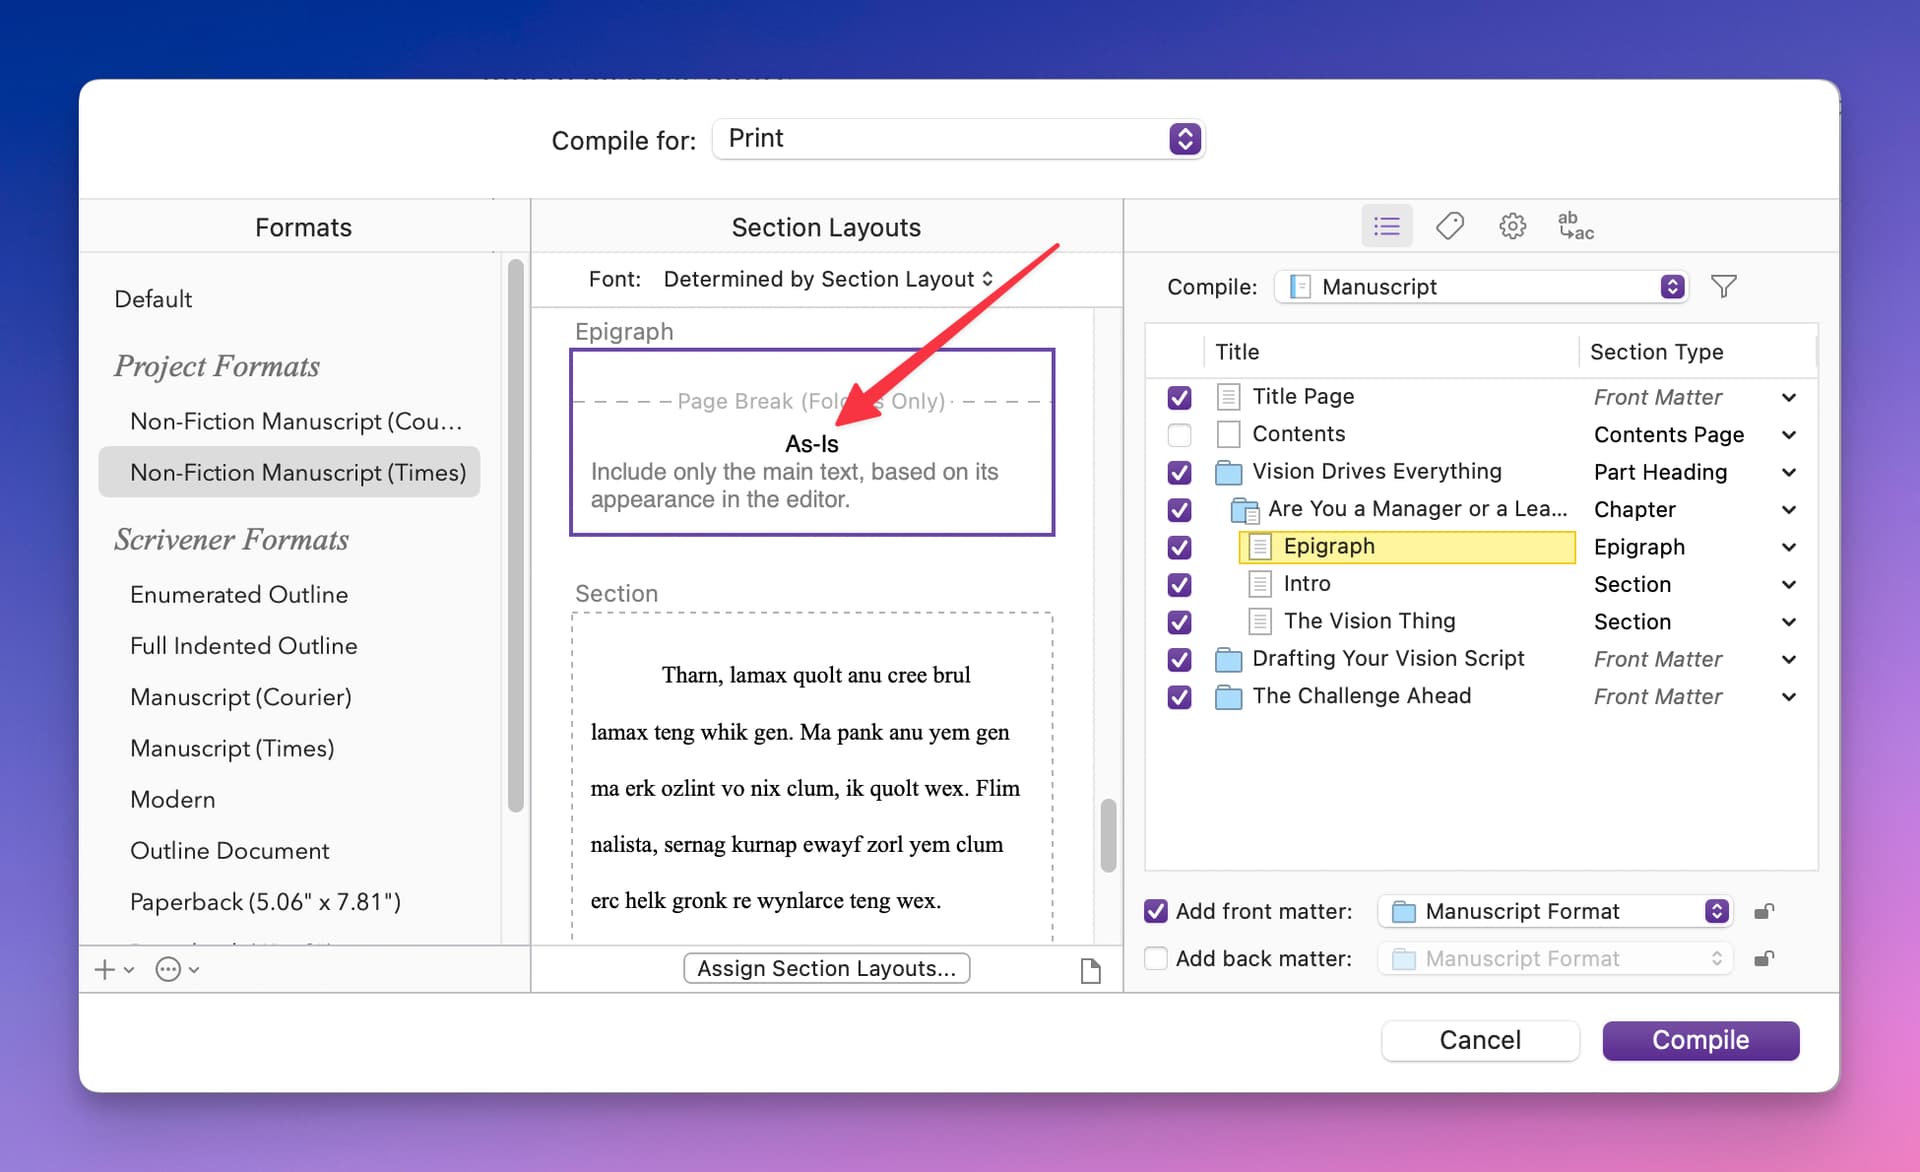
Double-click on the preview tile itself to open the compile format designer window, and that will take you to the Section Layouts area, with the Epigraph layout selected.
At the bottom of this pane, below the formatting area, you’ll see a checkbox to override the formatting for this layout. Once you tick that, the sample text will light up, and you can put your cursor in there and use the formatting tools to change the font, paragraph indent settings, etc.
Forgive me, but where is the “preview tile.” I can’t find the checkbox to override the formatting. (It’s probably starring me right on the face!)
It’s the thing you’ve got a big red arrow pointing at in your screenshot. ![]() If you hover over it you’ll also see a little pencil icon appear in the top-right corner of the tile. You can click that to edit as well, double-clicking is just a more direct approach.
If you hover over it you’ll also see a little pencil icon appear in the top-right corner of the tile. You can click that to edit as well, double-clicking is just a more direct approach.
That’s what I initially thought. When I double-click on that, nothing happens. Also, there’s no pencil icon like there are for the other tiles.
Oh! I see, you’ve assigned the stock “as-is” setting that isn’t a real layout that can be edited, but just a fallback setting that is always available. You’ll need to create a new Section Layout in that case:
-
Double-click the “Non-Fiction Manuscript (Times)” format in the left sidebar to edit it.
-
Now you’ll see the window I was referring to before. Make sure “Section Layouts” is selected in the left sidebar. You’ll see a list of all the layouts this format provides that you can scroll through.
-
For your purpose in testing here, I would suggest scrolling to the bottom and selecting “Section Text” as a place to start from. Click the
+button, in the top-right corner of the layout list to duplicate it. Call it “Epigraph”.Now in this case the text is already being overridden, as you can see by the Override text and notes formatting checkbox at the bottom. But you probably don’t want the typical double-spaced look, so click into the sample text and make whatever changes you wish.
-
There is one other thing we should change while we’re here. This “Section Text” layout that you copied from is intended for sections of text, like scenes. It will insert scene break markers where you probably don’t want them. So to fix that, click on the Separators pane in the left sidebar.
-
The new “Epigraph” section should be selected for you, but if not, just pick it from the list of layouts in this pane. Set all of the separator types to “Single Return”, and clear the text in the Blank line separator field.
That should be good enough to start with, save your settings, then make sure to click the Assign Section Layouts... button below the preview area, and assign your epigraph section type to this new layout instead of the stock “as-is” layout.
If you want to revert back to how you were doing things before, you can just assign it back to “As-Is”—or you can edit the new “Epigraph” layout and disable the formatting override checkbox.
Thank you for taking the time to provide detailed instructions. That worked! I now have it working. Thanks again.
1 Like
Here’s an example.