How to set up prologue, interlude, and epilogue in novel with parts?

Hello!

I’m brand-new to Scrivener after 2 decades (yes, decades) of using yWriter. One of my big motivations to switching to Scrivener was because it has a better compiler than yWriter, as well as a way to insert chapter titles and epigraphs. Overall, it sounded like it would be far easier to compile manuscripts/ebooks that I could send to beta readers using Scrivener.

I’m having a hard time figuring out how to set it up and get it to compile correctly, though, and I want to make sure I understand what the structure needs to be before I start copying my 160,000-word manuscript over into Scrivener!

My novel is structured like this:

Prologue

Part 1

  • chapters in part 1

Interlude

Part 2

  • chapters in part 2

Epilogue

I couldn’t figure out how to insert a screenshot, so the idea is that the Prologue, Interlude, and Epilogue are all at the same folder level as Parts 1 and 2, with the chapters nested inside Parts 1 and 2.

When I compile it to a .docx file, I run into a couple of issues.

First, there doesn’t seem to be a way to title Parts 1 and 2. Even when I try adding a title to the area above the dashed line in the Scrivenings view (no idea what that area is called, I just know that I can put chapter titles and epigraphs in there), it just doesn’t show up anywhere in the compiled document. I’d also like to have the titles for Parts 1 and 2 to be on their own title page, followed by a blank page, and then the first chapter of the part starting on the next page, but I can’t figure that out, either. I tried adding a text document inside the Part 1 folder, at the same level as the first chapter folder, but instead of appearing before Chapter 1, it randomly showed up as text within Chapter 2.

The second issue is that when I compile the document, the chapter headings are ending up duplicated. So it will say “Chapter 1” and then on a line beneath that, “Chapter,” even though I have not added anything that says “Chapter.” And the chapter titles and epigraphs show up, but they aren’t properly centered.

I hope these descriptions make sense. If I figure out how to add screenshots, I’ll do so in a reply!
1 Like

Hi

It doesn’t really matter. You don’t have to have the structure perfect (or even remotely perfect). It is not rigid and can be modified at will at any time.

In the binder.

The rest of your first set of issues are settings in the compile format.
Search the manual for “compile format designer”. That’s where you’ll find everything you need to know.

Yes, expected, if you typed them in the editor. Again, you can turn off the occurence that comes from the name in the binder in the compile format. Ideally : don’t type the title in the editor.

Hmm. The line below? Are you sure? Else, expected, as I said.
Could be because of this :

You’d have typed the title at the bottom of the previous document. There is no such zone above the dashed line.

. . . . . . . . . . . .

Again : compile format.

The compile formats are what you see listed on the left side of the compile panel.
If you double click any of them (then say yes to duplicate and edit), you’ll see what’s inside. But read at the very least about this in the manual. There is a lot in there.

Hope this helps.

. . . . . . . . .

P.S. If you are almost done with your project (in yWriter), then now is probably not the best time to migrate to Scrivener (mostly intended for content development). I’d personally wait 'til next project.
If at this point it is only a matter of general formatting, you can tweak it all in LibreOffice – which happens to be free, so nothing lost.

2 Likes

So when I say “the space above the dashed lines,” I mean that I have been creating the chapter titles the way it’s outlined in this YouTube video.

That seems to be working… mostly, other than the title and epigraph end up weirdly off-center. And it doesn’t seem to work to title Parts 1 and 2 the same way.

(I tried adding screenshots but it says I can’t do that yet because my account is new)

Also I’m trying to figure out how to structure a novel like this because this isn’t the only book I want structured this way, and I’d rather figure out how to do it now in a mostly-empty project so I can set up new projects the right way, rather than wrangling with them at the time I’m trying to compile them.

1 Like

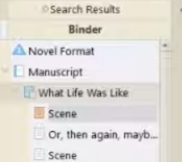
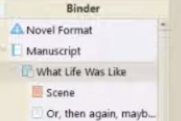
Look at the binder when she clicks above (then a few seconds later, below) the dashed line. Yes, I was right, you typed your title in the previous document. Which happens to be the parent folder, in the video. [Folders are documents too, you can type in them just the same.]

Here :

You’ll see the selection changes.

At compile, that title will still be at the bottom of the previous document. Doubled by the real title –the one that the compiler pulls from the binder–, now just below.

(In the video she first has a title in there, before she types something else. It is not by the book. It is not optimal to type a title in the editor. You shouldn’t. If you want to see the titles in the editor, use View / Text Editing / Show Titles in Scrivenings. Titles go in the binder – much preferably.)

If you typed them above the dashed line (or below, for that matter), they are not titles for Scrivener, but simple body text. You can make them big and bold, it makes no difference – unless you use a style. But I’m not getting there at this point.

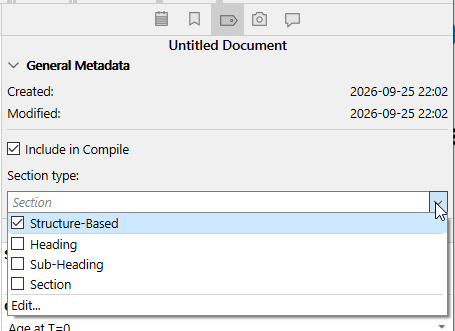
Section types. Your next read in the manual. Your different divisions/elements in the binder are in your case likely assigned to a different section type and section layout (formatting).
This you can easily see in the inspector (right panel, next to the editor) in the metadata tab.


Set the ones you don’t like to the same section type as the ones you like for now.
Mine is set to Structure-Based but says “Section” in gray. That’s as per the binder structure. Look to see which section type the documents that you like say, and set the other ones to that. We’ll tweak it properly later. You already have a lot on your plate.

Fair enough.

2 Likes

For a basic setup like you are describing, you might as well check out one of our example projects that does exactly what you’re looking to do, the “Novel (with Parts)” template. Make a throw-away copy somewhere to play with maybe, and use its examples to set up your main project.

In these templates, folder names, for both parts and chapters, are by default meant purely for your internal use. They won’t print, as the compiler is set up to use generic, automatically numbered titling. You can change that so they print the folder title as well as the numbering, very easily, so if that is what you prefer, name them how you would want the reader to see them. Also have a look at the help file at the top of the template, and in particular the subsection, Working with chapters instead of scenes, which describes a few adjustments you can make to adopt a popular approach for those that don’t write “complex” enough chapters to require additional outlining into individual scenes. You can use one single simple text entry for each chapter if you prefer.

You then also might as well benefit from the years of existing discussion on this: here is a list of discussions on the matter of adding prologues and such that I’ve gathered. The first link in particular describes how our templates already do what you want, but then goes into detail on why it works that way, which I recommend going through since it sounds like you want to learn this stuff.

2 Likes

Thank you!

I am using the “Novel with Parts” template, with separate parts for the prologue, interlude, and epilogue.

I’m a bit confused regarding what you said about the folder names. My understanding was that folders titled “Part” and “Chapter” and set to their respective Section Types (“Part Heading” and “Chapter Heading”) would automatically number as “Part One” and “Chapter One” etc., which it does seem to be doing when I compile. But the formatting ends up all weird, and it throws in an extra “Chapter” on a separate line. I still can’t insert a screenshot, but this is kinda what it looks like:

Chapter One

Chapter

Title/Epigraph

The second line shouldn’t be there and isn’t found anywhere in the document, and I can’t figure out why it keeps appearing.

I also can’t get my titles for the parts to show up in the compiled document, so I don’t understand where I’m supposed to put them. When I compile, I just get a standalone page that says “Part One,” but doesn’t have the title/epigraph for Part 1, even though I put the title/epigraph into the Part 1 document/folder.

What is the name of your binder element that is in place for a chapter?

If the name in the binder is “Chapter”, that’s where your extra “Chapter” comes from.
If you’d give it a name “The hollow castle”, you’d get :
Chapter One
The hollow castle

Can you please tell us which compile format you are compiling with ?

[FYI : If @AmberV says something that seems to not quite go along what I am saying, go with what AmberV is saying.]

1 Like

Hi! Sorry, I missed this reply until just now.

Ooooh, yes, the binder elements are titled “Chapter.” I thought you had to title it “Chapter” in order for it to auto-number them as “Chapter One,” “Chapter Two,” etc.? Or does it understand that they are chapters because I set the Section Type to “Chapter Heading”? (And what happens if I don’t set it to “Chapter Heading” and just leave it on “Structure Based”?)

The compile format I was using for both the Parts and Chapter folders is the one called “chapter with title.” It worked to insert the chapter titles, but not the part titles, for some reason.

Yes. It doesn’t understand anything :wink: but this section type leads to a section layout that has the “Chapter + <$n> (autonumbering)” waiting to number something. And it did.
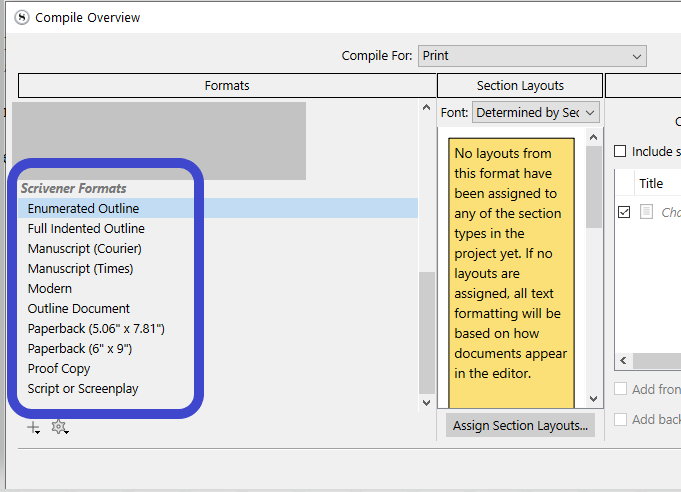
A compile format is one of these :

Section types would then be automatically assigned as per the level of the document, in the binder. It is the same, but you don’t have to do it manually, should your structure be tidy and clean.
In your case, you use a template, you shouldn’t have to change them, for as long as you use them documents/folders for what the template has them intended for.

As a matter of fact, I just checked, and the novel with parts already has the binder elements set to Structure-Based.
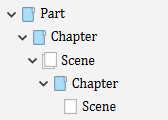
Just don’t do something like this :

:wink:

2 Likes

Okay cool! Re: the compile format, I was using “Manuscript (Times)” and compiling to a .docx file.

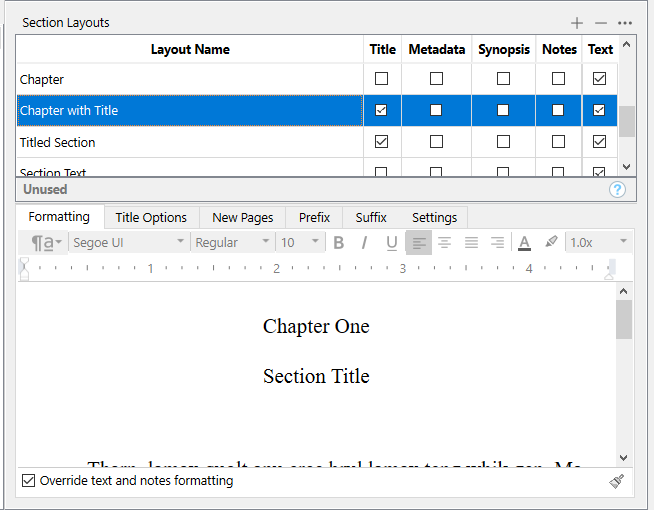
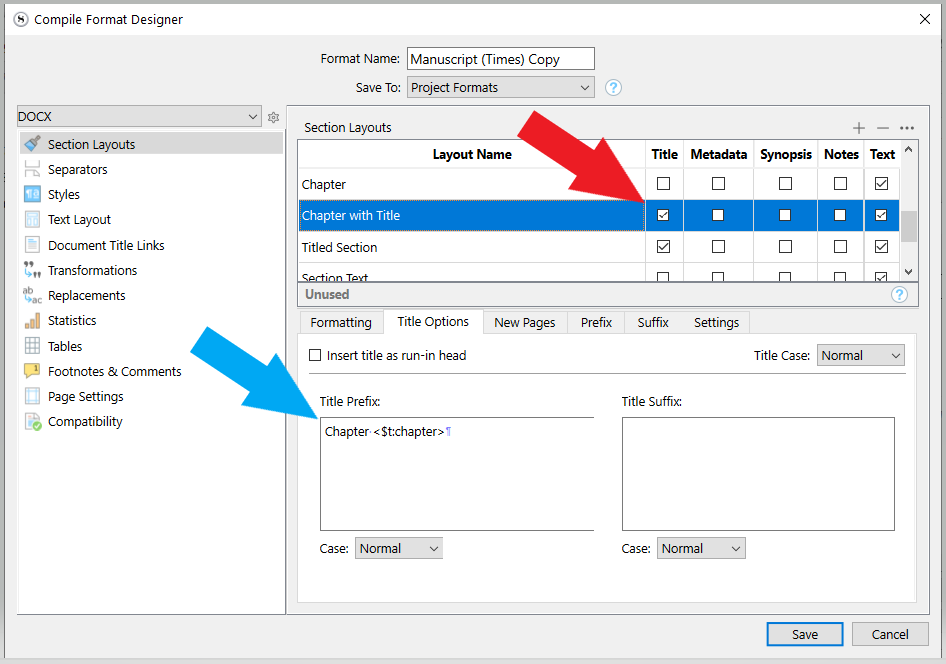
Your “Chapter One” comes from the title prefix (blue arrow), where there is the autonumbering placeholder too.

Your second “Chapter” comes from the red arrow, the title of the document in the binder.

(My arrow is red so that it stands out. Not to say that you should uncheck this.)

Here, the snapshot just above, is what I meant when I said

“Section Title” is just there to show you where the name in the binder will end up and how it’ll be formatted.

So, that’s where all the post writing formatting happens. (Not that you necessarily got to dive in this subdimension of the app right away…)
(But if you want to explore, this is the inside of a compile format. You access it by double-clicking the compile format and clicking Duplicate & Edit, if prompted. That’s a safety. So you can destroy it all you want, you’ll always have the original to start over.)

1 Like