I have been using Scratchpad 2 for a few days and was very happy. All of a sudden I can no longer paste into documents, neither from the system clipboard nor from a clipboard manager like Paste’em. I can still drag and drop text/images into documents. The problem
The problem is unique to that project, not others.
I tried closing / re-opening the Scratchpad 2 project, quitting and restarting Scrivener, quitting Paste’em, rebooting my computer, but the problem persists.
So I simply closed the Scratchpad 2 project and have come back to the old Scratchpad
I don’t feel like reinstalling Scrivener and resetting all the pref parameters.
In this forum I notice one instance where it is described but with the Windows version.
thank you
I can’t think of what might cause that; although contorted by settings, it’s really just a normal project window.
The standard troubleshooting I’d run is:
- Shut off all automation tools and shortcut accessibility utilities (BetterTouchTool, KM, etc.)
- If that doesn’t immediately solve the problem, try the various different paste commands: contextual menu, and from the main Edit menu. And while there, verify the shortcuts are in the right place.
- Run a safe boot cycle, check there, then reboot normally.
- If automation was the trigger, launch each one individually and test. Sometimes I’ve found these kinds of tools will glitch, and a simple restart of them is enough to get normal mouse/keyboard input back.
- Clear that project’s interface settings. You should have the layout saved at this point, so it’ll be a simple matter of getting back to where it was—if not, use the project template to create a fresh layout.
Reinstallation is the last thing I would try, and I don’t think resetting preferences would be necessary.
I hugely enjoy working in the Scratch Pad Project Template you created. It had a big impact on my workflow.
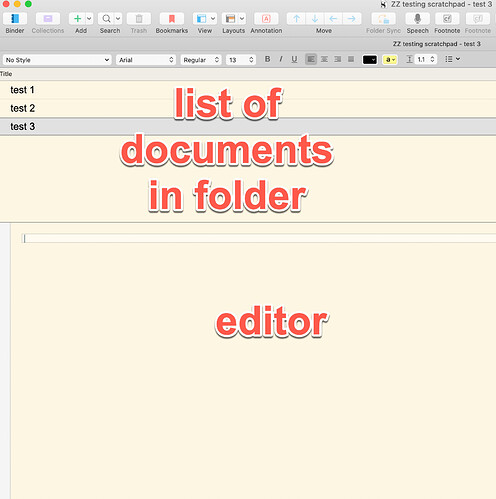
Just for my intellectual curiosity, I would like to better understand how you create the horizontal split with the list of document on the top and the editor on the bottom.
As you instructed, I removed all outliner columns, and set preferences to binder affects top editor only with the special exclusion set to open non-group items in “other”.
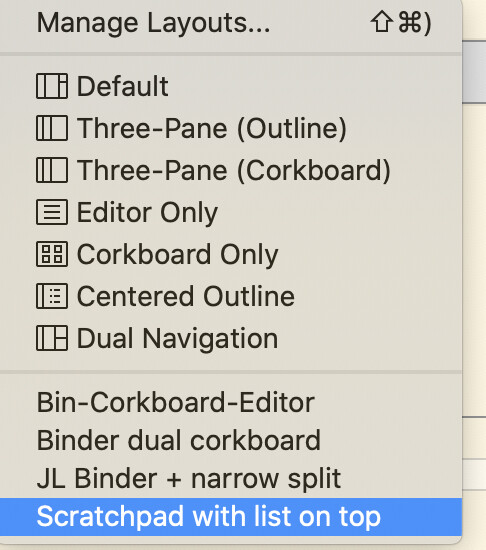
I understand that I can generate the split view by changing the layout to Scratchpad with list of top (which I do all the time), but I would like to know how I can manually create the split view with list on top to better understand the inner working of Scrivener and give me more flexibility in configuring my projects.
In other words, I would like to understand how to manually create the scratchpad with list of top layout myself (apart from the above which I understand)
thanks very much !
Do these steps in sequence:
1 - For the horizontal split:
If you have ever used a Scriv Layout with two editors divided by a vertical split, then this is the same thing, except divided by a horizontal split. I’m on Windows, so the Windows navigation to achieve a horizontal split is View > Editor Layout > Split Horizontally.
2 - For the list on top:
Click in the top editor. To select the Outliner, on Windows the navigation would be View > Outliner.
3 - For controlling the editor on the bottom:
Click in the top editor. To set the Outliner to control the bottom editor, on Windows the navigation would be Navigate > Outliner selection affects > Other editor
There are probably another three or four variations possible for achieving this layout. As these other methods would involve pressing Mac function keys of which I am ignorant, or clicking on buttons that may not be visible, I went with menu options. Hopefully the equivalent Mac navigations are easy for you to locate.
Best,
Jim
WOW ! a superb explanation. Everything is crystal clear. I could reproduce all your instructions on my Mac. I solved my problem and gave me the means to be more creative in setting up projects.
Thank you so much and have a nice weekend !!
Thanks, and I’m glad to hear that the project has been beneficial to you! I’ve been using a variation on that template as a global “everything I jot down” type tool for many years now. I periodically switch to a new fresh folder in the top list, which has the effect of “erasing everything”, but without actually doing so. I thus have years of scratch notes that are out of sight and mind, and really only of impact to the backup speed of the project.
Absolutely. I do the same. And the floating window is very useful to take notes.
I have a crazy question / comment for @AmberV and @JimRac @brookter @JimRac
The project above basically replaces my usual Scrivener native scratchpad. It’s IMO much more powerful and flexible.
I miss one small feature of the native Scratchpad.
The standard scratchpad that comes with Scrivener 3 is basically a set of RTF files in a folder.
I created multiple other folders, and using the Hazel app, I managed my documents with keywords. A simple keyword like #archive typed in any document (does not need to be the title) would be read by Hazel as it monitors all the Scratchpad RTF files and trigger in this case (just an example) a document move from the scratchpad folder to a folder called Scratchpad Archive. This is just one example using Hazel. There are many others, and this improved my speed and efficiency of workflow.
In a way the Hazel method is a small workaround the fact that Scrivener does not allow for scripting.
The problem with the ver. 2 Scratchpad is that the .scriv file is basically a package, not a series of files that I can monitor and manipulate with Hazel. Is there any way to access/manipulate the folder/document hierarchy inside the scriv files ?
In terms of workflow, all is fine thanks to your explanations.
I have one issue and would we grateful if you had any suggestion.
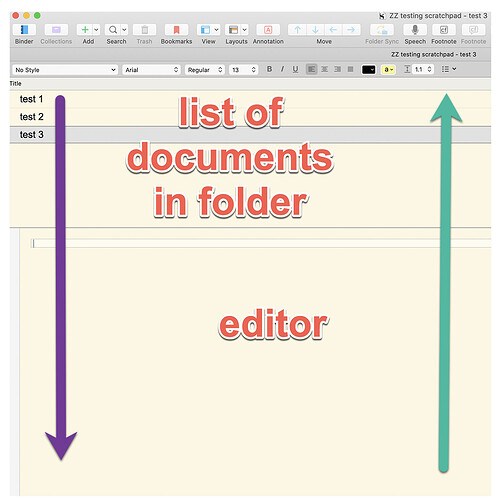
In terms of workflow, I find that I often navigate between the doc list on top and the editor the bottom. The issue is that the doc list amputates part of the editor real-estate.
When I am working on a more extensive text in the editor part, I would like the editor to occupy all the space (“turn off” the list of documents).
Conversely, when I am going through the list of docs, the list of often amputated by the editor which compels me to scroll down instead of simply choosing the right document at a glance.
The solution would be to create or understand the necessary keyboard shortcuts for a 3 way screen toggle:
- list of documents on top + editor on bottom
- list only (purple arrow)
- editor only (green arrow)
I thought that this would be simple (outliner mode on off, etc) but nothing really works. Every attempt generates its own series of secondary issues.
I would be grateful if you had any suggestions
thanks very much for your time and help
I’d say, given how Scrivener works with splits, there isn’t a terribly efficient way of doing that. When you split the editor it splits what you are currently working on, it does not restore whatever had been navigated to in the other split whenever it was last in use.
Plus, there is a bit of a bug (on the Mac) with the keyboard shortcuts in that when you close a split with them, it can end up swapping the internal split layout order. So when you reopen the split, the settings for the list half end up on the bottom, and the settings for the editor end up on the top. You can of course swap that in View ▸ Editor Layout, but at this point we’ve lost any advantage to using keyboard shortcuts, so it’s hardly worth mentioning.
Overall I’d just say it’s easier and less fussy to make the list as small as possible and move on. You could also clean up a lot of space if you don’t really need the Format Bar and Tab Bar on this window.
Here are some ideas to try. Navigation is for Windows Scriv, because that’s what I’m using. ![]()
1- Instead of using a horizontal split, use a vertical one. I prefer a vertical split because it maximizes space in both the Outliner and the Editor. To set up this layout, do the steps from my post above, but choose Editor Layout > Split Vertically.
If you want to keep the horizontal split, try positioning the divider so that the Outliner takes up most of the space, but you still see enough of the bottom editor pane to be useful to you. Then, when you want to do more extensive work in the editor, do one of the following:
2 - Launch the text in Composition Mode. (Click inside the editor. View > Composition Mode. )
3 - Launch the text in a Quick Reference panel. (Click inside the editor. Navigate > Open > as Quick Reference.) What’s really nice about this approach is you can work on multiple texts simultaneously, when that’s something you need to do.
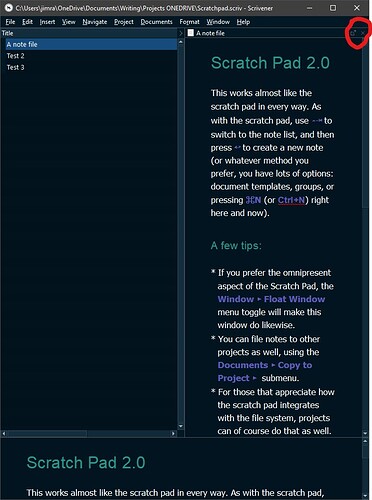
4 - Launch the text as a Copyholder. (Right-click the doc in the Outliner. Select Open > in Copyholder. ) This opens the text in a Copyholder, with a vertical split from the Outliner . See screenshot below. When you’re done with the text, to close the Copyholder click on the small ‘x’ in the upper right corner, circled below.
Or, if the titles of the docs are enough for you to recognize their contents, perhaps you don’t need to display the editor or the horizontal split at all. In this approach, you would only display the Outliner, giving you a basic table of contents.
To do this, you’d disable the split editors. Click in the Outliner and select one of the documents. View > Editor Layout > No Split. The horizontal split should disappear and you’ll only see the Outliner.
From this layout, if you want to review or edit a text, do one of the following:
5 - Launch the text in a Quick Reference panel. (Right-click the doc in the Outliner. Select Open > as Quick Reference.)
6 - Launch the text as a Copyholder. (Same steps as #4 above.)
Yes, it’s going to be a matter of experimenting with different options and see which works best for you. ![]() Key point is that the ideas above are not necessarily mutually exclusive. Use different techniques depending on what your use case is at the moment.
Key point is that the ideas above are not necessarily mutually exclusive. Use different techniques depending on what your use case is at the moment.
There are probably other methods I’ve missed, so don’t be afraid to try something else. The thing to remember is, even though this is a really minimalist layout, it’s still a Scrivener project, so you’ve got lots of viewing options available to you.
Hope you find something useful!
Best,
Jim
Sorry for the delay ! I was ruminating and testing all the options.
I have not found the idea solution.
If you change from horizontal to vertical split, you end up emulating … the binder on the left.
QRP and CopyHolder one problem is the loss of the formatting bar, and another is that they float over Scrivener windows only (not other apps).
Work only in outliner, then QRP or copyholder. I did not find it very practical.
So, I am continuing to search for the ideal solution.
I am extremely grateful for your detailed notes. Very kind of you.
I noticed that you didn’t mention Comp Mode, suggestion #2. But there’s no formatting bar in Comp mode, so maybe not of use to you.
There’s a setting in Windows Scriv that controls that. Window > Float Quick Reference panels. However, I’m not sure if Mac has it or how it works.
Thank you for your reply.
I both cases, the problem is that the objective is to have a scratchpad with all features of a project which would allow me to take notes floating over any app.
The Comp mode occupies the full screen which defeats the purpose.
I tried QRP panels, but contrary to the floating project (Window → Float), QRP only float over other Scrivener items, which defeats the purpose of note taking.
thanks very much !
QRP and CopyHolder one problem is the loss of the formatting bar, and another is that they float over Scrivener windows only (not other apps).
I know that this isn’t your primary issue, but the formatting bar is available in QR windows — you just use the same toggle that you would in the editor (cmd-shift-r), or from the menu (View > Text Editing > Show Format Bar). The panel is (as far as I can tell) a fully fledged editor, so you should be able to do everything there that you can in the main window (but obviously not things like splitting windows).
I don’t have a solution for the floating problem, sorry…
I will have a second look. Thanks very much
After a lot of testing, I think that floating QRP is a potential solution with the addition of a special windows management app (in my case keyboard maestro).
You can’t take notes in the QRP from another app (Chrome, etc) because the QRP window does not float over other app windows. Only over Scrivener windows.
So yes, QRP is a very good idea to extend the editor but only while you are working in the scratchpad itself.
Thank you both VERY much for your help !!
This is interesting and unfortunate. QRP windows do float over other app windows in Windows Scrivener, when Window > Float Quick Reference Panels is enabled.
I checked the Scrivener manuals for both Windows & Mac, and the section for the Float Quick Reference Panels feature describes how QRPs are supposed to work relative to Scrivener windows, but makes no mention of how they’re supposed to work relative to windows of other apps, so I don’t know if this is due to a bug or to a difference in the Windows & Mac implementations.
But it seems you’ve found a way to make it work, so that’s good news!
Best,
Jim
I just double checked and indeed in Mac OS Catalina, the QRP does not float above other apps.
Thanks again very much for your most instructive and didactic comments and all your research ! take care
Such an interesting and useful thread. I had stopped using the Scratchpad as I was one of the few who regularly suffered from that mysterious crash bug. The Scratchpad template put together by @AmberV is a fantastic (and better) replacement, and the subsequent discussion is opening my eyes to a lot of different ways of using Scrivener. Thanks all.
Funnily enough I originally created that template when the crash bug was really bad (it’s pretty rare now), as a workaround for those that liked the concept but could no longer safely use it.


