I want to print out the corkboard view so that I can see all the chapters and synopsis. How do I do this?
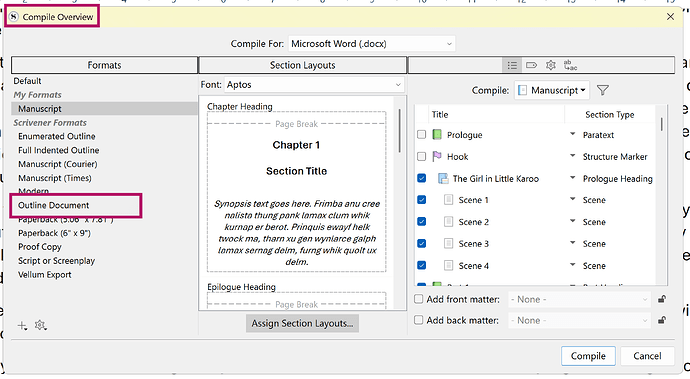
Looks like you want to compile and print an Outline. Choose one of the Outline Formats in the Scrivener Formats category in the left column of the Compile Overview window.
Click to Assign Layouts button at the bottom of the center column of the Compile Overview window.
Select the Layout you prefer for your chapters and scenes from the Previews, close the Assign window. Compile to DOCX and print from there…
Check the manual from the help menu: D.2.6 Outline Document.
Thanks for that, AntoniDol. I do want an outline. As I am new to Scrivener, would you break down the process a little more? ie. Where do I find the “Outline Formats” and “Compile Overview” windows?
Judith
FYI @AntoniDol has an outstanding book that you may wish to purchase that surely covers this. And there is the Scrivener Tutorial and Manual which also surely covers this.
Well, here’s one page of my upcoming book “Troubleshooting Scrivener” that explains it a little more:
Irritation #1 - How to compile only the outline?
How to compile only the outline?
The issue
You have written a manuscript, but want to compile an overview of the structure in the Binder. The outline should only contain the Title and the Synopsis of the Binder items.
The explanation
In the predefined Compile Formats, three Formats exist that compile numbered or titled Binder items, including a titled or untitled synopsis coming from the Inspector Synopsis field. Scrivener can also include the Notes field if you update the Section Layout.

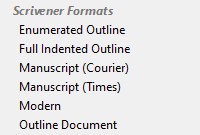
Figure 1.1.1 - In the Scrivener Formats category are some Formats for compiling Outlines.
The solution
-
Open the Compile Overview window. Choose [File > Compile] or click the [Compile] button on the Main Toolbar or press Ctrl/Cmd+Shift+E on your keyboard.
-
Choose one of the Outline Compile Formats from the Scrivener Formats category: “Enumerate Outline”, “Full Indented Outline”, or “Outline Document”.
-
Open the Assign Layouts to Types window by clicking the [Assign Section Layouts] button at the bottom of the center column of the Compile Overview window.
-
Make a selection of the possible Section Layouts for your Section Types.
-
Click [OK] to close the Assign Layouts to Types dialog.
-
Click [Compile] to compile an Outline of your manuscript.
Relevant Information
- Starting the Compile Format Designer allows you to adjust the Compile Format to your wishes if you want to.
- You can also print an outline including the Word Count via [File > Print Settings > Outlines].
Related trouble
- Cannot find the Compile Format Designer
Reference material
Mastering Scrivener section: 9.1 - Deep dive into Compile
Scrivener Manual section: 23.2.2 Built-In Formats
Compile Overview is the screen that opens when you click on Compile. There is a default Outline Document format among the included Scrivener Formats.
It is suggested that you familiarise yourself with the Interactive Tutorial available from the Help menu. It is a Scrivener walkthrough project that will teach you the basic of Scrivener.
Scrivener is not a one-size-fits-all app, so answering specific questions will lead to potential answers that will lead to more questions, promise. Therefore, it’s best to see what the best fit is for how you prefer to work yourself. You may find the Outline Document format suitable for your needs, who knows?
While compiling is useful if you want something a bit more custom, if you’re happy with the simple options given, the easiest way to do this is:
- Select the folder you want to print the contents of in the binder.
- Use the View ▸ Outline command.
- Press
Ctrl+P/⌘P.
You can print from the corkboard as well, but do note that creates index cards that are roughly sized correctly and can be cut out of the paper. Printing from an outline view will be more useful if you just want a summary.
The options you can adjust, such as what prints, and fonts, are all documented in the user manual in Chapter 26, Printing.
