<$rst_R> not working in Scrivener 3 for Windows

Hello:

I am probably not doing this the best way and that may be the root of the problem, but as I understand it, if I place <$rst_R> anywhere, the stream that uses large roman numerals (I, II, III, etc.) should reset. I have a book with multiple parts. I use the R stream to number those parts and the $n stream to number the chapters. I am new to version 3 of Scrivener. I have used version 1 for years. I am converting the automatically imported compile format I used in 1 and trying to make it work in 3. One problem I am having is that my “project” has multiple books in it–its a series. I want to compile just the first book and I want the title of the book included. I cannot seem to create a “new style” and instead am using the style for the book parts for the book title. All that works well, but because I am using the book part style, the book’s title gets numbered roman numeral I and then the first part get’s II. I want to avoid putting the actual book title on the first page of the project because it may change and I do not want to have to change it in multiple places. Instead, to reset the $R Stream I have <$rst_R> as the only text on the title page. Nonetheless, the first part of the book still gets PART II instead of PART I.

There’s probably a better way to accomplish what I am trying to do, but I find the whole compile thing to be quite complex, and I use to program regularly and used a LaTeX like editor to create my thesis back in the day. Any help is appreciated.
Hi

Use <$rst> and place it right before (no space) the <$R> you want resetted.

<$rst><$R>

(There are a few things as regard to auto-numbering that don’t quite work as they should in the Windows version. – I’d be surprised if <$rst_R> is one of them, though. But the reset placeholder is very capricious with named streams.)

. . . . . . . . . . . . . . .

BTW, the chapter numbering doesn’t come from a style.

It comes from the compile format. (It could come from a style, but you would have to have done it yourself, purposely. – And you’d know you’ve tweaked it so.)

In the compile format you compile with, you could create a layout to accommodate your title, without any numbering. (One should/might actually already exist, if you use a factory compile format.)

To see what is going on in a compile format, double click the one you are using, from the list on the left side of the compile panel. (Duplicate & edit if prompted to.)

Thank you for your response! I very much appreciate it. Unfortunately, replacing <$rst_R> with <$rst><$R> made matters a little worse. In addition to the original problem that I described, the title page also had the uppercase Roman numeral “II” printed just below the Title. I assume it translated the <$R> command as a request to place the Part number in roman numerals within the title page text and the <$rst> command was totally ignored.

BTW: Yes, I know the compile format is the source of the numbering. My problem is that I cannot seem to create a new style for “Book Heading”, using an unnumbered one, I can only choose from the list of styles that exist. I am kludging something together based on what was working and imported from version Scrivener 1 that worked but did not produce the output I wanted in Scrivener 3. The compile formats were difficult in Scrivener 1, but I am finding them impossible in Scrivener 3.

I think (perhaps) you confuse “styles” and “section layouts”.

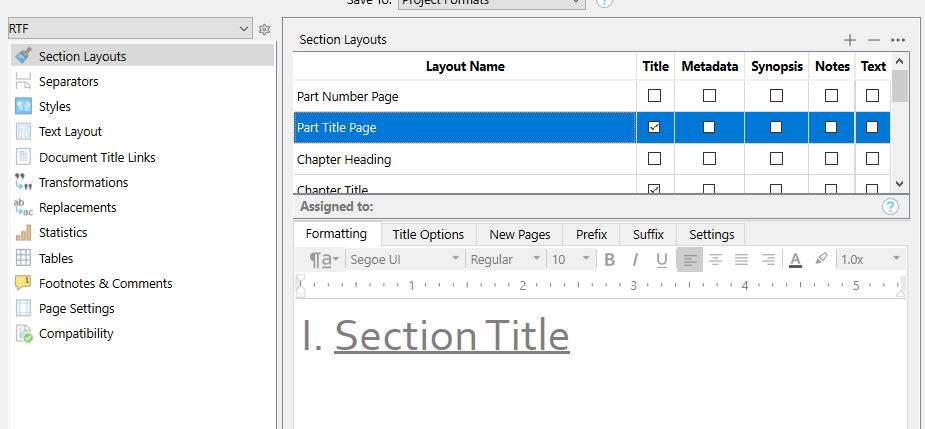
If this :


is what you call a “style”, lets set this straight right away : this is a section layout.

You can create one where your title won’t be numbered by clicking the “+” at the top right
image

→ There should already be one that is without a title prefix if you used a factory compile format as your starting point.

Then set your title as the document name in the binder, with nothing in the editor, patch that document through section type/section layout and format it in the compile format.

1 Like

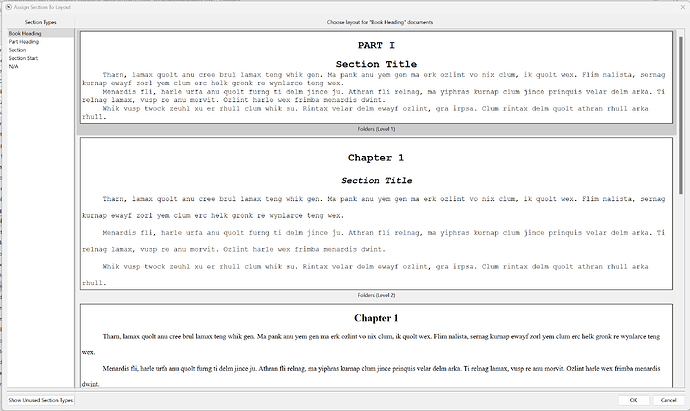
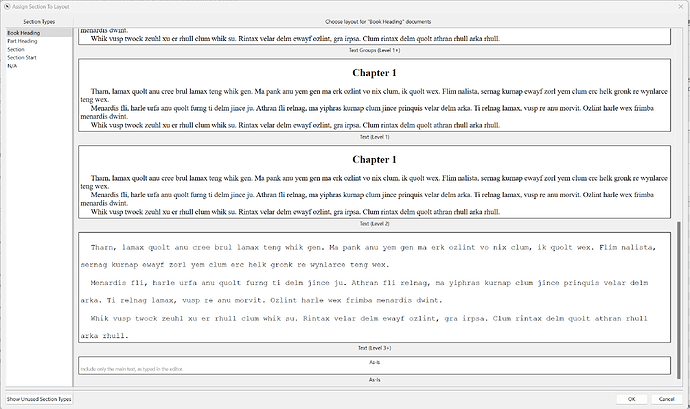
Following are screen shots of what I call “styles” and the choices I have, and what I wish to assign them to:

I wish to assign “Book Heading” a style that would take the title, place it on its own page, unnumbered and without any following text, should there be any (there is not). There is no choice for such and if I modify the Folders (Level 1) style, then it also modifies the “style” that I have correctly working for the Part Heading Section type, which I do not wish to alter (Both use Folders (Level 1)) Style.

I assigned Part Heading the Folders (Level 1) style, and it correctly works other than the <$rst_R> command does not work (making the first “Part” Part II because it assigned Part I to the Book Title.

I assigned the Section the Folders (Level 2) style and it works correctly without any problem.

I do not use Section Start, but for debugging purposes, I assigned it “as is” so that it would be obvious something is wrong.

N/A I use and it also is assigned “as is” - I have very limited choices and would have created a new style if I could, but I see no way to create a “new style” which is why I assigned the same “style” to both the Book Heading and the Part Heading and to both Section Start and N/A.

Now… even saying all this, there are serious inconsistencies in how these “styles” are applied. I used trial and error to make the progress I have made rather than anything that I consider logical to me.

Specifically… in the Project Outline, Book Heading is actually Folder Level 2, not 1… and Part Heading is Folder Level 3 not 2, yet that does not seem to matter. In the end, the inability to create a new “style” other than those provided when I first hit “Assign Section Layouts…” limits what I can do.

I know I am missing some logic here, but I like writing, not figuring out how software works. This seems an overly complex contortion for doing what should be straight forward… to create a new style, when those available are not what you want. Maybe there is a way to do that, but I see no “+” on the Assign Section to Layout screen shots.

Look in your compile format. That’s where it all happens.

What you’ve screenshotted is the “patchbay” ; the in-between ; where the connections are made, to put it this way.

I very much appreciate your input, time, and attempts to help. Clearly, the compiler, its styles, and setting it up is well beyond my ability. The simplest solution for me would have been using <$rst_R> after the Books Title. Unfortunately, there seems no way to correct that issue. What I have done, for now, since I just want to export the document as a Word document, is create a template Title Page in Word as I want it, then after compiling the Word document, I just copy and paste the title page at the beginning. At some point I will need to either fix this issue (like when I create an eBook, or PDF version), or I will need to abandon Scrivener as my way of creating a final product. Maybe someday, Literature and Latte will host a database of compiler templates people who know what they are doing create and are willing to share. Then Scrivener illiterates like me can just download the template that works best for us.

Again, thank you very much. I know you tried your best and I very much appreciate it.

They are currently developing and beta-testing a simplified version, sort off. A new app, way more minimalistic.
Stay tuned.

Will do… and… thank you!

1 Like

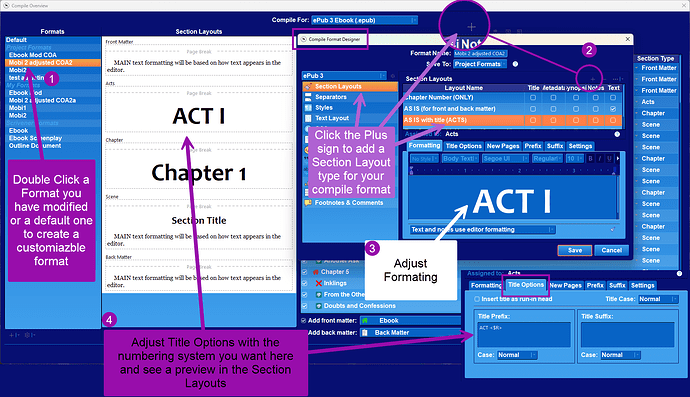
The key is modifying the compile format to a custom one with the Section Layout to present your project the way you want. I will include a picture where I have a chapter numbering layout and an Act numbering layout in a Custom compile format. You can create your own from scratch, but it is easier to click an existing one and rename. Then this new compile format can be adjusted.
I included the steps in the order I did to ADD a custom layout for chaptering and act numbering and the settings I used. I don’t claim to be an expert, but this might help. When you add a section layout you can give it a custom name and check or uncheck the boxes you want. Once created you will see a preview of your new section layout in the Middle Compile Panel (Section Layouts). When it looks like you want then assign this to the approapiate files/folders in your novel project.


I hope this helps make Vincent’s points clearer.

Thank you for your response. What you describe is what I attempted on my first try. I created the Manuscript (Courier) 2 Format, then a new section “Book Heading” edited the existing Part Section Layout to what I wanted then assigned it to the “Book Heading” and while that produced the Book Heading format I wanted, it unfortunately, changed the Part Heading that was good, to the new Book Heading format, which is not what I wanted for the Part Heading. That is why I reverted back to the Part Heading section settings as they were, and tried the <$rst_R> approach. Again, maybe the fact that all this was based on an automatically imported Scrivener 1 format that I tried to modify rather than a new one started in Scrivener 3 is the root cause. Just not sure.