I have searched back a month and have found questions asked but not answered. Does anyone know if a tutorial for creating .mobi files for Kindle?
I have watched the videos here but they seem to be for the Mac, found some tutorials for the Mac other places on the web, and have managed to produce a file - yeah! But, for example, I can’t figure out why some things happen/ or how to:
my table of contents comes first and lists my “title page” as a chapter; can I designate which folders are to be used for the table of contents?
there is something at the end of my table of contents called “notes” that is empty except for something like <<<<>>>>> which I think is some sort of indication of end of text
I want to change the font size and bold my chapter headings
I want it to automatically insert “Chapter #” skip a space, then put a chapter title in the same font.
I want to skip some spaces after my chapter headings
I am also going to want to insert my cover art and/or insert a title page image that makes a title page that matches the font on my cover.
(I did finally find on this forum how to change my font without changing it in each-scene-individually-by-select all- font change, repeat. )
I’m hoping to not have to resort to compiling to .html and making changes in the .html file, learning html commands to do that, doing something in Calibre(?) and all sort of other things that I have been reading about. One of my reasons for getting Scrivener was converting to files for e-publishing!
Thanks, wikiup! Those tutorials are the same as on the Literature and Latte site, though. So I’ve seen those.
So far, I still haven’t seen anyone get any answers for ebook compiling on this forum, and I still haven’t figured out how to make my book look the way I want to if I use the compile to kindle (Mobi) book options, which is disappointing since that was one of the reasons I wanted to use Scrivener! So now I’m learning what to do with it once I compile to html…
The main reason I wanted to get Scrivener is for compiling a couple of books I have written to .mobi format. Now, I am not so sure based on the comments on this thread. It can also be the case that support comes more quickly by email direct to Scrivener support personnel.
I haven’t tried compiling for kindle yet, but there are a few things that need to be addressed before anyone could help you out for sure…
First your issues with “notes” and <<>>>'s indicate to me that there is a disconnect between how you’ve organized your binder, and whatever compile preset you are using. So, how are you organizing your chapters? The out-of-the-box way that a novel is organized from the Novel template is to have the following in your Draft (aka Manuscript) folder:
Title page
Chapter folder
– scene 1 of chapter
– scene 2 of chapter
chapter folder
– scene…
If you have it organized like that, and you use the Novel Standard Manuscript format as a starting point, you should solve a couple of your issues. From there you’d have to customize line spacing, font choices, etc…
To change your chapter titles (fonts, spacing, etc…), most of that is in your compile settings (the pop-up window when you select file->compile). Click on Formatting and then on the Level 1 folder to start out. There’s a Modify button that gives you access to change what is included in titles, how titles and body text are formatted, etc…
Also under the Formatting portion of compile is a selection of check-boxes which allow you to include or exclude Notes, Synopsis and Metadata in addition to the normal Title and Text that most people want in their manuscripts. You probably have “Notes” selected somewhere in there.
The <<<< >>>> is probably a visual separator stuck in between the notes and the (empty) body of some part of your project.
Once that’s done, make sure that you have the correct folder selected at the top of the “Contents” pane of the compile settings.
I am not 100% sure this will help with the above issue, but here is what I did (after starting with the Novel template) to solve the table of contents before title page problem I was seeing in my short story collection. It appeared to work! I made sure my title info folder was above every other folder/file and the very first thing after the template’s “Novel Format” file. When I did this, the title page was no longer included in the TOC (at least when I looked at the MOBI file using the Kindle Previewer tool on the PC).
I have attached a small JPG to illustrate my point. I intend to play around with placement of the “Dedication” to see if/how I can remove it from the TOC, too.
Hope this helps a bit!
John
I own a nook, not a kindle, but when I checked my copy of the 10th anniversary edition of American Gods, and navigated to the ToC (Go to->Chapter->) I get the following list:
Cover
Title Page
Dedication
Contents (a separate page with links to everything but Title page and itself, plus links to each chapter)
An Introduction to the Tenth Anniversary Edition
A note on the Text
Caveat, and Warning for Travelers
Epigraph
Part One
Part Two
Part Three
Part Four
Postscript
Acknowledgments
(and a lot of other additional material as well)
If the novel wasn’t divided into Parts, I bet that the chapters would be listed after the Epigraph; they are listed in other novels I’ve checked.
So, excluding the Cover and title page might not be standard practice (and so might not be worth the hoops you’re jumping through). Not that you shouldn’t do so, mind you, just that you may be going to extra effort that many (most?) don’t. If you just create a bare document, without the folder, at the same level as your chapter folders, then you should be able to get a reasonable output withoutit being labeled as “Chapter 1: Title Page”, assuming your compile settings treat a bare, un-stacked document differently than folders at the same level.
At the moment, it’s not possible to create a custom TOC; the one you get is the automatically generated NCX file based on where you have section breaks in the manuscript and always comes before any of the content (after the cover image). Ultimately we will be getting some additional options in here so that you can create your own TOC to replace this one and treat it as a document in your binder list, so you’ll be able to control both what appears in the list and where it falls in the order of documents.
As suggested earlier, this sounds like you may have an empty endnotes (or “notes”) file in your binder, so that’s the first thing I’d check for. “Notes” at the end of the TOC usually means you have footnotes in the document, but given that it’s blank except for the marker, it sounds like it’s just a placeholder file that got compiled by accident. If you find that you can delete it, deselect “include in compile” from the inspector or in the Contents pane of File > Compile, or just move it out of the Draft folder in the binder.
This is all doable. I’ll assume for the purposes of tutorializing that your chapter headings are all folder titles in the binder, similar to the “novel” binder set up that robertdguthrie diagrammed above, but you can adjust it according to your actual set up.
Open File > Compile and click the blue arrow icon to the right of the “Format As” pop-up menu to expand the window if you don’t see a list of options on the left. Choose “Formatting” from that sidebar, then select the top Folder Level 1+ row in the table that appears. (If your chapter titles aren’t folders but are document stacks–that is, text documents with subitems–choose the next row with the matching doc stacks icon; if they’re single text documents, choose the bottom row.) Make sure that the “Title” column is checked in that row. In the preview pane below you should see essentially what you’ll get for each of your folders when you compile–right now it might just be “Title”. Click the “Modify” button above the preview pane and then click the “Title Settings…” button in that window. This is where you can set a title prefix or suffix for that document type and level (in this case, all folders). You can delete any existing text and type in whatever you want, such as “Chapter <$t>” which would give you “Chapter One”, “Chapter Two”, “Chapter Three” and so on when compiled. (You can view a list of the available auto-numbering variables here.) Make sure to add a carriage return after the prefix so that your title will come on the next line (two carriage returns if you want extra space, etc.).
Click “OK” to close the title settings, then back in the modify formatting box, click in the title text to select it and click the “A” button in the left of the format bar to adjust the font size and attributes as you wish. At the moment, the prefix and title are linked so that any changes you make to the title will likewise be made to the prefix, so you don’t need to set these separately; this is actually a bug, though, so once that’s fixed you’ll be able to format these individually by clicking in each. Keep in mind that specifying the font itself won’t matter for the Kindle, since it will apply its own font. Click “OK” to save those changes and close the modify box.
Finally, select the bottom row of the table with the single document icon–this may say Level 1+ or Level 2+, depending whether you started from a compile preset or not. The “Level” has to do with where the file type falls in the binder hierarchy–for instance, if you used folders directly inside the Draft folder for chapters and put scenes as text subdocuments to the chapter folders, then your chapter folders are considered Level 1 when compiling the Draft and the scene documents are level 2. The “+” indicates that the formatting you set applies to that level and all higher levels, so e.g. formatting set to Level 1+ for folders will affect the chapter folders in the scenario above as well as any subfolders inside these chapter folders. You can add and remove rows to the table using the two buttons in the top right, just to the right of the “Options” button; the one on the left with the “+” adds a new row below the selected row and the “-” deletes the selected row.
Ultimately, you want to select the row that indicates the text for each of your chapters, so most likely this is just going to be the bottom text row, but we can work this out based on what your binder looks like. “Text” should be selected for that row and some lorem ipsum will display in the preview area. Click “Modify” again and “Title Settings…”, then add some empty lines to the title suffix. Even without the document title itself compiling, these will get included and will provide the additional padding you want between the chapter titles and the text.
Cover art needs to be imported into the project in order for it to be selected during compile; just drag the image into the binder anywhere outside the Draft folder. When you’re in File > Compile and set to compile to an ebook format, you’ll see a “Cover” option in the sidebar and in that pane you’ll get a drop-down menu to select any of the images imported into your binder.
To insert an image into a title page, just drag the image from the binder (or elsewhere on your computer) into the title page when it’s open in the editor; you can also use Edit > Insert > Image for this.
I hope that all made sense; I’m definitely fading out here so I apologize if the how-to started to get incredibly dense and loquacious. If it’s not making sense, just let me know where I lost you and I’ll try to clarify. You might also throw in a screenshot of your binder with a description of what’s what (chapter titles, chapter text, etc.) and I’ll tailor the explanation to your specific hierarchy.
I got back after a few days and there are lots of answers! Thanks to everyone! I will be going through them.
To start, though, to answer a few questions: I did have my chapters broken up with sections the way the default novel template wanted them so I should have been okay there, the default template probably created the notes or footnotes and I didn’t catch it, and I was trying to follow a tutorials directions for the Mac version (which has different options). I tried to adapt it but that did indeed create some of my problems and the above should help…
So now I’ll start going through everything above step by step. Thank you!
I can tell this question has gotten a lot of traffic, so I’m going to post my further questions and progress so far. Glad to know I am not the only one struggling with this! I used these replies and the manual to get to this point. I also read a few new questions and answers on this forum and a couple of them helped. So far, I’ve gone through compiles 20 different times, changing different parameters to see what happens.
I attached a screen shot of how I set up my binder with a part of my MG novel for learning how to compile. The screen shot is from my latest trial, where I tried to solve my front matter difficulties by putting front matter directly under “novel format.”
I am able to get a generated table of contents but I gave up/found out I can’t format different parts of the chapter headings, chapter numbers and chapter names, differently like they show in the tutorials I found (which are for Mac). (Ex. Chapter 1 The Middle of the Ocean, all have to be in the same size.) So okay, I am stuck with that. I’ll live.
I was able to generate a table of contents then that had title names and all my chapters started with “Chapter X Title.” And I was able to put in a cover. So far so good. But when I tried uploading it to Amazon it didn’t have a way to generate a title and copyright page there. So obviously I’ll have to generate it in Scrivener.
So my main problem is now coming up when I try to put in a title page, copyright page, etc.
I found that I need to check “compile as is” so the information is centered (not left justified like the rest of text that is put in.)
No matter where I put it, whether I wrote it in a folder or a text document I couldn’t get the table of contents to quit listing it as “Chapter 1.” Even when I made it a folder and turned of writing “Chapter X” for folder types and had my chapters as text types. “Front Matter” still appeared in the contents, and while my front matter didn’t have “Chapter 1” written at the top, my real first chapter was still called “Chapter 2.”
I tried moving my “front matter” up in hierarchy like jwnelson right after “novel template” (excellent suggestion! Excellent screen shot, very helpful.) but when I tried to compile, it wouldn’t give me an option to compile anything above “manuscript” (which has all of my chapter folders and scene files below it.)
so, I finally figured out how to strip off “Chapter X” at the start of each chapter. For some reason, going into "Formatting > level 1+ folder > modify > title settings > and deleting the title prefix didn’t work, even though at that point the formatting example only showed “Title” And not “Chapter 1 (return to next line) Title.” That’s how I thought it was supposed to work. I instead had to go into “Options” and uncheck “insert subtitles between text elements.”
so now I don’t have chapter numbers at all. Okay, again, I can live with that. But in order for my front matter to compile, I have to put my “front matter” below “manuscript” in the binder and the table of contents comes before the title page and the copyright page. Kind of odd. I’ve looked at tons of ebooks, and no one publishes a book where the contents comes before the title page. So I don’t want to look like the complete amateur that I am by making that mistake.
Now, here’s another odd thing. Under my compile formatting settings, for "folder 1+ " I have padding set to 8 lines so there is some plank space at the top of every first chapter “page.” It pads for only the first chapter, but not for the following chapters.
Jennifer - I did mean to say how helpful your reply was! With it as I guide I was able to dig into the manual and figure out quite a few things, and reading it again - now that I know more - I understand even more.
I’m afraid I’m not going to be able to solve my problem of needing to put title and copyright pages before the table of contents, which means I can’t use Scrivener to create my mobi file. Really hoping that I’m missing something either here, or if someone knows what I am missing over at the Kindle publishing page…
Does Amazon require ebooks to have their title and copyright pages before the table of contents? Or is that how you want your layout to be? I’m just curious because I’m going to be publishing to the Kindle too and haven’t looked at all the requirements by Amazon yet.
I don’t think Amazon cares too much where it is (but do check). I’ve seen ToCs at the very end of the e-book, even. Usually it doesn’t matter a whole lot because the reader is hyperlinking into and out of it, so it’s not like a traditional paper book where one uses the geometry of the book to make things easy to find.
I agree. I don’t think that Amazon cares what order you put the pages in.
I did just find an example of an independently published book where the order is cover, contents, title page, then chapters.
So, even I just downloaded a html editor and have started learning about html, I may go ahead and do it straight from Scrivener in the order I don’t like with only chapter titles (but no numbers) - to avoid learning more about html!
I am still having the problem with the padding between scene files appearing only on my first chapter (which in this case Scrivener thinks is my title page, not my first chapter) and not appearing on subsequent chapters. I must have something clicked incorrectly…
Erin Ivy - I haven’t had a chance to go over everything in your post, so this is a little off the cuff, but check that:
your folders are all checked to be included in compile in the Contents pane
there is some element within them that is compiling–that is, in the Format pane, make sure that there is some text showing up in the preview pane when you click on the Folder 1+ row
the text/folder separator in the Separators pane of Compile is set to “page break”
There isn’t a way in Scrivener at the moment to have your title page anywhere but at the beginning–it’s automatically generated and put there when you compile and is just the NCX file, so it’s based entirely on where the section breaks are in your project. We will be adding a way in the future to create your own custom TOC and override the auto-generated one, and this you’ll be able to place in your binder where you want it, but until then you could try compiling to epub instead of mobi and using a free WYSIWYG editor like Sigil to change things up, then create a mobi version from the epub.
Only items in the Draft/Manuscript folder are “eligible” to be compiled, so keeping a Front Matter section outside of that won’t work, no. There will be a way to do this in the future, so that you can essentially have a host of different documents for different types of compile all grouped in a special Front Matter folder, and you’ll be able to select at compile which to use, but again, that’s rather far off down the line at the moment as it was only just recently incorporated into the Mac version. For now you need to keep all this in the top of the Draft folder and just switch out documents if you have different versions for different compile formats.
As far as needing to uncheck the option for inserting subtitles, I haven’t the faintest idea why that impacted your project–it certainly shouldn’t make any different to the prefix, as it’s about inserting titles for “Synopsis” and “Notes” and so on if you include those elements in the compile. If you have this all set up still, could you go into File > Compile… and then click “Save” to create a file of your compile settings, then send that file as an attachment to windows.support AT literatureandlatte DOT com? I can pop it into a sample project and maybe it will give a clue as to what’s going on, and whether this is just a setting we need to adjust with your project or some odd bug. (If you’re willing but need better directions on that, give a shout; I’m not on Windows at the moment so I can’t double-check the particulars and don’t trust my memory to be more explicit.)
I think I missed a couple other things, so I’ll pop back later and take a better look.
Hi – I don’t want to take over this thread but I have a question pertaining to compiling in the Kindle format. I’ve compiled my book in a Kindle mobi ebook at it opens in the Kindle program I have on my PC. However, when I transfer the mobi file over to my Android phone into my Kindle App folder, it’s not working. I see my book’s cover in my Kindle app library but when I click on it, everything is blank. No cover, table of contents, or text. The reading progress bar at the bottom acts like there’s text but nothing comes up. Does anyone know what the problem could be?
Do you mean TOC here? Because I am not getting a title page automatically generated. Since the TOC is auto generate and comes first, this means it comes before any title page I create, which isn’t customary.
That’s what I thought! I found this puzzling. I did prepare the compile files for you as you suggested. Then I went back in and fiddled with the subtitled check again. Couldn’t get the problem I was having to repeat! Glitch, I guess.
So I think the last thing is the fact that my padding at the front of chapters is only showing up on the first chapter (which is now my front matter.) I put that in my email and will send you a compiled .mobi as well.
WriterNYC - I’m going to want to try this too, so I thought I would give it a try! I have an Android phone and a Kindle Fire.
How are you transferring your file to your phone? I saw somewhere that the way to get it on either device was to email it and open it on that device. However, my .mobi doesn’t have the standard download button, which is odd but I could get it to download on the Kindle Fire just by clicking on the name. But then it says that “can not open file.” I thought maybe it was the size of my test cover, but I took that off and it still won’t open.
Let me know how you move yours over to your phone and I’ll try it with mine and see if I can see inside.
Are you putting the .mobi files in the Kindle’s /documents folder? If so they will show up under the Documents tab on the Fire, not the Books tab. To my knowledge the Fire doesn’t let you organise books like the standard Kindles do. That was one thing that disappointed me about it. I don’t trust cloud services as a real backup. I download all of the Kindel books I buy to my computer. With the e-ink Kindles I can manage the contents of the Kindle myself, but it doesn’t seem to be so straightforward on the Fire. I’ll have to play with it some more when I get home though.
It’s likely nothing with the .mobi file itself. I wouldn’t rule it out, but I’ve been compiling .mobi files to my e-ink Kindle for proofing for quite some time now, I’ve done it hundreds of times successfully. It seems to be the Fire that has issues.
I don’t have an Android phone, so I can’t answer that, but if the Kindle software is anything like on Apple’s mobiles, you might need to upload the .mobi to your Amazon Cloud Drive to get it on—or e-mail it to the device, but that can cost money if it is a large book.
 Does anyone know if a tutorial for creating .mobi files for Kindle?
 It can also be the case that support comes more quickly by email direct to Scrivener support personnel.
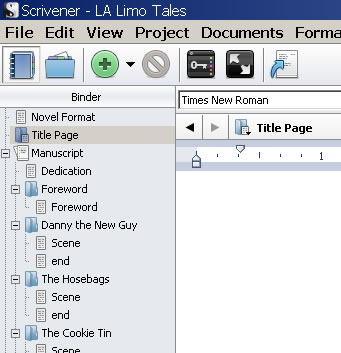
 I used these replies and the manual to get to this point. I also read a few new questions and answers on this forum and a couple of them helped. So far, I’ve gone through compiles 20 different times, changing different parameters to see what happens.


