Scrivener to Nisus Writer Pro

Some time ago, I posted in various threads about how I use font size and colour as distinguishing features to make it easy to use Nisus Writer Pro to assign proper styles to a compiled RTF from Scrivener. Rather than trying to find those original threads, I thought it better to start a new thread here in the “Tips” forum.

I have been continuing to work on it, and have now got a macro which does the whole process in one go, so, for all you NWP users, here it is. It takes a standardised, exported RTF from Scrivener, imports a style collection and then applies the styles defined. It uses “If …” constructions, so that if there is no text with the appropriate parameters, that part of the macro will be ignored and it will continue until completion.

I’ve zipped it up with a ‘readme first’ explaining the parameters I use. Do read the “readme first” before you open the macro in NWP, I think it will save you trouble. When you’re ready, move the ‘Set styles.nwm’ into an appropriate place in the Nisus “Macros” folder on your computer.

You may think it a lot of trouble to set up, but once you have set up the Scrivener end of it, using presets, and setting up Compile to export the appropriate titles for headings, you only need one click of a button, or an assigned keystroke in NWP to have your Scrivener output with proper styles.

If you find any glitches, let me know.

Mr X

Set styles macro.zip (66.9 KB)
2 Likes

Thank you very much, Mr. X.

This is very cool and I’m working on figuring out how to use the compiler to pull this off for my book. Still trying to wrap my head around it. The part that is confusing is the upper panel in the Compile settings “type” fields for the levels. I’m having a bit of conceptual difficulty mapping those to what I want. Part of it probably has to do with “best practices” on how to use folders and documents in the Binder. I currently put my heading in the document and don’t use the folder name. Not sure if that’s the best approach. The other thing is I don’t understand the “levels” and what the various names and icons mean. I have two level 1s and another level 2 with a different icon and it is indented on the left. I have a first “chapter” called introduction that is getting output as “Chapter 1” “Introduction” and that’s throwing the chapter numbers off. Here’s the basic high level structure I’m trying to pull off. I use bold/italic/underline purely to differentiate the levels in this example. The other thing I can’t show here is the Introduction chapter that should not have the “Chapter #” text at the upper left.

Chapter #
This is the Chapter name - dots are to simulate a tab
Paragraph text goes here until I need subheading like on the next line.
Subheading
Paragraph text goes here. blah blah blah
Sub sub heading
More text goes here. blah blah

Ok, starting to get the hang of the levels and how to create additional levels like a level 2 folder. Now the last piece I think is how to structure the compile settings together the RTF output I need. Do you uncheck the “override text and notes formatting” and rely on the formatting you put in the text itself - like the 16pt font for level 1? This seems to make the most sense to me as you would the have explicit control over the output.

More progress. Now I’m tweaking the macro and my styles in Nisus Writer Pro. You have this comment:

“You will need modify it to use your export parameters, changing all the [^\n\f ]+ regex code appropriately using the Finder font dialog.”

I see the lines of code but I don’t know what you mean by “finder font dialog”. I also don’t understand the ‘Eau’ string in:

Here’s the macro in question:

set the various heading styles

If Find All @Text<[^\n\f]+>, ‘Eau’
Menu “:Format:Paragraph Style:Heading 1”
End

What I mean is in each of the parts of the macro [^\n\f]+ must match the font, variant and size that you have set for that level of heading on compiling from Scrivener, so you need to highlight just that string, [^\n\f]+, then open the finder Font Dialog (Cmd-T) and set the parameters there. Don’t try to do it from the NWP interface.

As for the ‘Eau’ component, I can’t remember off the top of my head exactly what they refer to, but they do need to be there. You could look them up in the NWP Macro help.

On an earlier post of yours: I use hierarchy in the binder and have set the various levels in compile to work properly. If you want to have the headings as part of your text, you could do that setting up appropriate paragraph presets with “preserve formatting” set, so that the parameters wouldn’t be overridden in the compile process. But each of your macro heading sections’ [^\n\f]+ would still have to match the appropriate font, variant and size in your compiled output.

I’ll say it again here, most of this macro is the work of Martin of Nisus, and any bits that I managed also had help from the Nisus macro-wizard @phspaelti.

Mark

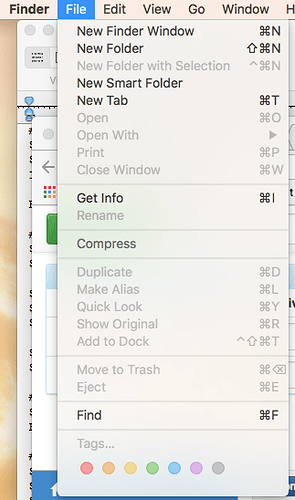
Still confused about the finder! Command-T in MacOS Sierra 10.12.3 brings up “New Tab”. What version of OS X are you running and what does Command T do in it? I don’t see a Finder Font dialog command anywhere.

Ok, I think I figured out how it all works. The code:

set the various heading styles

If Find All @Text<[^\n\f]+>, ‘Eau’
Menu “:Format:Paragraph Style:Heading 1”
End

The part that’s underlined actually is in the style and font that you are searching for with the @Text. So, in the macro that underlines stuff is actually in Adobe Garamond 18pt. The @Text matches the complete style/font. The ‘Eau’

E - treat findText (the All) as a PowerFind Pro expression - which is a Nisus implementation in NWP.
a - find all occurrences of the text
u - find text is attribute sensitive (that’s why the stuff I underlined is actually in the font and size for the header)

The ^\n\f is basic regex that says “start at the beginning of a line and match any text in the given font and point size that ends with a newline (\n) and form feed (\f)” The ^\n\f is actually in the style and font you are finding.

Pretty clever actually and I found the Nisus macro reference. I need to find the PowerFind Pro documentation next. It would be great to make this macro font independent so I can use whatever font I want in Scribner but it isn’t so bad if it has to be a specified font now that I know how to change it.

It looks like I might be able to do a fair amount with images/captions and my “Tip” text blocks too using conventions in Scrivener.

Totally my fault for getting my terminology wrong. What I meant was the font dialog provided by the system that you get in NWP by pressing Cmd-T, as opposed to trying to do it with NWP’s Character Palette.

But it seems you’re getting it all worked out. It takes a bit of setting up, but thereafter makes life very easy. You could also add other parts to clean things up like replacing straight quotes with smart quotes, getting rid of unwanted double spaces and spaces at the ends of lines, etc. I have never felt the need to do that but it shouldn’t be difficult.

Mark

So there are several different philosophies on converting to NWP. Each has it’s merits and they are not exclusive. But if anyone has experience - good or bad - with any of them I’d like to hear about it!

  1. the OP’s philosophy is to style the text in Scrivener and then use a macro in NWP to apply a NWP style to the styles in the Scrivener RTF document. The styled text in Scrivener can be done in situ - meaning you can apply the styles like font/point size/text color right in the document itself as you write. Or they can be done with Compile options to transform whatever you’ve written using Scrivener to enforce the output styles. This later approach seems to be more Scrivener-like but is not quite as flexible as in situ styling since you can apply many more in-situ styles than you can Scrivener compile settings to the same document.

  2. use a tagging system as you write. this is similar to XML markup. So, for instance, text you want to be set as Heading 1 in NWP would be written like

    Chapter 1, the best of times

    . Of course you can use tags however you want (without the terminator for instance). This technique can also be done in situ or with Scrivener’s compile settings (pre and post text). But again, in situ is a lot more flexible but perhaps less Scrivener-like.

Both of these are basically “coloring” the output from Scrivener in such a way that NWP macros can be used to find and apply style to things. I’d like to use Scrivener compile options to drive this as it minimizes human error and repeatable. My only concern is that you are limited to 3 document types, each with multiple levels. (the doc types are folders, document groups and documents). I’m trying to figure out how to use the Binder to structure more than simple headers and body but all my approaches so far go down “unnatural paths”. Meaning I have to create a folder hierarchy to support the additional “things” I want to format.

Folder

  • document1
  • document2
    –Sub Folder for a section
    — sub document1
    — sub document2

The above is natural and easy to support - it is basically what the OP is doing (but he has an additional 3rd level, which is also fine). Now I’d like to support two extra “things” that I can pick out at compile time to apply styles: my “tip” text blocks and images with captions. Currently, I add both of these as documents at the appropriate level like this:

Folder

  • document1
  • photo document1
  • document2
  • tip document1
    – Sub Folder for a section
    — sub document1
    — photo document1
    — tip document1
    — sub document2

Hopefully you understand what I’m trying to say. With the compile system, photo document1 and tip documents get the style of their level’s document settings. But this is not what I want. The only way I’ve figured out how to do this using Scrivener compile settings looks like this:

Folder

  • document1
    – Sub Folder
    ---- Sub Sub Folder
    ----- photo document1 <- now I can use a level 3 document to style this photo and caption
  • document2
    – Sub Folder
    ---- Sub Sub Folder
    ------ Sub Sub Folder
    -------- tip document1 <- now I can use a level 4 document to style this “tip” document
    – Sub Folder for a section

For each new unique thing I would like to add, I would have to create a new folder level which is yucky. Anyone see a creative way to deal with this? I hoped that labels or status could be used to “color” the items but the compile system does not utilize these to select output formatting.

Ok, just to wrap up where I ended up now that I’ve done some more research and experimentation…

Rather than rely on the compile formatting capabilities to “markup” my RTF output, I’m going to apply fine sizes and colors to my document text directly. In fact, I created a set of Document Templates that are setup to use the proper font, size and color for each of my “things” and all are marked as include as-is during compile in their metadata.

This gives me the granular control I (think) I need. It also allows me to put and use the headings in the document text - which is how I prefer to write - and use the folder/document title to help organize my Binder. It was straight forward to edit the NWP macro to add additional features like my “tips” documents, etc. I just need to have a unique combination of font/font size/style and color.

As people seem to have been revisiting this thread from 2016, I thought it would be wise to point out that the NWP Macro in question was developed when Scrivener was still version 2, without styles, only cosmetic presets. I used differences in colour as a way to mark text so it could be recognised by NWP and be given the appropriate style using the macro.

Scrivener 3 has styles, but I still use a version of the macro converting the Scrivener styles to NWP cascading styles. If any NWP user who has recently accessed this thread wants the base version of the macro, post a request here.

:slight_smile:
Mark

2 Likes