I have created sidebars in my nonfiction manuscript by inserting a 1x1 table with a grey background. Is this the best way to create sidebars in Scrivener? As I am previewing my epub proof on the kindle preview app the shorter sidebars display great but the sidebars with longer content don’t show up at all (just show as a blank area with a couple lines and no content).
An Aside with a float: right property?
I’m not sure what you mean by an aside- is that a style option?
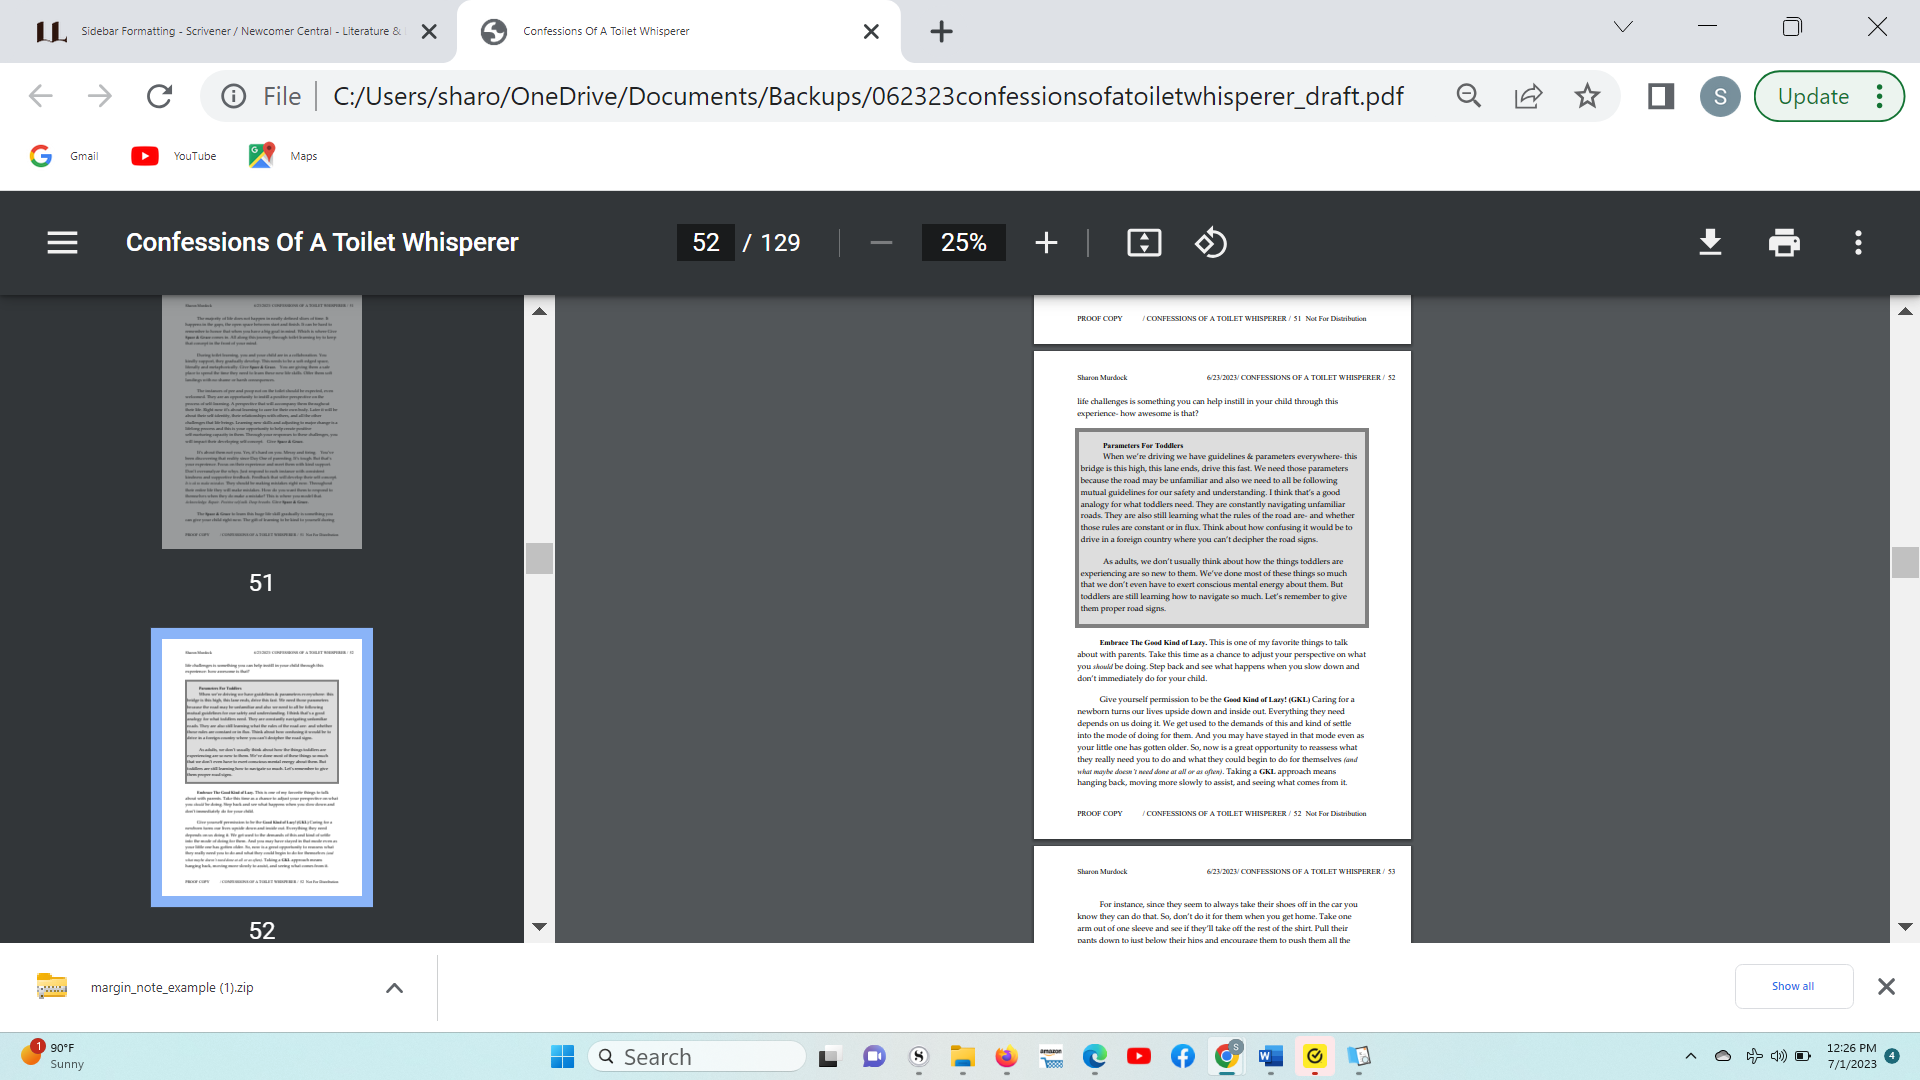
I am not allowed to embed media yet on my posts so I can’t share the screenshots that illustrate this. I have a screenshot from page 376 of the Scrivener 3 user manual that is an example of what I want my sidebar to look like. I also have a screenshot from the kindle previewer app that shows one sidebar displaying ok (the sidebar content is displayed inside an outlined box but without the grey background) and one of a sidebar that isn’t displaying- it just showing the left and bottom outline of the table with no content. That is a longer sidebar and won’t fit on one “page” on the kindle display.
I created these sidebars by inserting a 1x1 table. Is there a better way to format them? Is a limitation of epub format that tables that extend past one page won’t display?
Under the hood, the look of epub pages is controlled in the same way this is done for webpages, namely with CSS stylesheets. “Float: right” is a stylesheet declaration that is used to specify that an element should align itself with the right side of the page. If the element is a block of text, the block appears at the right margin – as in a marginal note.
(I don’t do epub layout, so I only have such generalized help to offer!)
I’m sorry, but I cannot find examples of sidebars on page 376 in either Win or Mac manual.
An Aside is a HTML5 Element to create sidebars. I don’t think Scrivener will generate Asides from tables, but just generate a HTML table. But you could insert HTML in the output and append a CSS-style in the Custom Stylesheet to make an Aside floating to the right side.
In the Compile Overview windows, select the Epub File Format.
In the Compile Format Designer, reached by double-clicking the EPub Format you use in the right-hand side of the Compile Overview window, click the CSS option in the menu on the left. Add code for the Aside to the Custom Stylesheet pane on the left:
aside {
   float: right;
   width: 200px;
   height: auto; /* the height of the content */
  background: blue;
  color: white;
  border: 1px solid black;
  padding: 10px;
}
In your document type the content of the Aside and give it a Code Block style:
Lorem ipsum dolor sit amet <!-- Style: Code Block
In the Compile Format Designer in the Styles panel select the Code Block style and check the “Treat as raw markup” checkbox. Add <aside><p> in the Prefix textbox and </p></aside> in the Suffix text box.
Compile the Binder Selection to check the results. See below for an screenshot…
Fortunately you can add the content of the Aside in Scrivener ![]()
HTH
1 Like
I am thinking this can be finessed by a Compile setting:
In Compile, the Code Block style can be assigned a prefix (<aside><p>) and a suffix (</p></aside>).
Assuming asides are the sole use of that style in the project, then all the OP needs to do in the text body is give each marginal note the Code Block style.
1 Like
Better, because in testing this doesn’t work ![]()
I go try that.
Alright, this works:
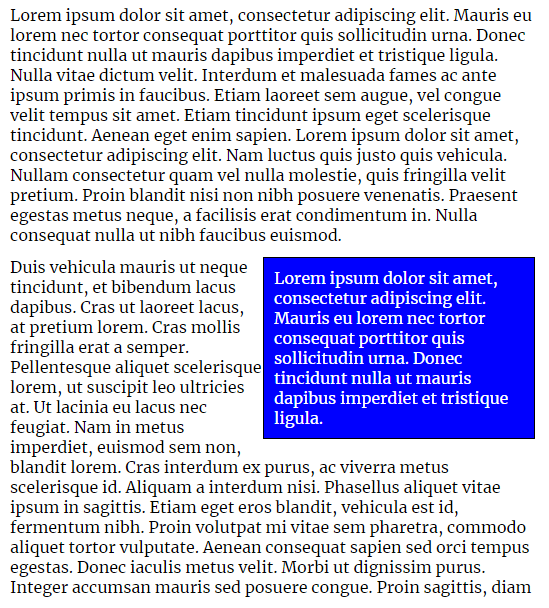
I’ll correct the original reply. ![]()
Live example
Here is a functional example of the ideas above:
margin_note_example.zip (183.0 KB)
-
In the main editor, note the pink box in the sample text. This marks a margin note using the “Margin Note” paragraph style. We’ll get to why some of the text is underscored in a moment.
-
In
File ▸ Compile..., double-click the “Ebook (with Notes)” Format to examine it. -
In the Styles pane, locate the Margin Note style and have a look at its settings. All of these are fairly important. You need raw markup enabled so that Scrivener does not escape the raw markup we are inserting with the prefix and suffix fields.
Thus, be aware that the contents of the pink highlighted boxes in the editor should be treated as HTML without their surrounding <p> element markers, since the style is adding them for us. You will not be able to use formatting, but must add it as HTML. Now the underscored areas in the example probably make more sense. As you will see when this is compiled, only the
<em>...</em>text that was typed in will come out italic in the .epub.While here, scroll through the style list and make note of “Raw HTML Block”. This is a handy prefab style we provide, along with the “Raw HTML” character span style. Simply add these to your project and use them to insert HTML wherever you want. I went with the special Margin Note style here though because otherwise we’d have to type in the containing HTML every time.
-
Lastly, select the CSS compile format pane and scroll to the bottom of the “Custom Stylesheet” column, to see where I’ve pasted AntoniDol’s example.
-
Give that a test compile, and you’ll get a margin note in the first chapter!
A bit of setup, but easy peasy to work with in the writing area, and once you know these tricks you can do other fancy things as well.
Alternatives & Disclaimers
- Now if the thought of writing in HTML now and then puts one off, there are other ways of doing this. For example that aforementioned “Raw HTML Block” style could be used on a line above the margin note area, where one types in
<aside>, and then the closing marker at the end using the same method. Now Scrivener is generating the paragraphs and all formatting within them. Using a similar idea to the first, one could create a “Start Margin Note” and “End Margin Note” style that exists purely to insert<aside>and</aside>respectively. I think you would want one space in such a paragraph to avoid the style being auto-cleaned on an empty paragraph. Maybe fine for a single-use case like this, but it could get out of hand if you intend to have a number of them. - I haven’t personally broadly tested book reader support for the
<aside>element. If this more semantically appropriate modern element is not supported in your ebook reader of choice, fall back to using<div class="margin-note">and adjust the CSS accordingly.
P.S. @sharonmurdock I’ve granted you upload permissions.
Antoni, you should also have some margin-left in the aside CSS specification, to make space between the body text and the inset box.
margin-left: 10px;
-gr
1 Like
Check. And if there are different asides in the document, add a CSS-style name in the textbox under the Prefix and Suffix textboxes and adjust the Custom CSS accordingly.
Thank you for all your responses! This is starting to make sense! I am definitely new to html but with that detailed explanation I think I will get it figured out.
I have probably been using the term sidebar erroneously. This screenshot shows what I mean. I want to visually differentiate some parts of my text. Preferably with rich text so that I can use bullet points, bold, italics, etc. I want to have an outline around the content and a background color.
I have about 15 of these in my 50k manuscript. They are of varying lengths. Some of these will extend over 2 pages. I am also considering including a photograph in a couple of these.
With those clarifications, does margin note seem like my best approach?
Ah, more like a call-out box then. I was going to say earlier, but forgot to mention to, that if you really did mean a margin note you should try and work the CSS so that it is responsive and displays more like what your screenshot has on very narrow readers, like phones.
I also better understand what you mean about using a table—as I was trying to imagine juggling main body content and sidebar content in two cells and that did not sound fun at all. Even so, this type of tool is decidedly not what a table is meant to be used for, so it is better to stick with the solution above, just with slightly different CSS.
Shaded boxes like this are much easier to do, as floats can be a bit of “fun” to work with on ebooks (different platforms handling measurements slightly differently can make things like a consistent drop-cap, which would also use a float) tough to pull off well. But a shaded box is just a background-color, border and maybe some margin and padding to keep the text from bumping into it, both inside and out.
You could still use the aside element for that. There is nothing that states that has to be laid out a certain way, even if sidebar/margin-note presentation is most common. All it really means is something closer to the parenthetical, on a larger scale. That is what is meant, earlier, by calling it a more semantic use of HTML. We are saying what the text is, not brute forcing it with general-purpose layout constructs.
You can of course do all of that (and far more) with HTML, but I take your point. So given that, I would go with my advice to create a “Start Box” and “End Box” type style setup, around normally formatted text.
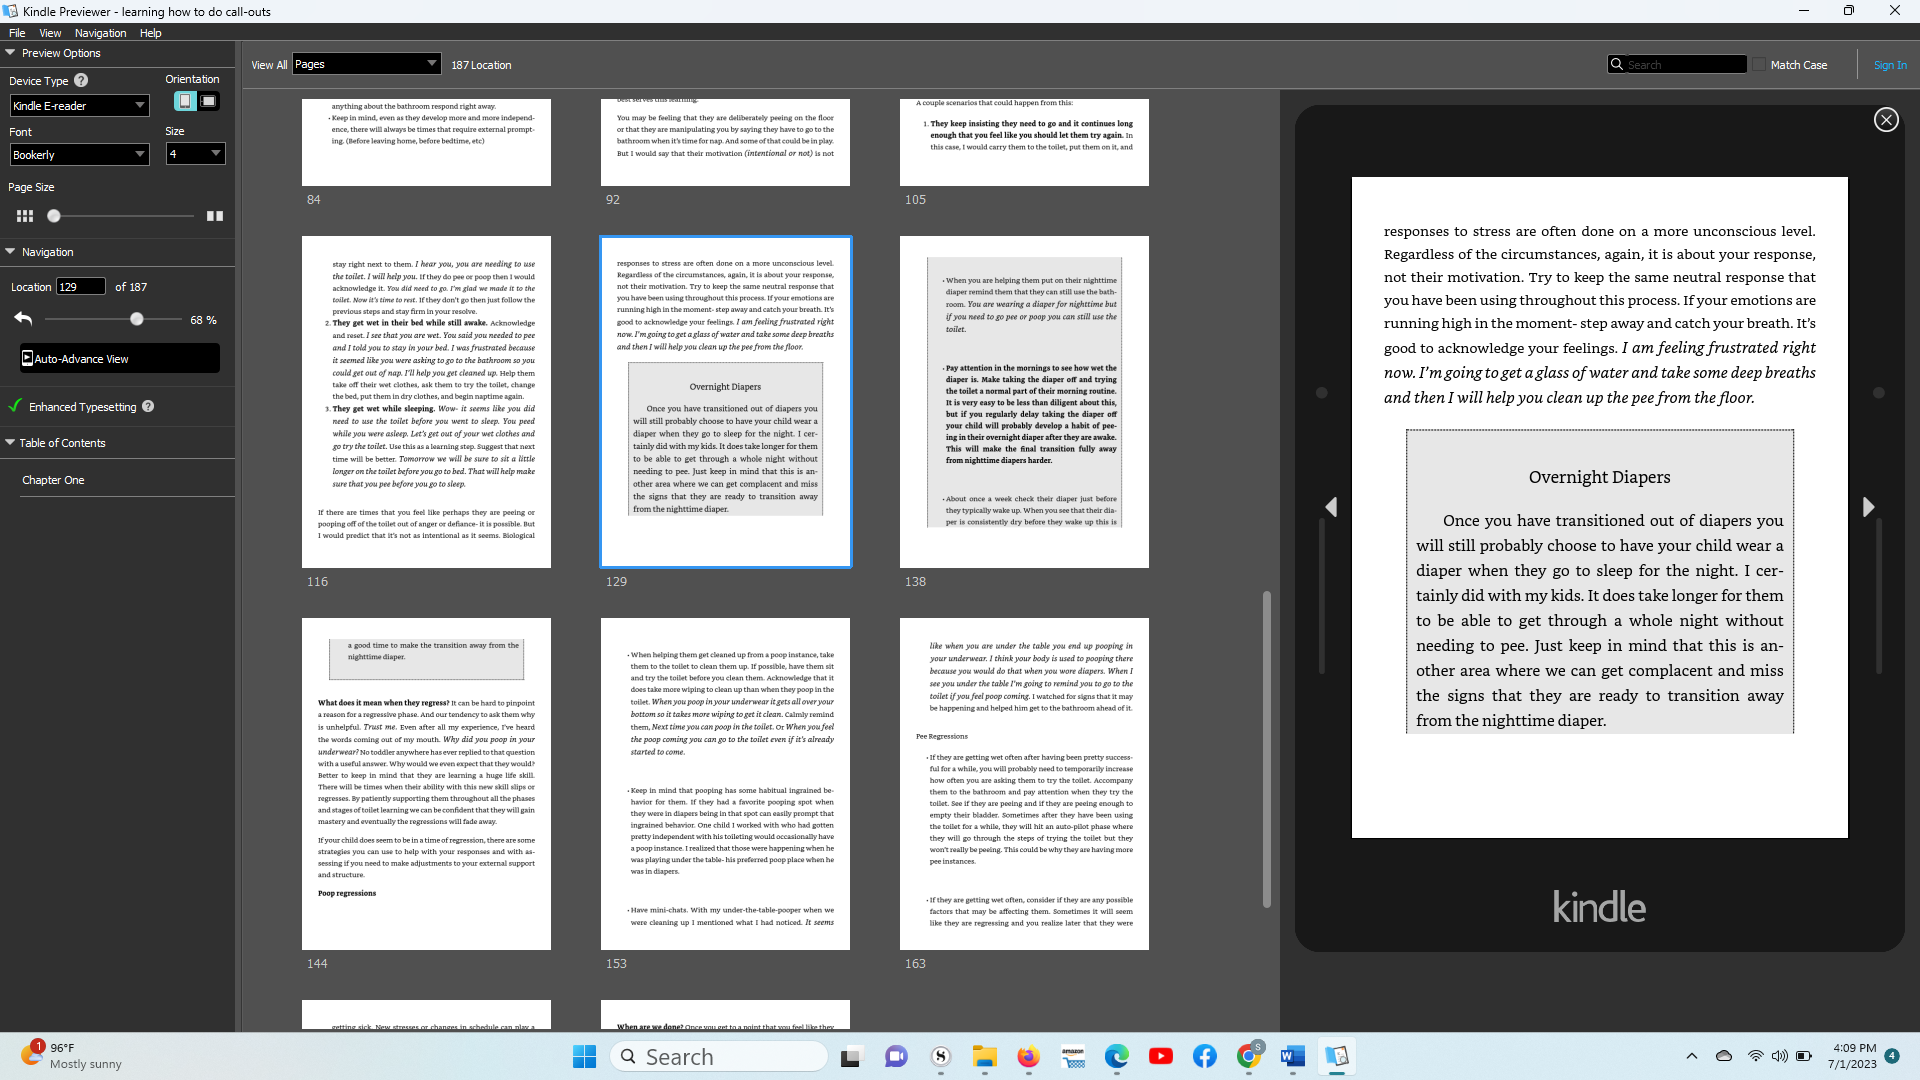
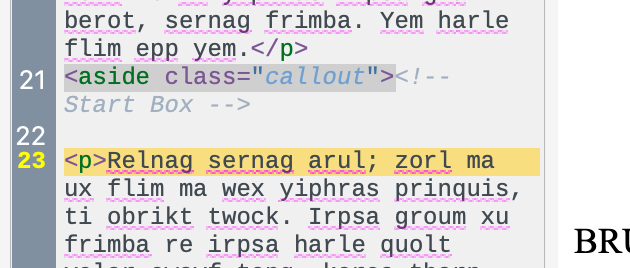
Here is an updated example of the first project. To see the new method in play (I left the old example in “Red Book”), flip to the first subdocument of “Black Book”. Note that whatever you type into the styled text itself is completely arbitrary because I’ve set this up to enclose whatever you type into an HTML comment. Just don’t type --> or you’ll break the comment because that is how you end one! ![]()
note_example-mk3.zip (195.8 KB)
I also classed the two aside elements. The first now uses the ‘margin’ class and the new one uses ‘callout’.
2 Likes
Awesome! I think I can understand this! I will spend some time with it and follow your examples and explanations. Thank you so much for the help! ![]()
1 Like
It works! Yay! I imported the style and compile settings from your file.
Can you point me to where I can learn more about using html in scrivener?
Also, how should I format/compile these for pdf or doc files for paperback printing?
Thank you so much for the help!
1 Like
Looks great!
As for learning more, you’ve pretty much covered what there is to know! The concept is pretty simple in Scrivener: make styles that have that “raw markup” checkbox enabled and have at it, either with those prefix and suffix fields or by typing in your own stuff in the editor. Section Layouts are worth playing with a bit as well, particularly if you have larger sections of text that should be treated differently.
In fact what we did here was slightly more advanced. In a lot of cases you can just get away with non-markup styles. The thing to know is that when you apply a named style to any text, Scrivener converts that name to a CSS style in the output, even if it isn’t in the compile settings. In that way you can do anything to paragraphs, or spans of text within them, Scrivener itself doesn’t handle with its basic formatting conversion.
Beyond that it’s learning what bits and pieces of HTML and CSS you can whenever you want to do something interesting like this. And of course you’ve got this forum as well. We have a number of people here that know their way around and can figure out ways of doing things you may only initially have a design idea for.
One trick I use is to get a program like Sigil or Calibre so you can look at the .epub itself directly, rather than having to relying on read-only previewers like Kindle Previewer. Not only do they give you a look at what’s really going on under the surface, both have “live editing”, meaning you can play with the numbers or colours in the CSS file and make things look just right, then copy and paste the result back into Scrivener’s CSS pane to make it permanent. Being able to see what you’re doing directly isn’t just a tool for experts, it’s a great way to learn.
1 Like
When I draw a blank on some valid values or can’t remember a properyname, I visit
3 Likes
this is so interesting! Excited to play and learn! Thanks for the advice about Sigil & Calibre- I was wondering how to look at the .epub. Appreciate all the help!
1 Like
Sadly, this example no longer works in Scrivener 3.5.2 on macOS Tahoe 26.2. Not sure what changed since I haven’t been able to wrap my head around some bits of this “hack” yet.
So, compiling the example as-is gives me an error in Apple Books:
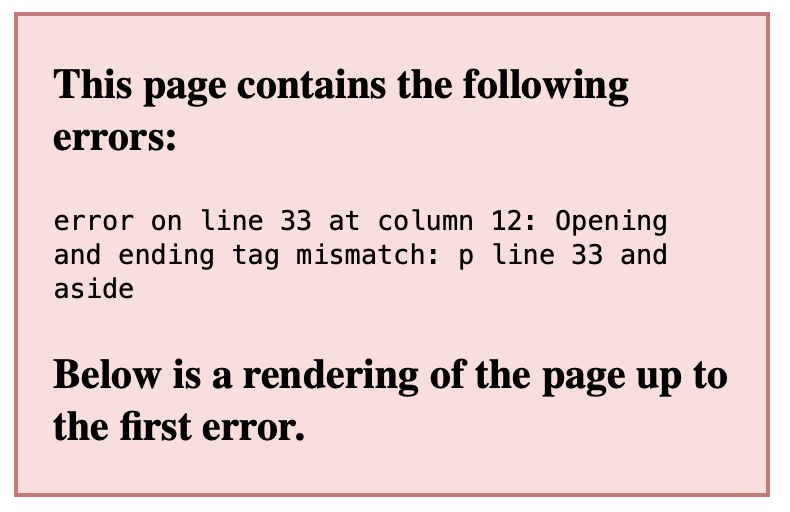
Looking at it with Calibre’s ePub editor, I see the start of the box looks fine:
But at the end, there’s an extra paragraph being inserted that breaks things:
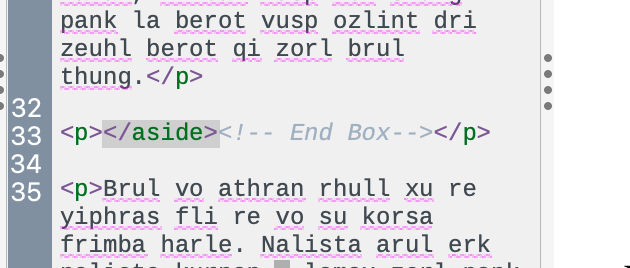
No idea where this paragraph comes from - I didn’t make any changes in the example from above, just went straight to compile.
Also, I can’t for the life of me figure out where the
1 Like
I cannot see anything wrong with the setup either, and it works perfectly fine on Windows, so it must be a Mac bug. I’ll get it filed.
The odd thing is that the start style and the end style are both set up and used identically. The only difference between the two is what is typed into the prefix and suffix fields in the compile Format’s Styles tab (which should answer your query on where the HTML comes from).
(I updated the original upload to include improved CSS that is designed to work in dark or light mode reader themes.)
Update: in going over notes on a similar issue we found a while back, it does look like it might somehow be a MultiMarkdown bug, which we are using to generate ePub HTML in the Mac version. We unfortunately use a very old version of it for this purpose.
3 Likes
Ah, I see the forum ate the “aside” tag I had typed in above. My question was where that opening aside tag was coming from, since I didn’t see it in the “prefix”. Whereas the closing aside tag was clearly visible for the End Call-Out style.
But now I see both tags. Very odd. Maybe the macOS 26.3 update that I installed yesterday has something to do with it?
Sadly, it didn’t fix the paragraph issue. Your updated example still produces the same error in Apple Books.