I have struggled for a while to get an effective way of listing things that need changing, editing, following up etc. Normally I do notes in the “Notes” section and make a bookmark of them. Works ok. When I saw Kirks blog on “How to do a checklist” I thought - beauty - just what I need.
But I cant get checked list to appear in the Binder (where I wanted to see them for quick reference). Following Kirk’s instructions I can crete the checklist and display the checked ones in the Outliner but the ticked ones only appear unticked in the Binder.
Is there a step I am missing ? It seems like an extremely handy feature but not sure how to get it to show. Anyone tried it and had success ?
To make check boxes, ticked or not, appear in the Binder, you’ll need to use the Custom Icons. Unfortunately, these are not tied to other metadata, and therefore won’t change automatically.
There, add shortcuts for Scrivener for menu items ‘Ticked’ and ‘Unticked’. Pick key combos that aren’t being used for anything else, of course. On my set up shift-cmd-V and shift-cmd-O seemed to be available.
[[Scrivener has been generously designed so that many, many functions have a (functionally redundant) presence somewhere in the app menu hierarchy and whose only real reason for being tucked away on a menu somewhere is precisely so you can attach key commands to them in just this way.]]
Something you should notice about McElhearn’s post is that, while the first image shows Ticked and Unticked icons used in the Binder, this idea is not carried through in the remainder of the post (nor in the two subsequent Binder images). This is quite misleading.
The checkboxes he is actually using are custom metadata fields set up and made visible in the Outliner. Those metadata fields will never show in the Binder itself. (Changing binder icons is never mentioned in his post.)
Using Ticked and Unticked icons for Binder items would be a distinct thing to do and not systemically connected with whatever was going on with those custom metadata fields he defined. So, trying to do both things would quickly lead to a mess, I think.
Thanks for that. So is there a way to have a unticked/ ticked box in the Binder (this is where I would mostly use it) ?
I’ve noticed I can change the icon next to the title of the “to do” list to a ticked box - but not one that you can just tick on or off. (if that makes sense)
Yes, Document > Change Icon has many prefab icons you can use for binder items. See my just previous post on assigning handy key commands to quickly switch to the ticked/unticked Binder icons.
Notice: those ticked/unticked icons will appear in your outliner also for free! (no custom metadata field(s) required).
Really sorry if it might sound dumb on my part, but why would you need a checklist inside a Scrivener project?
Personally, I love making checklists for my writing (I consider it to be a relatively safe form of procrastination ). However, I usually make them on my tablet and display them on a large widget that takes up a whole screen. I don’t mean that everyone should do the same, but to do apps are something that actually works out of the box. Why not use that? Genuinely curious.
I’m currently using the Scrivener implementation of checklists for metadata.
In my series resources project, I have a checklist indicating in which books my characters appear. After 200+ character sheets after 5 books, it’s somewhat difficult to remember whom of the lesser used characters appeared in which book.
Furthermore, I’ve been requested to provide background to characters from my various books in the series and the checklist helps to filter a compiled printout of exactly that, based on the tick box.
For those intrepid enough to have 5 books in one project, tick boxes could spare much redundancy when filtering.
@Terry_Haddow: I used a system with my last project where I color-coded texts as red (needs substantial work or unfinished, yellow (needs more minor revision) and green (done). also, I created stamps to use as well, which said things like “to finish!”, “done!” or “leave alone for now”.
Nice. A metadata checkbox defined for each book in the series, and then each “character sheet” doc gets checked for their book appearances. Presumably you could do a search and draw together all the character sheets for a particular book.
This is I think a sort of thing I would have thought to do with keywords, rather than metadata fields, though looking at the clean look you are getting here, I can see the attraction of the simple clickiness of the metacheckboxes.
What I do next for this Project is make the Draft/Manuscript special folder my Character Sheets folder, storing each Character’s sheet in that folder. I also change the icon of the folder according to what it now represents (characters).
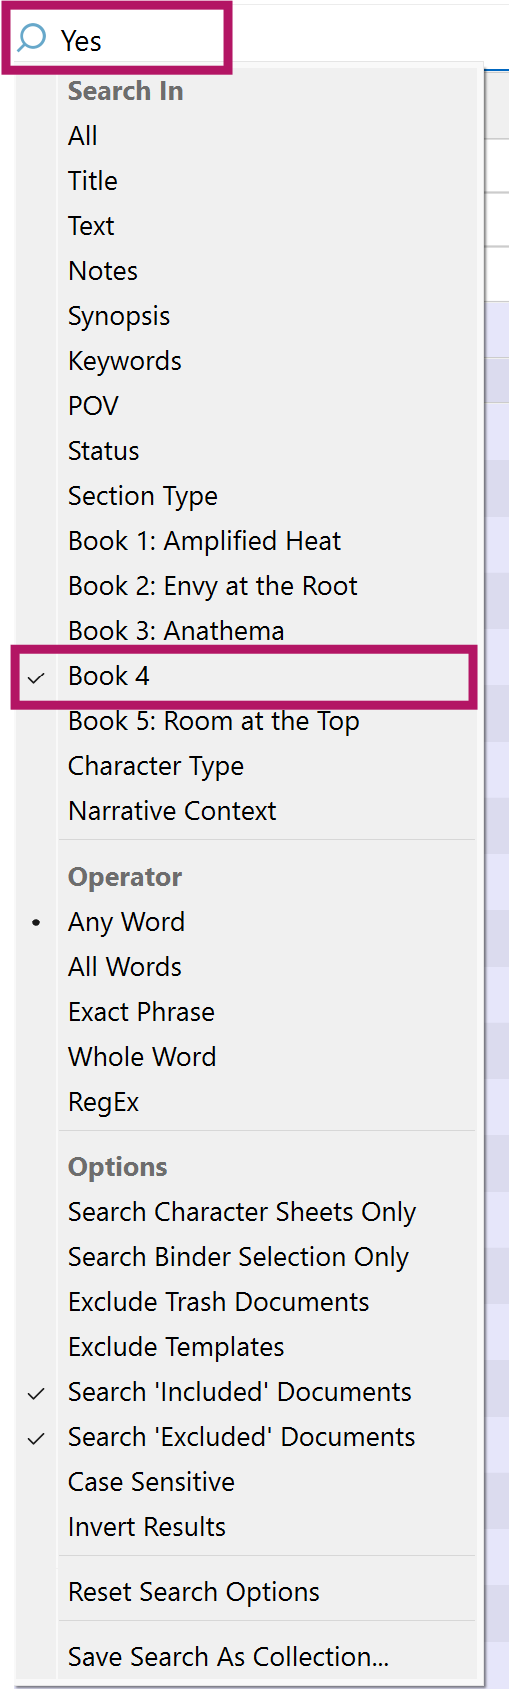
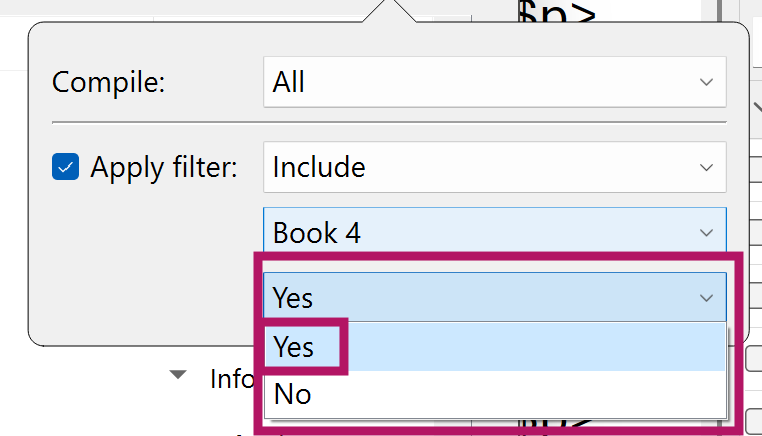
Then, if I want, for example, Book 4’s characters, I tick Book 4 in the Project Search criteria and type Yes as the search value, which is a Boolean return option for finding Book 4 metadata fields ticked for that particular book.
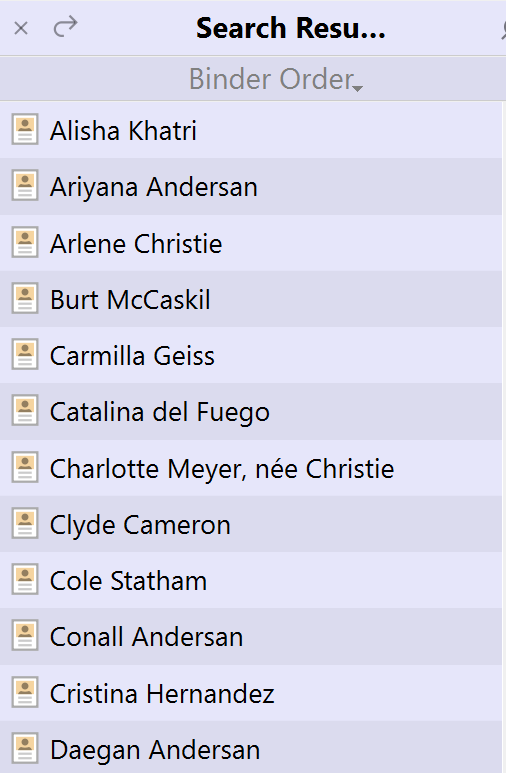
Highlighting the Search results in the Binder, is the first step towards creating a Table of Content for the particular book, using Edit → Copy Special → Copy Documents as ToC.
In Front Matter, I create a document for the relevant book and paste the result of the special copy, creating a ToC sheet, which I tidy up and label.
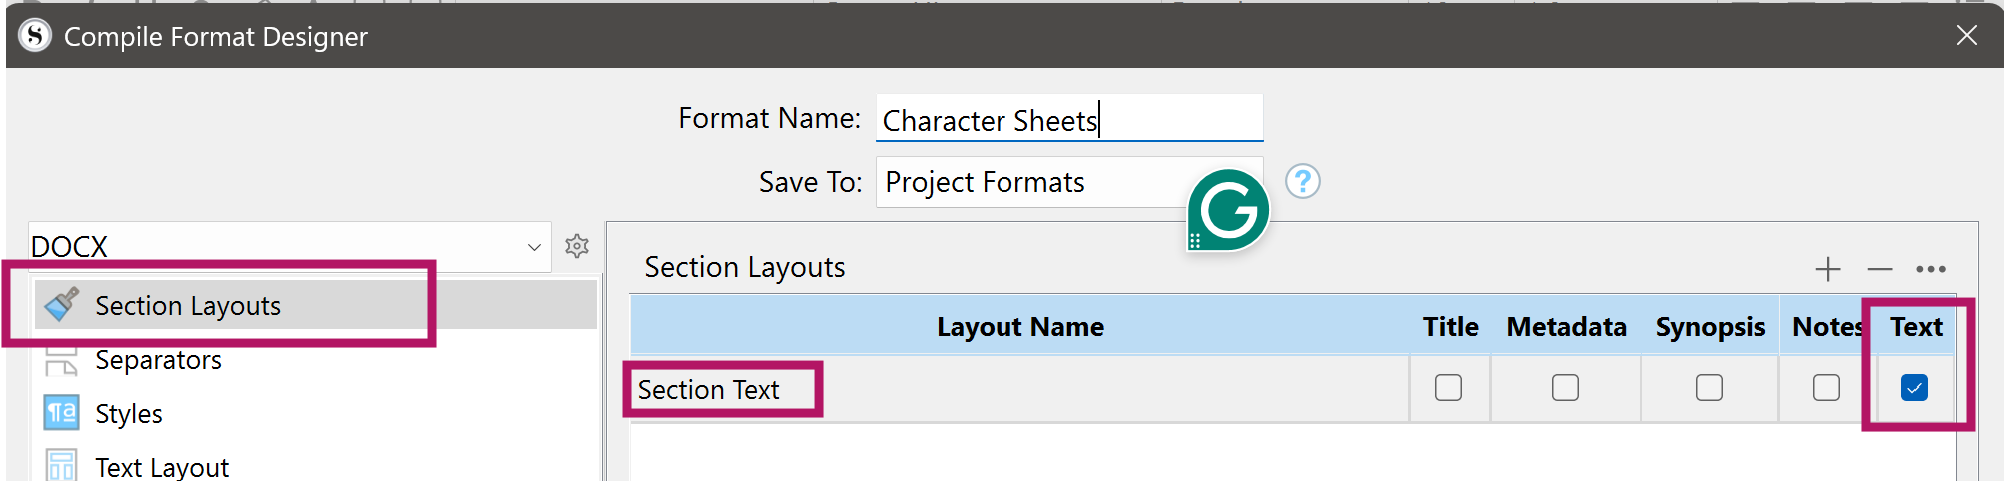
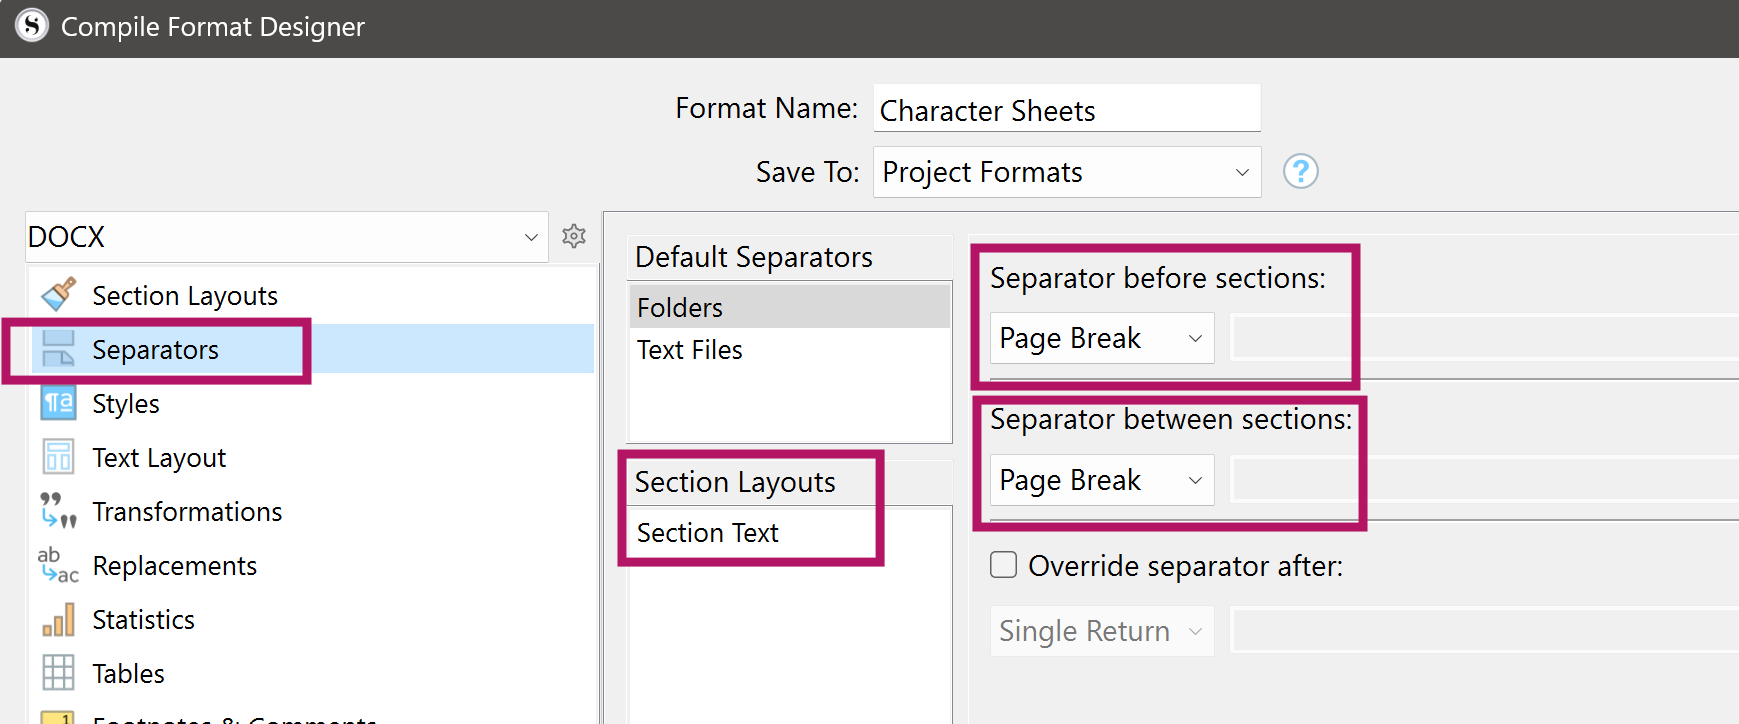
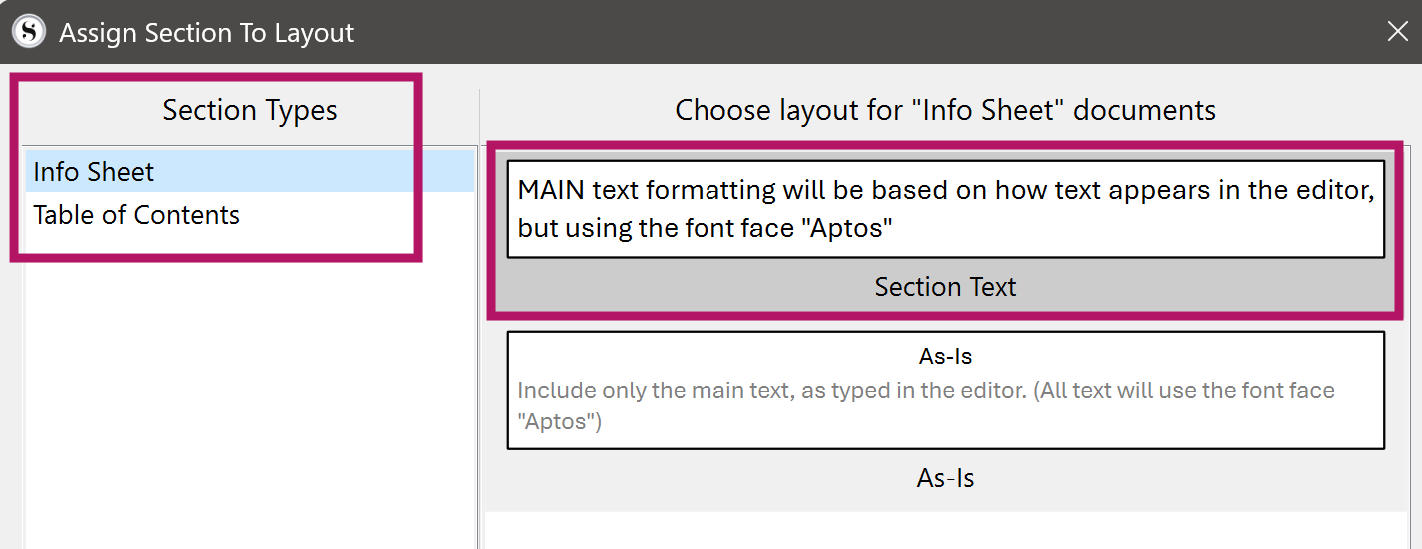
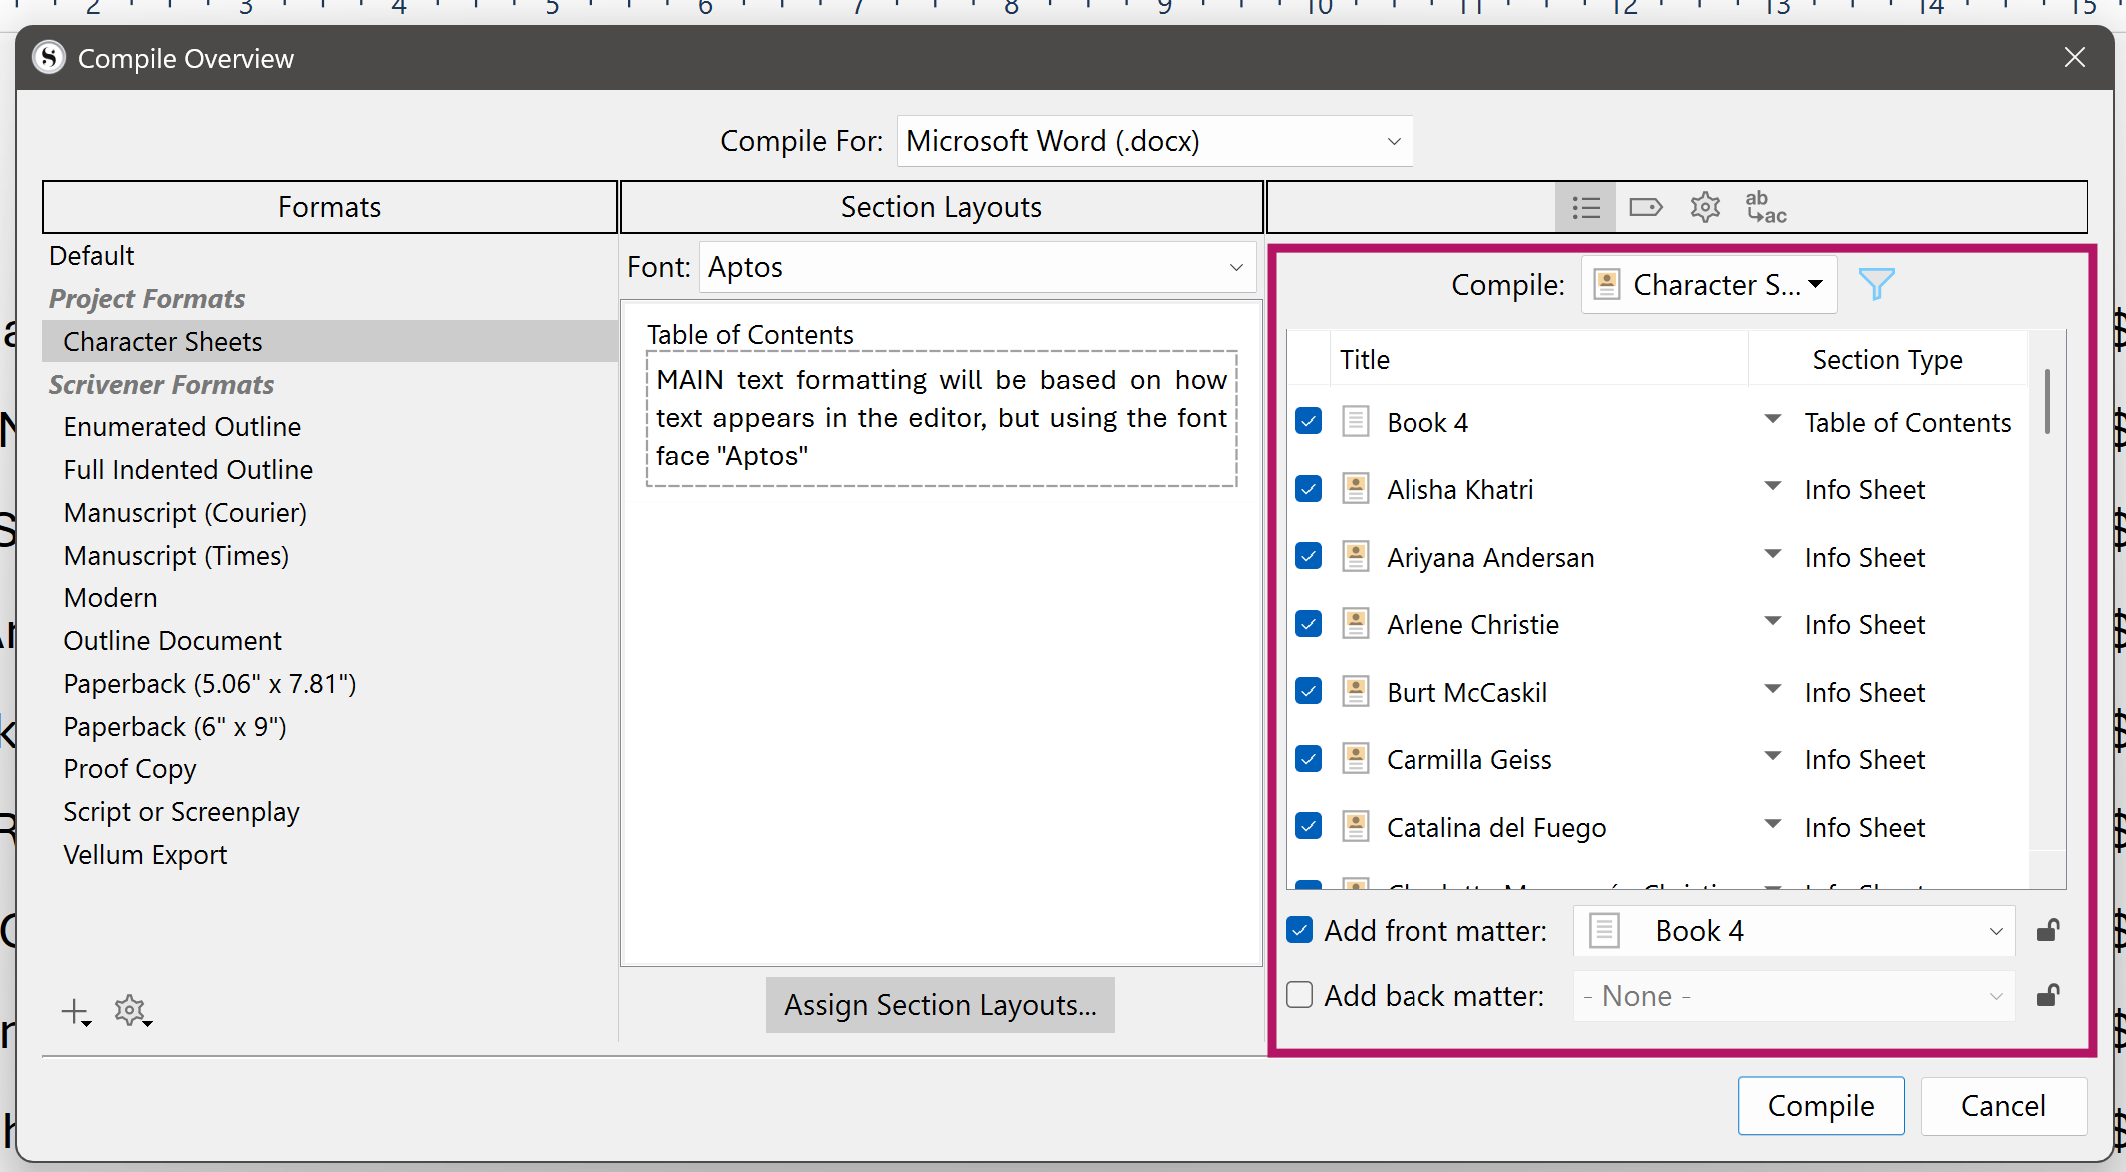
For Compiling, I’ve setup a Section Layout called Character Sheets, which is assigned to the Section Type I call Info Sheet (basically each character’s sheet is that distinct Section Type). Include in Compile is ticked to compile by default.
The only Layout Name I need is Section Text, with Text ticked.
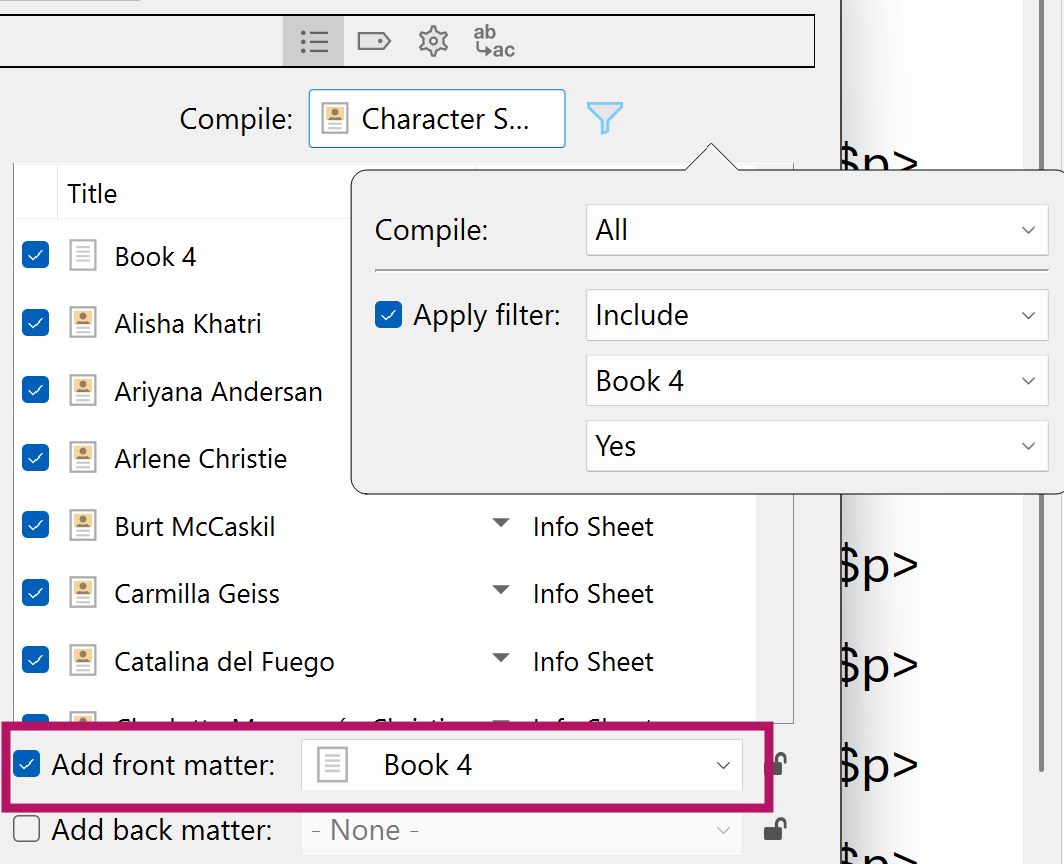
12: Next, I compile the Draft/Manuscript (which I’d set as Character Sheets) and apply a filter selecting Book 4 from the dropdown, which includes custom metadata.
The compiled result gives me a ToC of my characters for a particular book (it can be for all books if I’d like that), along with the character sheets, with each character’s sheet starting on a fresh page.
I mainly want it for editing. No matter how many times I edit I find little things/ or inconsistencies that need to be rectified. If I have a checklist in the Binder, I can add to it as I go. Come back later and rectify the mistakes or check the inconsistency.
If I am having a reread I don’t want to break the flow at that time to jump back a chapter to fix “he was actually wearing a green shirt - not a red one” type mistake. I would just find it a handy, useable feature for minor mistakes.
Use Inline Annotations on the fly for that. I’ve added an icon to facilitate that with a click, which doesn’t take me out of the zone.
When you’re done, Find by Formatting to find all your Annotations and work through each until done. It’s available from the magnifying glass icon.
I do this. I start each annotation with TODO: to make them easy to find. Then I have a Collection setup to search for that text, so that I can see all of them at once.
Bonus: I use BetterTouchTools to create a TODO: annotation with a single keystroke. I also have single keystrokes setup to open and close my TODO: Collection.
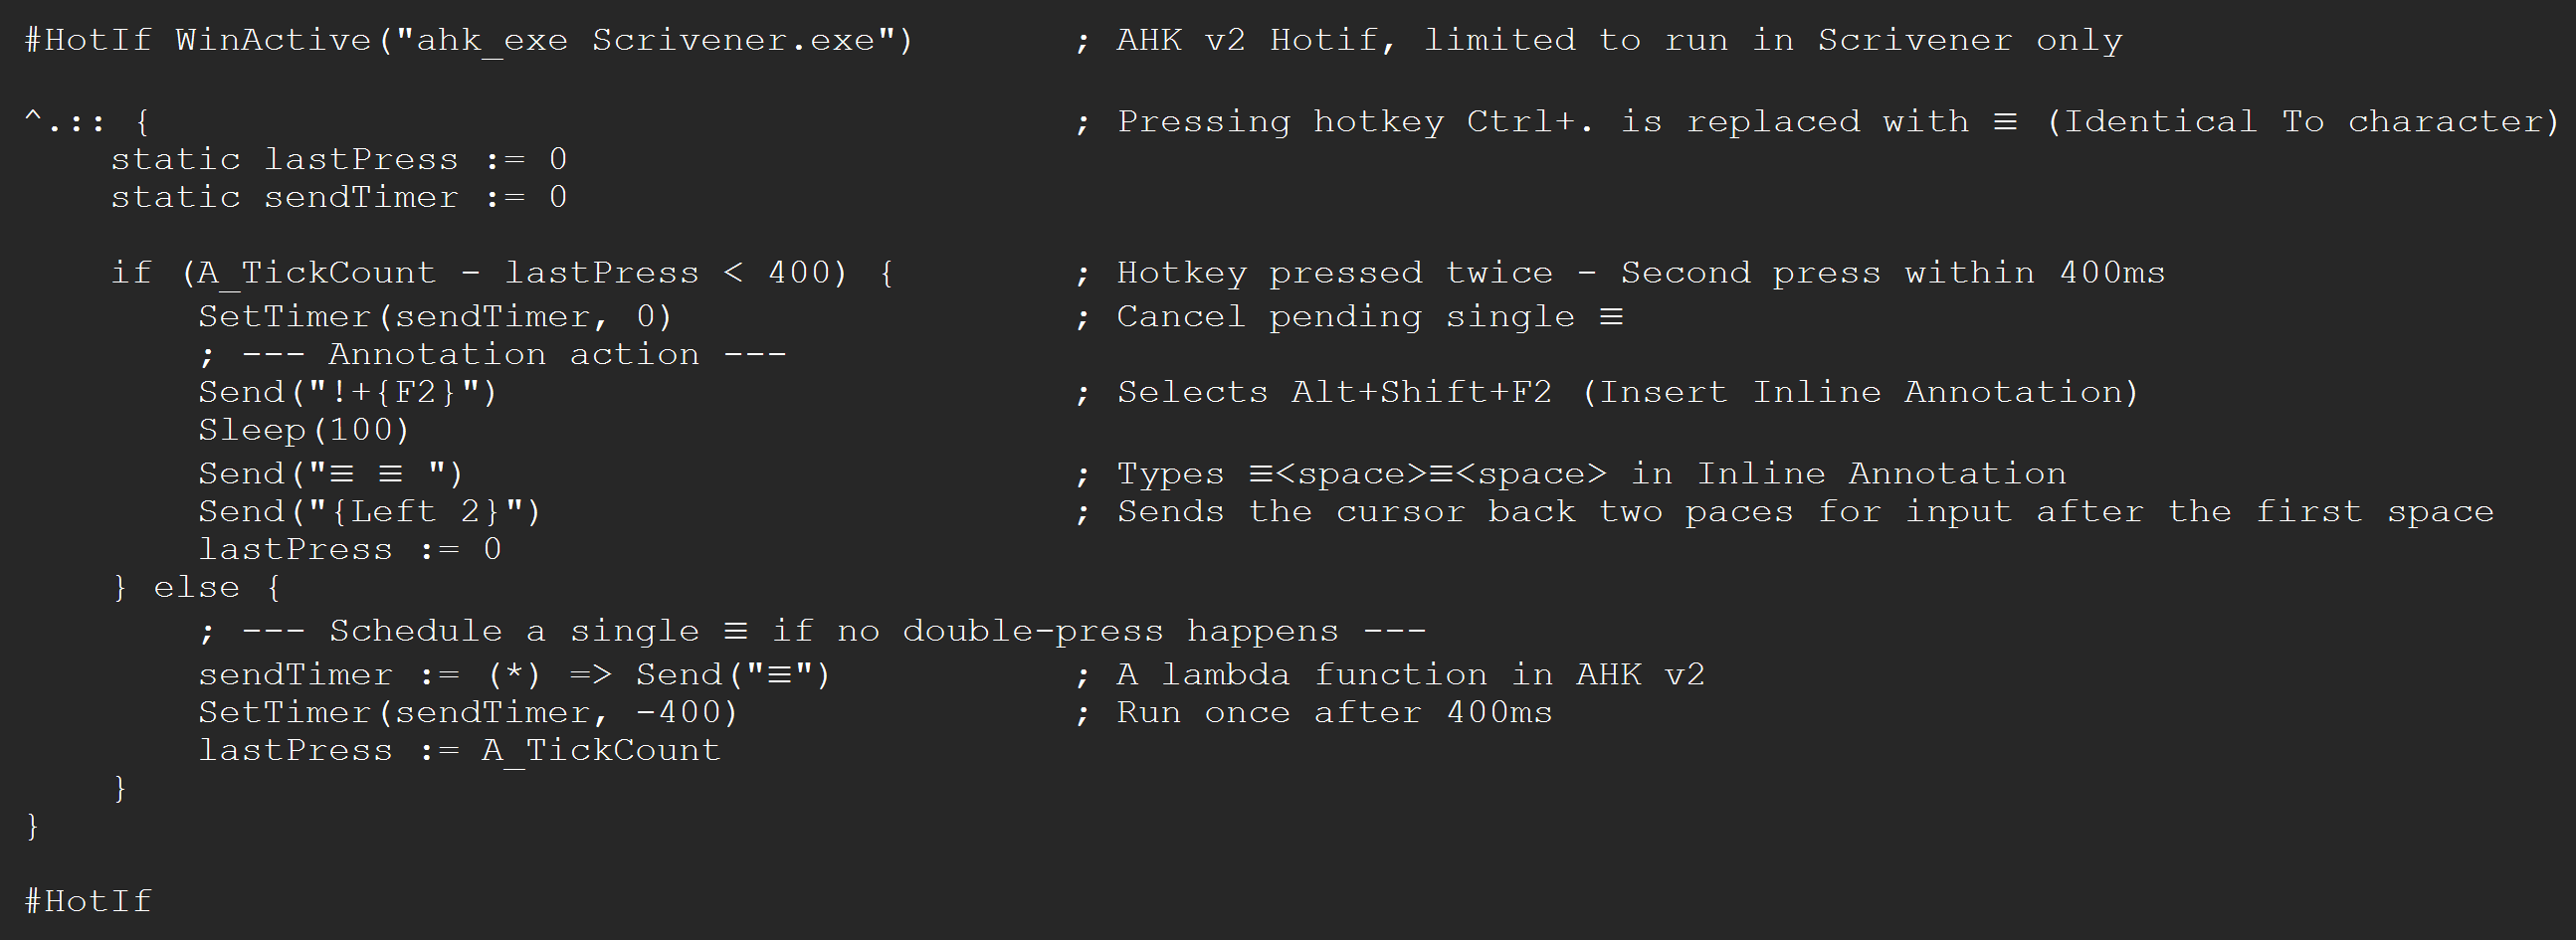
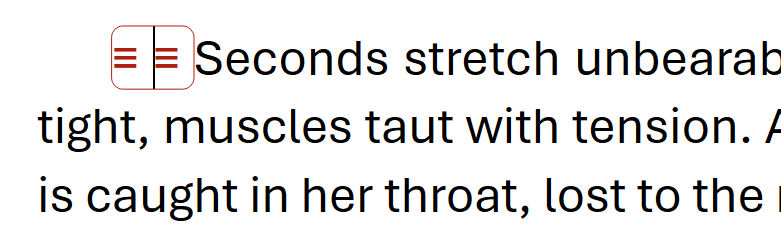
Firstly, in the Editor (and by choice at the beginning of a paragraph I’m referencing), pressing Ctrl+. twice in quick succession sets up the Inline Annotation—note the cursor is exactly where I need to start typing:
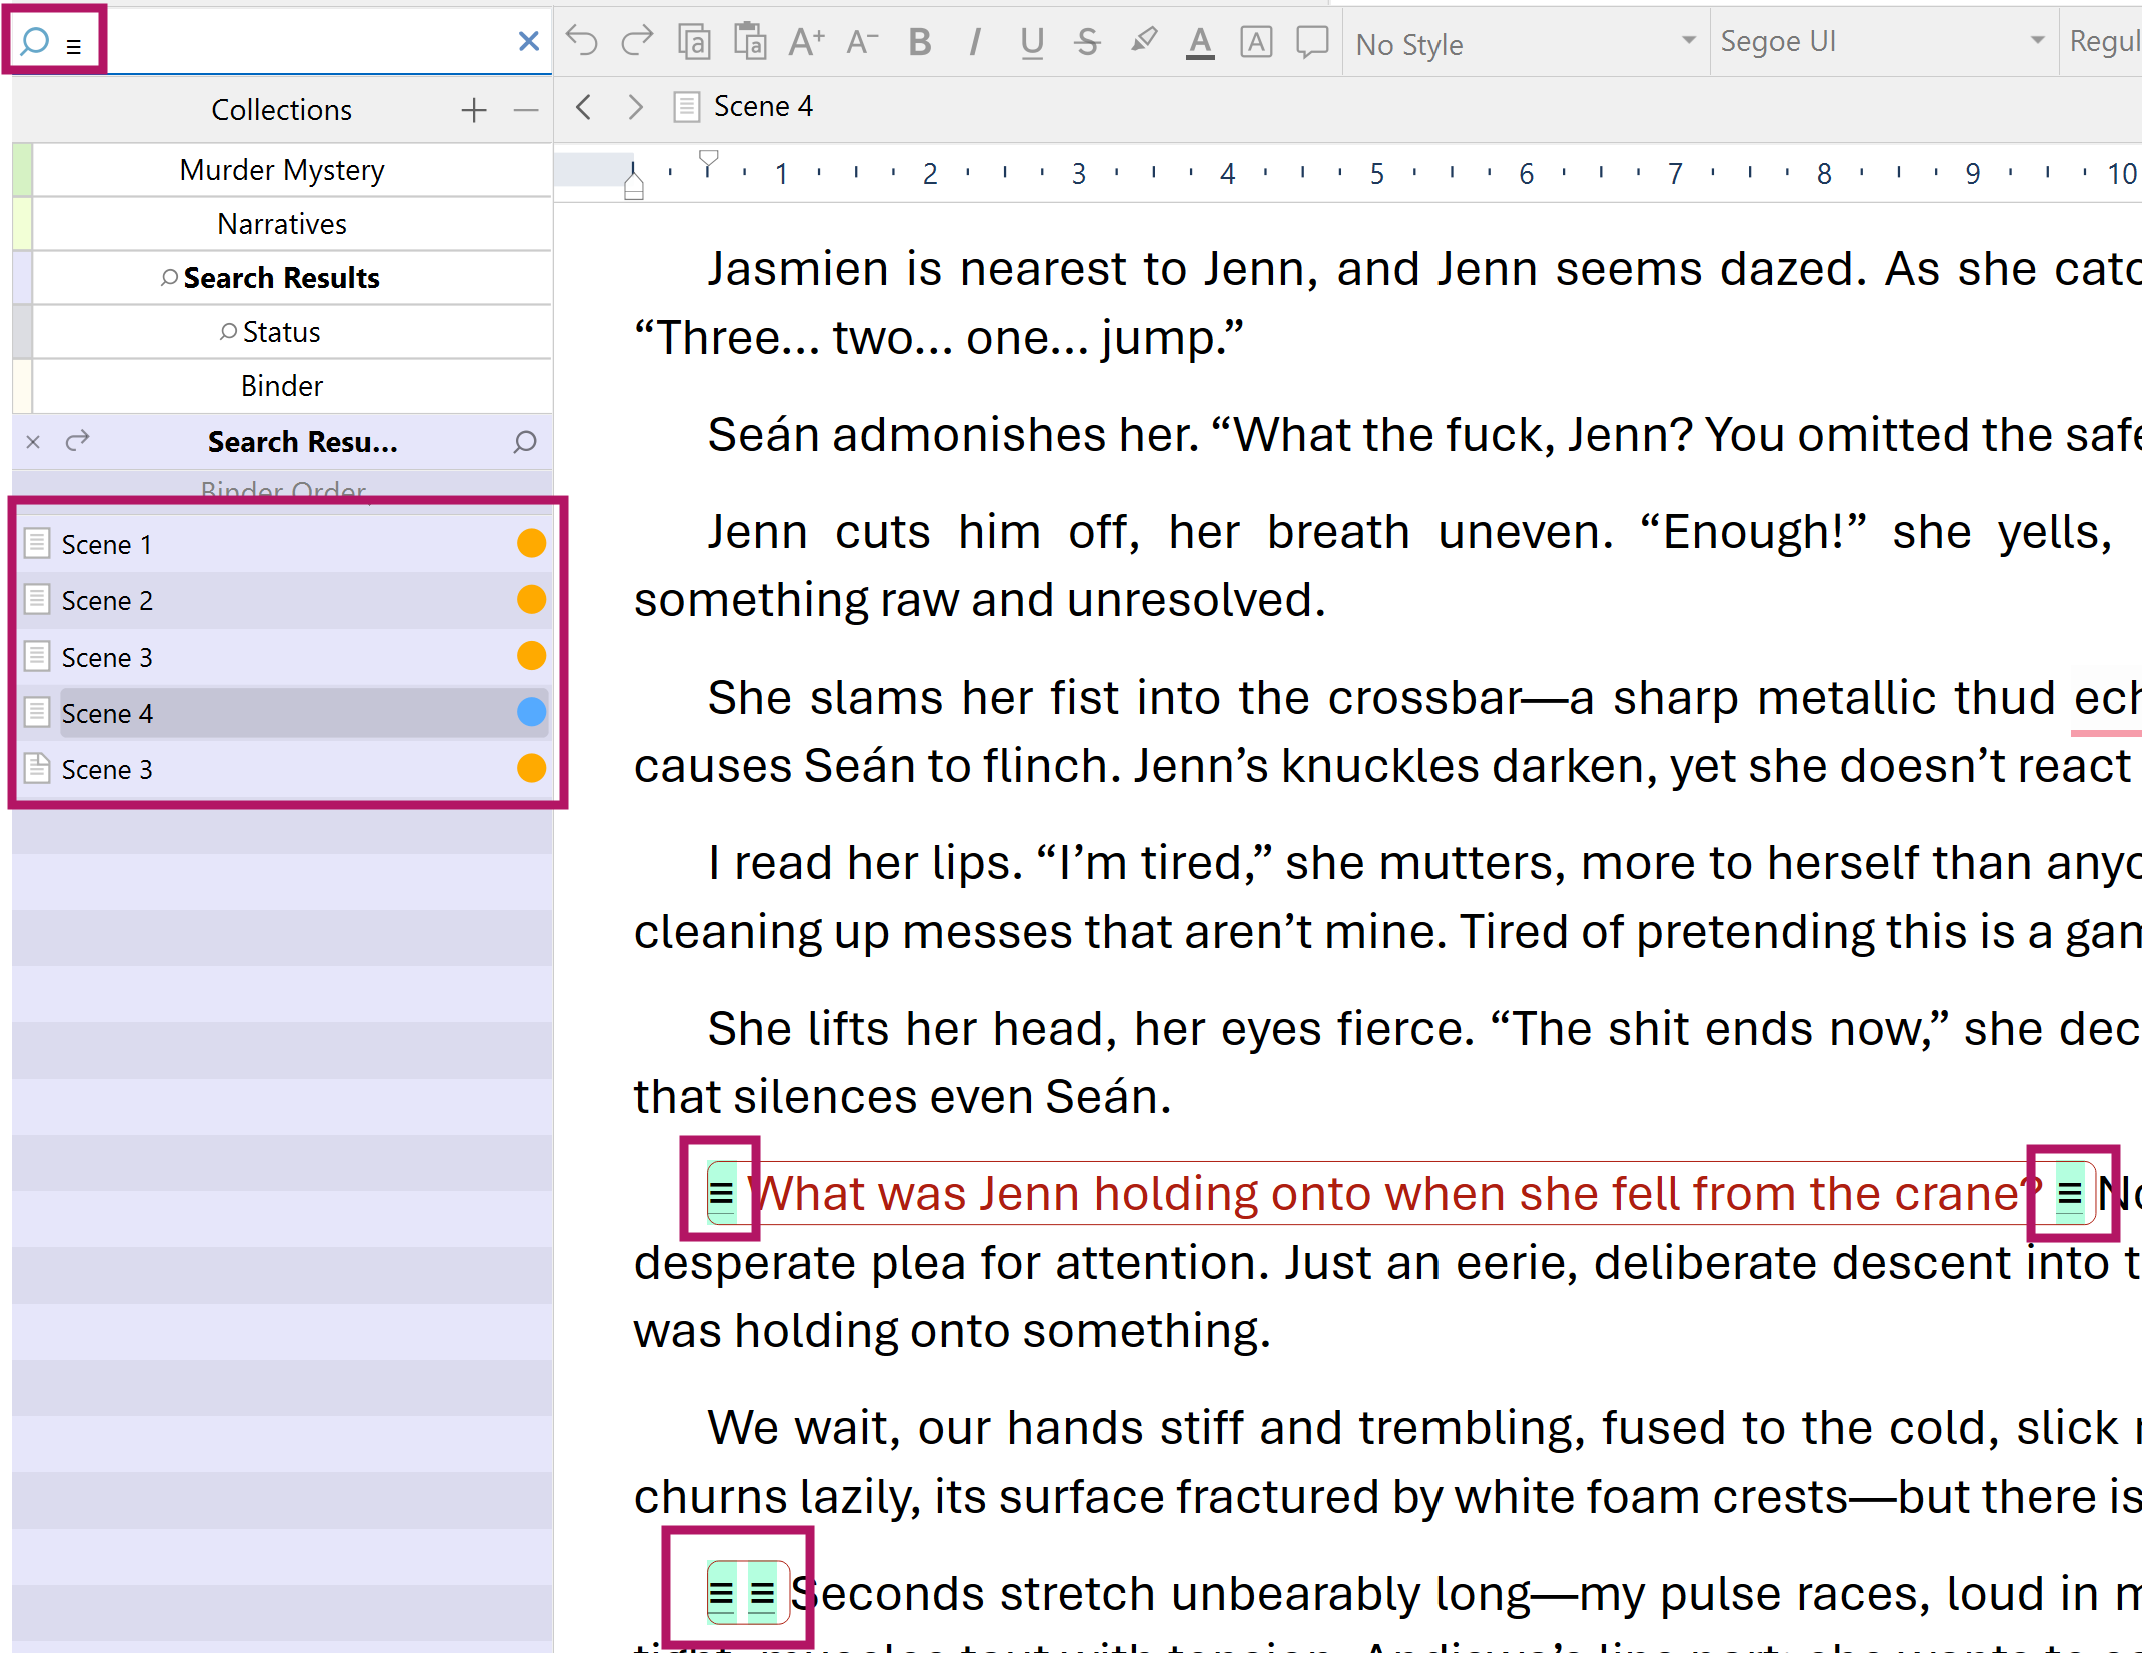
I search for all my Inline Annotation using Project Search (yes, I’m aware I could use Find by Formatting), typing Ctrl+. once only. Here I have to wait a proper second, else it render as ^. instead of ≡.
So, in effect, it lists my scenes containing Inline Annotation and highlights each instance as well: