Ok, that only works if I include my document in front matter with the TOC links. I get BOTH a page with all the HTML links AND working in-book links. Which of course is redundant, and I’d prefer just the nice in-book links. But if I omit the TOC document (the Convert document links to HTML links is checked either way) I lose both.
In the first image, ToC (page 3) is my TOC document, and then I get all the nice chapter links starting on page 5. (The second image shows what that ToC page looks like - so I get both.)
Note that the Compile command will automatically generate a ToC for you. If you have also manually created a ToC document, that could be why you’re seeing a duplicate.
(And both of these are distinct from the navigation menu generated by the reader software.)
See Section 22.3 in the Scrivener manual for more information about ebook ToCs.
Here’s how I get a controllable, clickable Table of Contents in a Scrivever 3 generated EPUB:
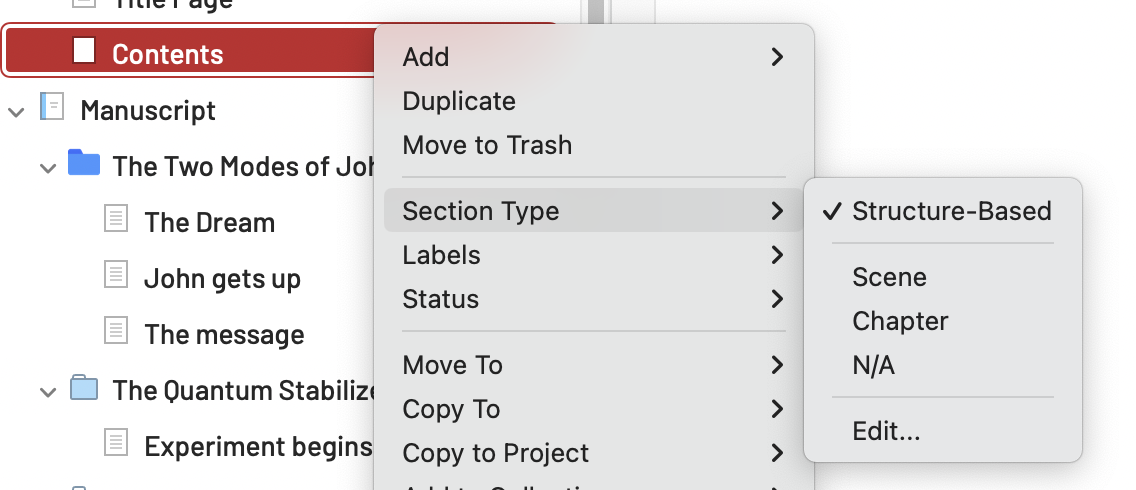
Create a document in front matter called Contents | Right click it and select Section Type > Table of Contents | If you don’t make it a TOC section type, you will get a flat (not clickable) TOC in the EPUB
Select what I want in the TOC and (menu) Edit > Copy > Copy Special > Structured Link List (not TOC) - if you choose TOC you get TOC page numbers which aren’t good for cross-device compatibility (they won’t be accurate)
Paste into the TOC document
Edit as desired
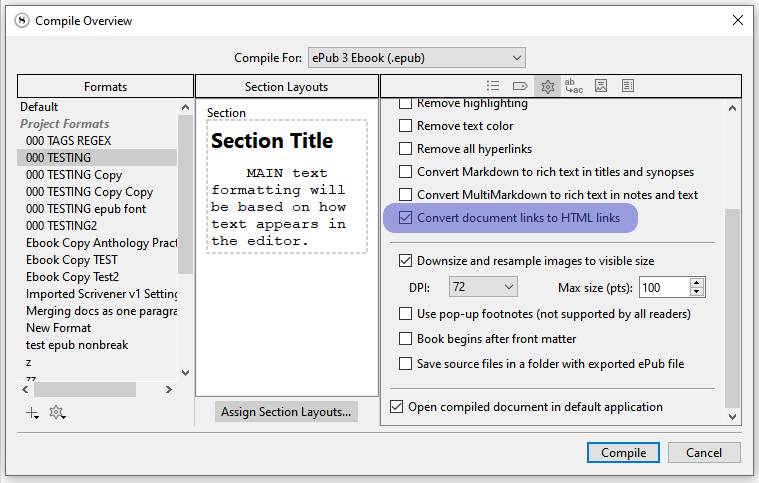
Compile > Select Epub as the out put > Click the TOC icon on the compile screen > select HTML TOC and make sure the TOC document name is the same as your document (e.g. Contents)
The reason for this solution is the automatic TOC generated includes the Front Matter only, not the manuscript items.
My structure is fairly simple. Manuscript folder set to structure-based, nothing but documents in that set to Scene. In other words no chapter folders. I don’t bother with them. A scene=a chapter. The Front Matter folder contains the usual. The Back matter folder contains the Epilogue. Nothing special. These are the options I have
Oh, wow. Maybe that is why. That’s an interesting way to set things up. I sort or rely on my chapters to know where things are. Makes it easier to find things too. I have the same questions as kewms then about chapters and section breaks.
Makes sense (I hypothesize) that they wouldn’t include the type as contents feature unless what you had in the manuscript might not get included in the auto-toc, though I think it should be included, and I think the option should exist either way. I have it set this way because it gives me chapter titles without numbers or the word chapter, yet without having to use folders to get chapter titles into the manuscript. Cool, eh?
Well, you don’t have to use folders to get document titles into the output document, you just need to assign an appropriate layout to the documents you have. Likewise, both numbers and the word ‘chapter’ are easily included or excluded, as you prefer.
But the automatic ToC generator needs something to generate from. The body text of the document is effectively invisible to it.
I mentioned I use SCENE as my section type. As I prefer “chapter” titles to show for my scenes rather than numbers, nothing, or chapter numbers. I have scene set in the Compile screen (assign layouts) to Section with Title.
However, on the epub output, I want the titles numbered, since page numbers are specious. E.g. 1. The Dog Eats 2. The Dog Runs etc. But I don’t want numbers applied to my epilogue, timeline, or other addenda. So simply put the word contents at the top of the contents document, select the scenes/chapters I want numbered, and make them an ordered (number bulleted) list.
There’s an XML bug (not looking to debate, just saying this is what I see from reproducing it across multiple books and fresh contents docs for epub). The number for the second numbered item does not appear in the epub. However, adding a word (like Contents) in the document, then putting my structured links under it, and numbering those eliminates the issue. YMMV.
FWIW, everything you’re trying to do can be accomplished via the Compile command. Having different settings for different output formats is the whole point of the command.