This kind of capability is something we get asked about now and then. While there isn’t a dedicated feature specifically for doing this, there is a larger general purpose tool which very closely provides what you want—and at the same time is capable of much more beyond that: Project Search. You may have encountered the feature before, but there are some tricks that can make it work well for this purpose—and yes, that includes RegEx support, which can do some interesting things such as finding duplicate words.
I do often require something along the lines of what you are describing (I tend to abuse “just” and “simply”!), and so I’ll share how I do that along with some variations you might find more appealing than what I do myself—meaning that out of all of this description below there is likely one concise approach you could take that once set up would involve extremely little overhead on your part to switch in and out of this “highlight mode”.
Setting Up Search
First, with some initial setup:
-
Use the Edit/Find/Search in Project menu command, or click the magnifying glass in the toolbar.
-
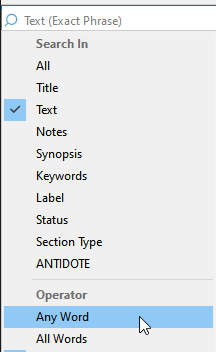
In the search bar that will appear above the binder, type in the word(s) you wish to highlight. You might want to also click on the magnifying glass button to the left of the typing area and hone the options here. For example, to only include matches found within the Draft folder, in “Text” (rather than Titles, Keywords, etc.).
I often want to highlight multiple words at once. This can be easily done by changing the operator to Any Word. One could dump an entire list of words they overuse and wish to avoid into a search like this.
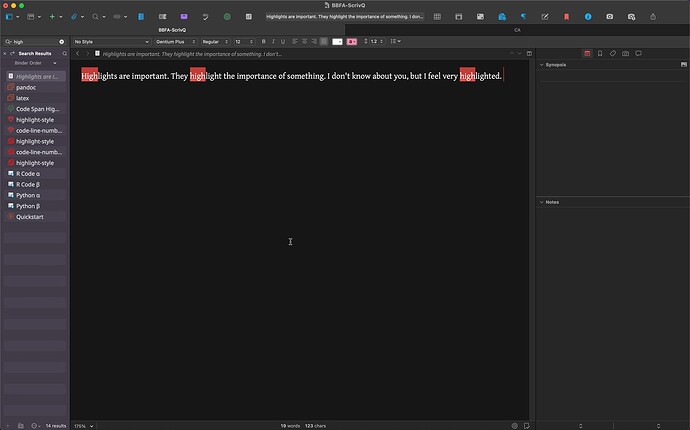
Now you’ve got a concise list of all documents that contain the words in the sidebar, and each instance of the word highlighted for you in the main editors. You can either have Scrivener retain those highlights as you edit the text or remove them. The option for that is, Typing clears search highlights in the Editing: Options preference pane (and by the way the search highlight colour and underscore decoration can be customised in Appearance: Textual Marks: Colors).
If you intend to have this on while writing, you will obviously want to keep that option off.
Refreshing the Highlights
Like me, you’ll probably want to refresh the highlights from time to time, once you’ve sprinted past the rough draft burst. This is easy to do: use the shortcut to move the cursor into the search field (Edit/Find/Project Search), and hit Return.
Read more about Project Search in the user manual, section §11.1.
Preserving the Search as a “Highlight Mode”
The next thing to do is to make it so you never have to do that again.  We will save this search for future use and later recall it with a single click or command:
- Click on the magnifying glass menu to the left of the search tool typing area again.
- Select the “Save Search as Collection…” option at the very bottom.
- Name it whatever you like, and click OK.
- You’ll note the sidebar changes colour and the header for it switches to using your name.
Read more about this in §10.2.4—and also this Collections section in general if you are not familiar with the feature.
To recall this search in the future, there are a few easy ways to do so:
-
Use View ▸ Show Collections to reveal the collection tab list. Now the binder, your saved searches and the last search you ran are all available via single-click.
-
Use the Navigate ▸ Collections ▸ submenu to jump straight to your saved search at any time. This is the method I prefer.
Mac only: this can be optimised further by adding custom keyboard shortcuts pointing directly to common collections. For example one pointing to “Navigate->Collections->Binder” is generally useful, but if I standardise on this concept throughout all of my projects, I could set up a shortcut for “Navigate->Collections->Hot Words”, too.
As a bonus, you can use this saved search as a springboard for highlighting other words as you require. When you load a saved search collection, its settings are loaded into the project search tool, meaning you can refine how it works by changing the word you are searching for, or other settings.
Windows note: at the time of this writing there is a bug where changing the search term while viewing a search collection modifies the collection’s search term.
Browsing the Draft without the Sidebar
Now you have a good way to highlight your draft at will, but you might want to navigate more freely within the draft—with the search result sidebar you can only see those portions of it that contain highlighted terms, and replacing the sidebar with the full binder will exit search mode and remove the highlights. This will also be important if you want to have words highlighted while you are writing, rather than as a retrospective tool, as you will more likely than not be wanting to create new items without having to back out to the binder and then load the search again.
There are a few different approaches you can take here.
A Dedicated Window Layout
-
Split the editor and use one side for navigation, probably as an outliner view, but that’s up to you. For example:
- Click the split view button on the far right side of the editor header bar.
- Use the
Navigate ▸ Go To ▸ Draft menu command.
- Optionally, set the
Navigate ▸ Outliner Selection Affects ▸ Other Editor menu toggle to make it load what you click on in the other split automatically (like the binder works).
If you like this approach you might want to save it as a layout (see Window ▸ Layouts ▸ Manage Layouts; and while there, note some of the built-in layouts might even work well for you without having to do the above setup by hand).
-
If you already use splits extensively, you can turn one split into a navigation tool all by itself:
- Use the
Navigate ▸ Open ▸ in Copyholder menu command. This will open the currently edited document into the copyholder for the current split.
- With the keyboard focus in the main editor (not its copyholder), use the
Navigate ▸ Go To ▸ Draft menu command.
- Toggle the
Navigate ▸ Outliner Selection Affects ▸ Copyholder menu toggle.
Simple Editor Navigation
But if all of that sounds like a lot of setup, you can also efficiently navigate around using nothing but the editor itself in conjunction with keyboard navigation shortcuts—this is incidentally more what I tend to do, I treat the editor very much like a hybrid navigation/text editor. A few tips:
- The
Navigate ▸ Go To ▸ Enclosing Group menu command (⌃⌘R / Win+Ctrl+R): moves “up” from the document you are editing into the group it comes from. This can help in switching to different items and creating new ones.
⌥⌘O / Alt+Shift+O: loads the selected item from the outliner/corkboard into the main editor.⌘[ and ⌘] / Ctrl+[ and Ctrl+] go forward and backward in history.- And it’s worth noting that you can always press
⌘N / Ctrl+N while writing to create a new text item after the one you’re currently working within. This works from Scrivenings mode as well.
- I also use the Quick Search tool a lot (the URL looking field in the main toolbar), to jump around between things I know the name of.
One way or another you can get around within your entire draft inside the editor, thus leaving the binder sidebar in search mode the entire time. In general, Chapter 12 on Project Navigation has a lot of value for getting the most out of the editors.
Let me know if you have specific implementation questions with any of the above.

