I don’t think there is any area of Scrivener that is more frustrating than “labels” I have spent hours watching tutorials and reading people’s descriptions of this fabulous tool, but none of it is helpful. Sure there is a lot on how you can change colors but none on the substance. Or maybe it is that Scrivener 3 bears no resemblance to the versions referred to. My three problems are this. I have no option in Metadata for assigning a label to a card - except at the bottom next to status. All the tutorials feature labels as an available organizing option in the pane (not just on the bottom). And perhaps that explains why even though I am supposedly attaching labels to scenes, none appear in the outline view. Lastly the way the View section is now arranged in Scrivener 3 does not correspond to what was there previously so neither my corkboard nor outline view options include labels. Thanks
Maybe View > Use Label Color in… might help you?
In the outline view, you can enable the “label” column. From there, you can view and modify which label any given document is assigned. You can also select multiple documents and folders, right-click on one of them, and the context menu lets you assign a label to all the selected documents.
What pane are you talking about? They did move labels and status metadata in the Inspector pane to the bottom, rather than in a middle section where they used to be, but they’re still in the Inspector… which is often referred to as the Inspector “pane”.
Antoni pointed out the main way that lables are “displayed” in the cork board, which is by coloring either the icon, or the whole index card. In the outline, as I mentioned before, you can also display it as a column, but you have to add it.
Statuses can be enabled as a “stamp” across index cards, if you want to see a word or symbol as a kind of watermark behind the text of your synopses.
Rdale, thank you so much for you reply. I have column in the outliner view that says “label” but despite having used labels on the scenes in the metadata pane, none appear. I don’t know how to enable them. I think (It was awhile back) added the label column. When you say the “context menu” by right clicking on a scene or chapter, some choices appear but none have anything to do with labels. Thank you for letting me know that I need to use the bottom of the inspector pane to add a label. I have been doing so. In corkboard view the index cards are colored according to which label I have applied.
If you change a document’s label in the inspector at the bottom, and are viewing that document in the outline view without seeing that value in the column, check this: Go to the menu Project->Project Settings, and then choose “Custom Metadata” in the window that pops up. Is there a “label” defined under “Metadata TItle”? If so, rename it to something very different from “label”, like “custom”. If the column of the outline changes, then that’s what it was; add the real “Label” column to the outline view.
If not… I can’t think of what it is that you’re seeing.
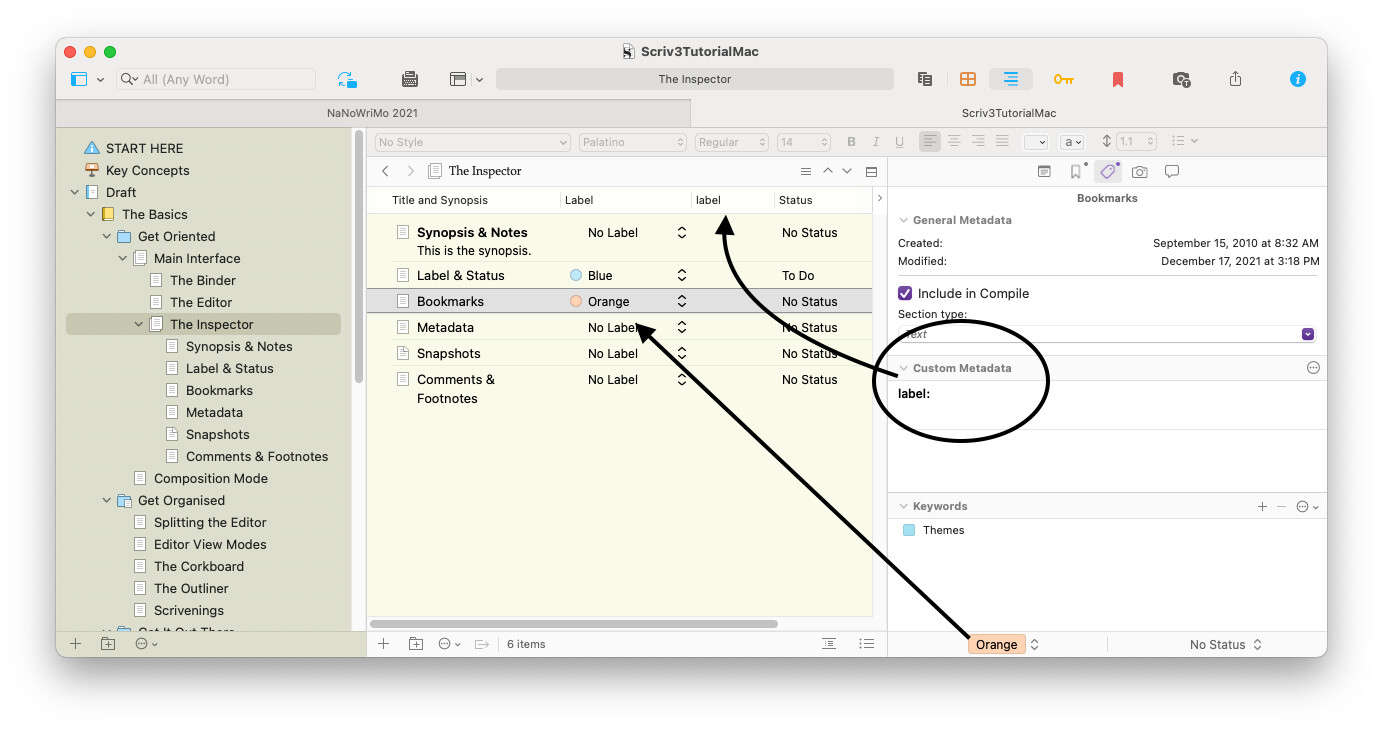
Since a picture is sometimes more illuminating, here’s an example of a custom metadata column named “label” displayed next to the built-in “Label” in outline view. Note that in Project Settings, you can rename the built-in Label metadata title, so that can confuse discussions about “Label” too…
I think we are close to figuring this out. I did as you instructed. I went into project settings, custom metadata and renamed “label” “test”. Then when I went back to the outline view the column was named test. But this just seems like I am renaming columns and the label information is not appearing under the column. When you say: Add the real “Label” column to the outline view. In other words what is the real label column. Obviously just as you point out I am confused about the built in versus the renamed. Thanks
As you’ve renamed your “fake” custom metadata field to “Test”, it should be simpler to find your “real” Label field.
Go to Project > Project Settings > Label List.

This is the “real” Label field that is part of every Scrivener project. Note that the Label field can be renamed by assigning a Custom Title–perhaps you’ve already done this? For instance, I have a novel project where I’ve renamed the Label field to “Plot Line”, because I’m using Label to track plot lines.
To add the “real” Label column to the Outliner:
Select View > Outline.
Select View > Outliner Options.

From this dropdown, find and enable the field with the the Custom Title name–as mentioned above, this is the “real” label, and it may be called Label or something else. Enabling it will add the column to your Outliner.
After doing this, if you don’t see the new column in the Outliner, scroll to the right to find it. You can drag and drop Outliner columns to rearrange them.
Best,
Jim
Jim, very grateful. That did it and so a whole host of organization has just opened up. Thanks again Joel
I actually think keywords is much more useful as can show on corkboard as colors on card, or in outline, and can add multiple ones to any file such as pov, settings, foreshadowing or anything else and do keyword search in collections and if click and highlight multiple keywords can then search for files or folders with that exact group of multiple keywords.
Labels are useful to give overview and will probably change value as project moves along, using different valules when writing such as pov labels and in editing labels for stages of editing.