Advanced Search and Replace: emojis to text in a specific font

Quick reply, Mark, first and foremost to say how extraordinarily grateful I am for all your help and (material) support here.

Very, very much appreciated!

(My own experience with computers is not entirely different from yours. BTW my sister - same last name as mine - may be known to you as a linguist… she is recently retired from Lancaster. Or have my quarter of a century as an expat in the much more populous USA distorted my sense of how small such a community may be ‘back home’? What is your area of interest in linguistics? Perhaps something to exchange Messages here on, rather than (in) this thread?)

At this point I’m beginning to see that this font replacement is possible :slight_smile:

Indeed, as I found out last night with LibreOffice, I think this can be achieved there - even though it’d be somewhat laborious.

In the case of either NWP or LO, does each Scrivener Note have to be exported, ‘processed’, one at a time; or can the Project’s entire text be ‘converted’ at one go?

My concern, though, being relatively new to Scrivener, is how advisable/safe/even feasible it’d be to export files which are presumably well-embedded and quite ‘happy’ in a Scrivener Project into another app altogether (NWP or LO), work on them there - presumably potentially changing their length, any checksum and other metadata for each one - and then bringing them back into Scrivener.

If that is accepted good practice and doing so runs no risk of compromising the (‘internal’) integrity of a (to me, increasingly) valuable Scrivener Project, I’ll experiment forthwith.

Thanks again!

Quick(-ish :grin:) reply:

Basically, Sync with External Folder was set up before Scrivener for iOS was released to enable users to work on documents from their Scrivener project using their iPhone or iPad or other device (I believe the problem with Android devices is the lack of RTF-capable editors, so for them it has to be plain text, thereby losing all formatting). So yes using it must be considered good practice. Read about it in the manual; again it’s not something I’ve used, but as I said, I might experiment.

The only thing that I can think of that might be of concern is styles, in particular “No Style” as NWP (and presumably LO) labels that as “Normal”, so I don’t know what happens there.

I’m actually beginning to think that, were I in your position, I would probably compile the whole thing to RTF opening in NWP, run all the F&R on it, create a new Scrivener project and Import and Split the resulting RTF.

And, talking of compiling, there is a setting somewhere to compile with each document marked so that that can be re-imported into the original project with documents automatically being allocated correctly; it’s intended for working with a non-Scrivener using editor(-person :grin:).

But however you go about it: (1) before doing anything drastic, make a backup, or preferably use a duplicate project; (2) make good use of snaphots before doing anything like this.

Great. Thanks, Mark!

I’ve read section 14 of the manual [pp 358 to 371]; it does seem as though - for someone relatively new to Scrivener - I might run into some snags which could frustrate the whole process - and me :slight_smile: !

So, for the moment, I might be better off experimenting with Compiling, as you say; Yes.

I experimented a bit with Compile. (I still wish it were possible to do all I want to do interns of F&R within Scrivener. But if not…)

Yes, a setting which allows me to perform the ‘round trip’ (out of Scrivener - amend (F&R) - back into Scrivener) without either:

  • having to set separators (I can’t use the hash/sharp/# character !, or
  • losing the document structure on Import and Split…

seems necessary.

I couldn’t find that immediately; maybe @AmberV could help here, please?

Here you are:

:slight_smile:

1 Like

Thanks, Mark!

I’ll try that later today.

I did see that ‘Insert links…’ option when I was experimenting yesterday; but - and I always, always, ALWAYS work on a copy - I couldn’t immediately get it to work.

It usually brought everything back in (on Import and Split) as one single Note.

Perhaps that was because I wasn’t sure whether it still means that I will still have to put Note-separators (at the foot of?) each document… I was thinking of a nice, unique “-±±+&&&” ! ?

If so, I’d like to be able to insert and remove these automatically across all individual Notes.

The good thing, though, remains that - thanks to your guidance - global ‘font-aware’ F&R will work.

If I understand correctly, this isn’t really so much of a workflow that is being proposed but a one time procedure to fix a formatting problem more efficiently in a different tool?

If so I think this is probably the best answer:

And the best way to ensure your document structure is maintained is to set up Heading 1 – 4 (or whatever depth you require) styles in the compiler. This is something that is a good idea to have anyway, as a stylesheet outline in your compiled file will work so much better in word processors, down the road. You’ll be able to insert a ToC with a single command, use the navigation tools they provide, etc. So what could be done now as a quick and dirty outline preservation tool could form the backbone of how your compile setup works down the way.

Setup Instructions...

What I would do is quite simple:

  1. Set up Section Types in Project ▸ Project Settings... to include enough headings for the structure you have. Part, Chapter, Section, Subsection, etc. Use the second tab to have these hierarchically assigned. There is a walk-through on this in the interactive tutorial if it is new to you.
  2. For this kind of task we don’t want the compiler to do much of anything at all, other than stick those headings in. We want the text to stay the way it is. So rather than adjusting one of the more elaborate Formats, make a simple new one with the + button at the bottom of the left sidebar in the compile overview screen.
  3. Click in the Styles pane and create however many heading styles you need. The naming convention is “Heading 1” for top level, “Heading 2” for the next below that, and so on. They can be either para or para+character, but it really doesn’t matter a whole lot, nor does how they look. They exist purely to make importing this file back into Scrivener better, later.
  4. Now go over to the Section Layouts pane and flush all of these examples out with the - button on the top right, save for “Text Section with Heading”. Rename that to “H1”, and in the sample formatting area below, assign your “Heading 1” style to the Section Title sample text.
  5. Click the + button to create a new one, call it H2, and use the “Heading 2” style.
  6. Repeat as necessary.
  7. Save the Format with a good name, and once you return to the compile overview window, click the Assign Section Layouts... button to marry the concept of “Part” to “H1”, “Chapter” to “H2” and so forth.

You might be wondering why we don’t have such a setup for you, built-in, but you can probably see why that would be difficult. It’s really a problem with the whole rich text concept, with styles driving how such documents work. You’ll find the same exact issues in a word processor, where in some works Part needs to be Heading 1, while in others like an article, “Section” needs to be Heading 1. One-size-fits all document generation doesn’t really exist outside of the Markdown universe, where we simply declare heading depth directly rather than semantically or in an embellished way that forces their intent, with formatting.

Example files...

Here is a simple setup patterned after the above, that can illustrate what is going on, and it may even be of direct use to your project.

4-level-example.zip (4.0 KB)

To use it:

  1. Open Project ▸ Project Settings..., and in the Section Layout pane, click the Import... button and select the “4_level_schema.scrtypes” file from the zip.

    Note: the Export button might come in handy if you have stuff already set up here that you care about keeping.

  2. In File ▸ Compile... drag and drop the “four_level_outline.scrformat” file into the Format sidebar to import it.

  3. Now all you have to do is assign the Level 1–4 Section Types to H1–4 Layouts.

After the document has been modified externally, use File ▸ Import ▸ Import and Split..., with the split method set to Split using document’s outline structure, and Remove first lines of text when splitting by outline enabled. The heading structure created above will be converted back to a nested outline and the headings themselves stripped out of the text.

As for this:

And, talking of compiling, there is a setting somewhere to compile with each document marked so that that can be re-imported into the original project with documents automatically being allocated correctly…

Unfortunately that is not what it does. The most it does when you import it back into the project is transform the text markers into internal links. This is 100% a proofing tool. It is so you can proof a PDF or whatever and when you spot something that needs fixing, click a link to jump straight to it in your project. The links/markers are intentionally not removed when importing, so that you can proof in Scrivener. Thus that option would add a bunch of stuff you’d have to manually delete.

There is nothing, other than External Folder Sync, that routes external material between independent binder items. Doing this in a single flattened file would be difficult and prone to failure if markers are moved or removed accidentally.

Whatever the case, it is best to do this kind of thing early rather than later, and to get as much done as you can think of while in the word processor. Compiling and then importing with the intent to replace your original outline is pretty destructive, particularly the more you start using of Scrivener’s feature set. The only thing that survives this is the raw text and outline hierarchy. Labels, metadata, links, freeform corkboards… everything we might want to use Scrivener for at the outline level will be lost.

@AmberV,

Thanks so much for helping here!

You do; and it is, yes. Thanks for confirming the advisability of:

  1. Compiling to rtf
  2. amending (font find and replace, which I’ve tested in LibreOffice and works a charm)
  3. re-importing to Scrivener

Great! Shall try this soonest. Since I haven’t done so, are these Headings part of - or in addition to - the Headings I already have in each note, please?

As things stand now every single Scrivener Note consists of:

  1. one and only ever one Title (no keyboard shortcut)
  2. several Heading 1’s (option + command + 4)
  3. fewer - but potentially several in any Note Heading 2’s (option + command + 5)
  4. (‘masses’ of!) No style text

Or are the Headings you’re referring to something else? If so, sorry.

Could I not use Title as a separator in this instance?

In the document in question the deepest Note hierarchy is currently four: top level in the binder and Notes up to three levels of nested Folders deep. Is that relevant? I’d say it was essential to preserve that Folder hierarchy in the round trip if at all possible, please.

How do I set that up? Or is that part of your instructions?

Thanks. Obviously that’s my next step. Shall work carefully through this on a copy/duplicate Scrivener file asap.

But I must understand the Heading side of things first, I think… mustn’t I? :slight_smile:

Still not clear whether those Headings in Project ▸ Project Settings... are additional to the text formatting paragraph headings in the text itself.

I’m learning a lot here, and recording it all for eventual later use.,

Much appreciated. Will experiment.

That sounds ideal. I tried that before but it didn’t work - presumably because I haven’t done the first part of the setup.

Now I can see why.

Again I am learning… :slight_smile: .

Your help is very much appreciated, @AmberV - I’ll try and come back here if I may. I know I can get this working!

1 Like

I see, yes having numbered headings in the text body does complicate matters, as it sounds like they are perhaps being used relatively rather than absolutely. For example, say we have this binder outline:

Draft
	Part I
		Chapter 1
			Some Text
			More Text
		Chapter 2
			More Text

All right, now seeing as how “Heading 1” is the top level style, we would expect that to be applied to “Part I”. But it sounds like you have it in the text itself somewhere, presumably way deeper? I don’t know. So in effect the compiled stylesheet outline you are building looks incoherent once the body text headings are inserted, like this:

Draft
	Part I
		Chapter 1
			Some Text
	Some Text's Heading
			More Text
	More Text's Heading as well
	Maybe it has two H1 headings
		And an H2 heading in the text (chapter level!).
		Chapter 2
			And More Text
	And More Text's Heading

Does that make more sense? Maybe you’re doing all of this right though. Of course what you’d really want is for the headings in the chapter’s text items to be either H3 (if these text chunks have no heading of their own), or H4 if the text chunk is printing an H3 heading for itself. Like this:

Draft
	Part I
		Chapter 1
			Some Text
				Some Text's Heading
			More Text
				More Text's Heading as well
				Maybe it has two H4 headings
					And an H5 heading.
		Chapter 2
			And More Text
				And More Text's Heading

That is more like what you’re going to want to see in the word processor’s navigation sidebar.

But there are more complications. By putting numbered headings into the text body with the intention of importing the stylesheet outline back into Scrivener later, the second outline is what you’re going to see imported! Each subsection will be indented in its own document beneath the “Some Text” level items they came from. That wouldn’t be the end of the world, Scrivener is designed to work with very detailed outlines, but it might be more outlining than you prefer.

So one way around this pickle is to simply rename your body text styles. Scrivener wants them to be called “Heading 1” &c, so if they are anything else then they are not going to be part of the formal document outline. Even if you just do that temporarily, I suspect that will by far be the easiest thing. You can then proceed to use the prior instructions which inject levelled headings based on your literal outline structure, purely for the purpose of later importing a nested outline and stripping them out.

You can blend the two methods, as I demonstrated in the previous outline, just so long as you keep coherency in mind and use the right level of heading in the body of the text.

I wrote a bit about this topic in this thread. The main point of conversation there was getting good styled output so that a ToC could be added in the word processer. What that isn’t your goal, the road to getting there is identical to what you need, because what makes for a good indented ToC is exactly the same thing Scrivener will be using to import a nested outline from the document’s stylesheet.

It’s a personal choice, whether to do that or not. I myself would not because I prefer a fluid outliner to baked in document structure as a function of the text. I don’t like that in Markdown text either, where we mark headings generically, like “### Level 3”. It’s just stuff I have to manually fix if I want that to become a chapter, as opposed to just outdenting it.

Still not clear whether those Headings in Project ▸ Project Settings… are additional to the text formatting paragraph headings in the text itself.

So specific to this, those are not headings. We might certainly choose to use implement them that way, and in this particular case we are, in order to achieve a specific effect of making your outline round-trippable—but section types can be anything and by themselves they have no implementation, they are purely a name. They don’t even have to be stuff that compiles.

All they are, quite simply, is a way of saying this binder item here is that type of thing. This is one of those things that really sets Scrivener apart from many other outliner-based tools. Each level in the outline can have semantic meaning, and we can also manually assign such semantics to items by hand as well. Even if we don’t use them to compile, they can be useful simply for being a thing, like a section marked “Figure”. If you put all of your figures into binder items tagged with that Section Type, then you can run a search for the “Figure” section type and get a list of figures. You can load a corkboard and then have it filter out all of the items using the type, “Notes to Self”.

When it comes to compile it is entirely based around these types. That is where you can say what a “Part” should look like in the document, what heading level it should be maybe, or if a “Figure” item should print the binder title beneath the image using the Caption style. Or in other words: its implementation.

We’re a bit in the weeds here, but the important thing to note is that your outline can be typed, and you can take those types and assign them to “layouts” in the compiler, which work like printing templates. We are using that capability here to do something unorthodox, something you need for a specific “throwaway” purpose. It is perhaps in that regard a great example of the power of this system in that you can do that, and then later take the same exact binder outline structure and have it print like a book rather than a raw outline feed with brightly colour-coded headings.

While this is all quite a lot to run a search and replace in another program, it’s all solid learning material as this is good stuff to get a grip on. It will make Scrivener much easier to use.

As Ioa (@AmberV) has come in again, at this point I’ll leave you in his capable hands. As I’ve said, I’ve never had to do this myself so don’t know the wrinkles. It seems you’ve got quite a bit of sorting out to do along the lines he gave, but you’ll find it’s worth it.

:smiley:

Mark

1 Like

Please know, Mark, that I’m extremely grateful for the time and effort you’ve put in here!

Thanks so much!

May I step back from this hugely helpful post, which won’t go away (!) and see if I can clear up what might be fundamental misunderstandings on my part about how I should (best) use Headings (and maybe other formatting) in Scrivener - as you say, that will stand me in good stead for the future :slight_smile:

This is (a partial screengrab of) how my Project is set up now:

When I compile to .rtfd and view in TextEdit, I see this:

How far does that help you, Ioa, to assess whether I am using ‘Heading 1’, ‘Heading 2’ (and for that matter ‘Title’ etc) correctly in this Project, please?

I have read here that to start with the Blank template - which is what I did here - may need to adjust my Project Template.

What I think I’m asking is whether I am anywhere close to having ‘applied’, or otherwise used, those styles in this project in the way that I should.

I went back and re-read Section 17 of the manual. But I can’t see anything which addresses the different use you are kindly drawing my attention to. My bad. But I can see I need to grasp it.

May I ask you to point me, please, to the sections in the manual which will help me to understand these:

Is it not good practice to…

As I obviously don’t really understand Heading Styles - do I?

It seems only fair that I should do the research here and not keep asking you to explain things - although I am grateful beyond words for your help :slight_smile:

So a quick ‘tutorial’ that will enable me to structure my Project(s) in such a way that they will both:

  • have Headings - in bold and a larger font size to stand out as paragraph heads, and
  • allow the Compile and Import process to work preserving my Notes and Folders correctly separated

would be very useful.

If I’m following - and my apols if I’m not - you’re suggesting that I rename what is currently ‘Heading 1’ to, say ‘Paragraph Head 1’ and what is currently ‘Heading 2’ to, say ‘Paragraph Head 2’. This will allow two things:

  • my document to keep its paragraph heads
  • I can create ‘Headings’; that can act as indications of structure during the Import process after Compile

Yes?

That is - I can put in ‘artificial’ structure markers, which happen to be called ‘Heading 1, 2’ etc to aid the re-importing and keep both the separation of what was compiled in Screening mode back into the fully-nested Notes structure. Yes?

I suspect that this speaks to the difference you mentioned at the start of your post between ‘absolute’ and relative use of Heading 1 etc. Am I correct?

If so, I sense that there may be a way actually to use headings (small ‘h’) as a way to ‘impose’ a structure on a document - and that I have not done this. Yes?

So I think you’re saying that ‘Headings’ as section-types/section-markers are more like ‘properties’ which can be applied to conceivably to any block of text (or graphics); but I have so far used them as conventional tools to indicate a bold, larger-font paragraph ‘title’. Yes?

If I’m understanding you correctly (and if I’m not, that’s on me; so where should I look to get a sense of how this is working - even a L&L video, perhaps?) I need to rethink this document now… before it’s too late :slight_smile: !

That I can see; I like it; and I want to get on top of this.

My apologies for stretching this out. But Scrivener has become a major part of this part of my work and I really want to understand it fully. Your patience is much appreciated! Thanks again.

So one thing to be clear on is that TextEdit has no idea what a style is, and so to proof one’s stylesheet setup, they would definitely want to use another tool. I don’t know about RTFD either, as a format for this purpose. The industry standard RTF is what I would stick with.

All right those technicalities aside, really there are only a few key concepts to be aware of here:

  1. It’s perfectly fine to mix styled headings in the text body with styled headings coming from the compiler. Just make sure they are hierarchical. 1 is the highest, 2 is the one below that, and so on. It’s a numerical expression of an outline. Skipping to 4 just because the font looks better makes no sense, that would be skipping an indent level in the Draft. Using 3 “inside” of a section using 4 makes no sense, etc. If you can’t do it in an outliner, your numbers shouldn’t be doing it.
  2. “Title” is not a hierarchical style. I don’t even know what that style is for to be honest. Maybe the cover page?
  3. It is of course also perfectly fine to have all of your headings coming from the body text, and the compiler just printing everything as simple text blocks by and large. It’s up to you to keep them organised properly in that case though.
  4. All of this is somewhat aside from what we’re trying to do here, which is to create a heading hierarchy in the stylesheet based on your outline nesting and that alone. Presumably I mean, I doubt you want “Tetrachords” to import back in as a subdocument of “Chords”, and “CMaj7” to be imported as a subdocument of “Tetrachords”, right? That’s what heading levels do, when splitting and importing.

So like I say, you’ve got content that is kind of competing with the notion here of rebuilding your somewhat abstract outline (at least, abstract if it has little to do with your actual document outline) and is thus complicating matters.

That is why I suggested temporarily renaming these styles you are using to anything other than what they are (“Paragraph Head 1”, as you proposed, is a good example), so Scrivener doesn’t use them to build the document outline. Now you can use the described method of Layouts and Types to build the document outline purely from the binder’s Draft folder structure.

After you have fixed the text and re-imported it, you can change them back to what you want.

May I ask you to point me, please, to the sections in the manual which will help me to understand these…

I don’t believe the manual gets into much of that kind of stuff. Perhaps a good point of clarification here is that we are well outside of Scrivener territory here in this matter. This is all general word processing fundamentals. Scrivener allows us to step out of the box as a writing tool, and do wild things (like having tons of outline that doesn’t drive the document outline), but at the end of the day we need a properly formed word processing document in most cases.

And that’s where “Heading 1 is the top level style…” is coming from, that’s not a rule, it’s just what you need for your document to “make sense” to a machine. It’s what a word processor is going to be looking at for showing Parts (or Chapters as the case may be), whatever is “highest”.

So if you are looking to do some research, that is where I would be looking first, but I wouldn’t consider it necessary to implement the checklist, unless you really want to know why this stuff is the way it is. That is honestly a rabbit hole that could take weeks to explore.

So I think you’re saying that ‘Headings’ as section-types/section-markers are more like ‘properties’ which can be applied to conceivably to any block of text (or graphics); but I have so far used them as conventional tools to indicate a bold, larger-font paragraph ‘title’. Yes?

That could be, yes. If “Tetrachord” is not meant to be part of the formal structure of the document, something you might include in an extended ToC for example, then it’s decorative text, and using a formal document structure style for it, like H1 is going to just complicate matters.

I need to rethink this document now… before it’s too late

And fortunately it is very easy to change your mind when using styles. If “Tetrachord” isn’t meant to actually be a part or chapter, a highest level document construct, and nothing else currently using H1 is, then redefine the Style and call it “Electric Bananas” or whatever you want. Problem solved! The only magic sauce here is that very name, “Heading 1”. That’s all Scrivener wants to see to make a formal heading at the given numerical level.

It’s purely based on naming convention (in this area, Scrivener does depart from word processors, which have super complicated setups for this, we’re trying to make things a bit easier here).

And I also meant to say earlier, it’s also very easy and very safe to experiment. Use empty projects you create for no purpose other than to test an import. Compile as much as you want, with different settings. Nothing you do in the compiler will mess up your text. If you change your mind later and really do want “Tetrachord” to be a heading, then rename the style from Electric Bananas to “Heading 5” (or whatever it should be).

And last but not least, if you feel unsure, use File ▸ Back Up ▸ Back Up To... to create a copy of the project called “I’m about to blow things up maybe.zip”. :slight_smile:

Keeping your text (your patience is so appreciated!), I’ve tried to pick out the bits I still need to learn:

Understood. It’s been TextEdit only to view trial Compiles.

To effect the Finds and Replacements, I’ve been using LibreOffice for Mac; does it know (enough) about Styles as they are used in Scrivener?

If not, then that is not going to work for F & R. Although Mark pointed me in the direction of Nisus.

It’s the equivalent extension for TextEdit with graphics… in may case screenshots.

My apols, again, Ioa: do I understand correctly that Scrivener has two ways to create and use Headings? One of them (the one I have used up to now) goes in the text itself - to indicate paragraph heads for clarity of reading only? And that Scrivener can also apply Headings specifically during the Compile?

Understood. Does that requirement apply to text-clarity-of-reading styling, or to Compiler-time styling (still not sure how to effect this)? Or both?

If both, wouldn’t I be wise not to create (?) Heading styles whose numbering overlaps: that is, use Heading 1, Heading 2 in the text for paragraph clarity; and Heading 3, 4, 5, 6 (?) for the structure/compiler levels?

Then I’m obviously misusing Title - or at best not using it productively/profitably… I have it at the top of each Note as the indicator of what the Note is about. What could I use instead: perhaps a Text Heading 0? Or Text Heading 1 and bump existing Text Heading 1 to 2, and 2 to 3?

But if I understand the way the Compiler works (which I don’t yet, alas), wouldn’t that make re-import create a new Note for every Headed-paragraph?

Yes. So…

I definitely do not, No!

I’m beginning to understand, aren’t I?

Would I be right to say that - to make things simpler for me to experiment with on another (unconnected) Scrivener document I could thus:

  1. create it from the Blank template
  2. by all means use the two levels (1, 2) of Heading Styles
  3. but rename these (e.g. to Paragraph Heading 2, Paragraph Heading 2), and then
  4. use some other styling conventions for Compiling

And that those conventions could safely use Heading 1, 2, 3, and 4 to get my four levels of nested Notes-in-Folders to compile in such a way that they would be preserved on re-Import and Split?

My questions would then be (if I have understood):

  1. am I right that Scrivener seeks/detects the presence of structure headings on Compile and inserts them in a compiled export as way to re-import correct?
  2. if Yes, how and where do I insert/mark the document with there structure headings?

Because the only indications of Heading are inside text for legibility - not structuring - purposes?

Using your reference to ‘Setup Instructions’ towards the top of this post of yours?

And the ‘structure Headings’ (?) inserted by Scrivener specifically for Compiling disappear?

Am I finally anywhere near the right track?

It’s obvious that Scrivener is so rich in this area that there might - for me - be a wood/trees issue :slight_smile:

Thanks very much again!

Yes, LibreOffice Writer is very much a stylesheet-based word processor. After you open your document, examine the Navigator tab in its sidebar (View ▸ Navigator if the sidebar is closed). What you want to see is an indented list of headings that matches your draft folder outline. If you’ve got that, then your numbered heading styles are set up right.

You’ll want at least RTF for it, but ODT may work better. It can’t read RTFD.

My apols, again, Ioa: do I understand correctly that Scrivener has two ways to create and use Headings? One of them (the one I have used up to now) goes in the text itself - to indicate paragraph heads for clarity of reading only? And that Scrivener can also apply Headings specifically during the Compile?

Those are two optional ways of doing so, yes. There are actually more ways than two, but those two are all that matter here.

However it wouldn’t be right to say one is only for this and the other is only for that. Again, this post explains that. The final word processing document does not care one bit how or where the hierarchical headings came from, that’s a distinction that only exists in Scrivener.

Headed paragraphs, or non-hierarchical headings, should just use style names that do not match the “Heading #” naming scheme in Scrivener. That’s all there is to it—again such can come from anywhere we please it to, not just one place or another.

If both, wouldn’t I be wise not to create (?) Heading styles whose numbering overlaps: that is, use Heading 1, Heading 2 in the text for paragraph clarity; and Heading 3, 4, 5, 6 (?) for the structure/compiler levels?

I don’t follow what this is driving toward, so it’s hard to say if that would be a good idea or not. Reading that literally though, that would feel a bit awkward to me. More typically I would expect to see lower, or more minor headings (like “Tetrachords”) in the text, and higher, or more major headings (like “Part I”) in the binder. I guess you could do things the other way around, but like I say, that sounds really awkward. Your primary book divisions like parts and chapters would only be found inside text files, but really super minor headings would be split out in the outline?

You absolutely could do that if you wanted to. There no rules about any of this. To circle back to what was said before: all the matters is the output. How it got that way is immaterial to the word processor (or Scrivener’s Split & Import routine, for the sake of this one very narrow use of that structure).

What could I use instead: perhaps a Text Heading 0? Or Text Heading 1 and bump existing Text Heading 1 to 2, and 2 to 3?

There is no heading 0, “1” is at the top. Whatever is at the top should be heading 1, in an absolute fashion. It doesn’t start over in each document (relative fashion). If your book has parts it will always use Heading 1 and nothing else would, unless it is a part.

From your screenshot, I would guess what is performing the function of the text styled “Title” should really be “Heading 2”, but for all I know the “Chord” folder this file is nested within is purely for keeping things straight (it isn’t meant to compile), and the items beneath it are actually meant to be chapters, and thus if there are no parts in this book, chapters are the highest level and thus what you are using “Title” for should be “Heading 1”.

It’s obvious that Scrivener is so rich in this area that there might - for me - be a wood/trees issue…

To an extent I would agree, but it’s really more that word processors and their document formats are super rich, and have rules that are supposed to be followed to make them well-formed. Scrivener by comparison is actually pretty simplistic when it comes to that stuff (it is richer in the toolkit used to construct text, overall I would say, while word processors are pretty simplistic: just jam it all into one massive scroll view). For what we are mainly discussing though, Scrivener only addresses a tiny fraction of what these tools do, but if you do want it to create a well-formed document you have to set it up right, and knowing how to do that is one part Scrivener know-how and three parts knowing what the product even needs to be in the first place.

And the ‘structure Headings’ (?) inserted by Scrivener specifically for Compiling disappear?

Only if you tick the option I referred to in my instructions.

At any rate it sounds like you are on the right track with your proposed experimental project. Everything I said about experimentation being safe is only more so if you’re playing with a project that exists only for that purpose. We all have different learning styles, but for me anyway, at a certain point any form of instruction stops making sense until I get in there and play with it.

Thanks. I am beginning to suspect that as soon as I understand the ways in which Scrivener uses Headings once and for all, this will all fall into place. Meanwhile:

Have I understood correctly that there are two ‘species’ of Headings: one as paragraph crossheads; the other as structural entities - especially relevant during the Compile and (re-)import and split round trip (our case here) because Scrivener relies on them as a ‘special’ case to recreate a Project’s (nested folder) structure?

I so, wouldn’t it be in my best interests now - before trying to Compile - to adjust this Project’s ‘build’ (and that of my other nascent Scrivener Projects in such a way that:

  1. I use something else for my crossheads
  2. I work out how to insert structural Headings?

I have conceived as this (music) Scrivener Project as consisting of roughly 20 (eventually) top level areas of interest; I have called them Topics in the (so renamed) Draft section of its Binder. If it were a non-fiction book, they might well be called ‘Chapters’, but there is no sense of sequence. They are ‘areas’.

Each (such) ‘area’/Topic are up to four levels of relevant, connected sub-areas. Non musical:

  • Animals: top level Note Folder
    • mammals
    • marsupials
    • amphibians
    • backbones?
      • vertebrates
      • invertebrates
    • cloven hoof
    • etc
  • Birds…
  • Insects
  • Reptiles etc…

These top (Animals, Birds etc) and second (Mammals, Marsupials etc) levels are all represented in Scrivener as Note Folders; not Notes.

I’m not sure where - if anywhere - what I believe I should consider what I (maybe mistakenly) call ‘Structural Headings’ fit in and/or where they intersect, whether (structural) headings can and should be applied to this part of the ‘Draft’ component of the Binder.

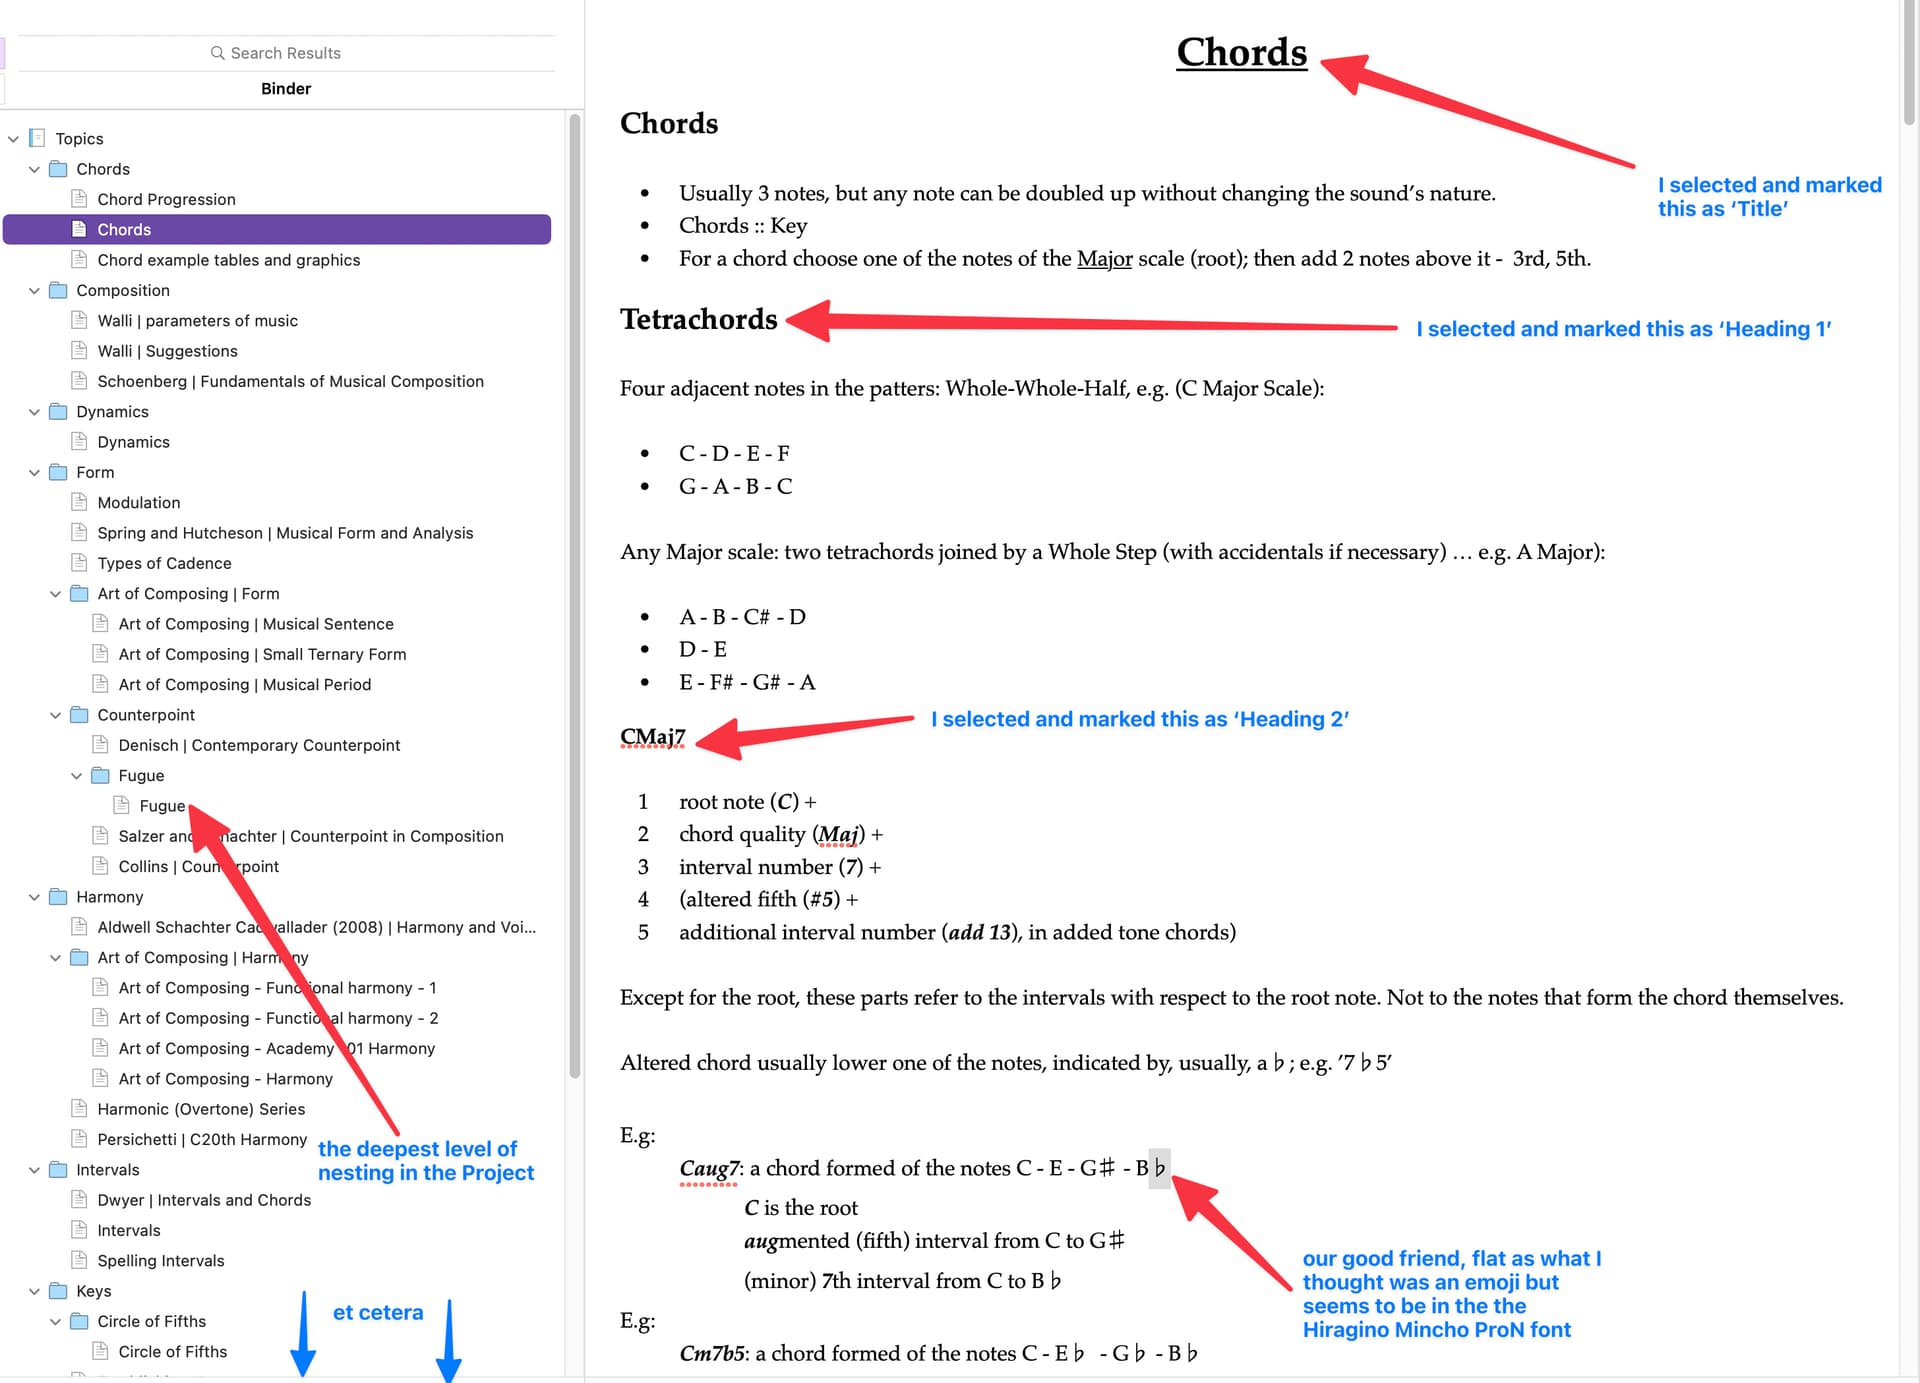
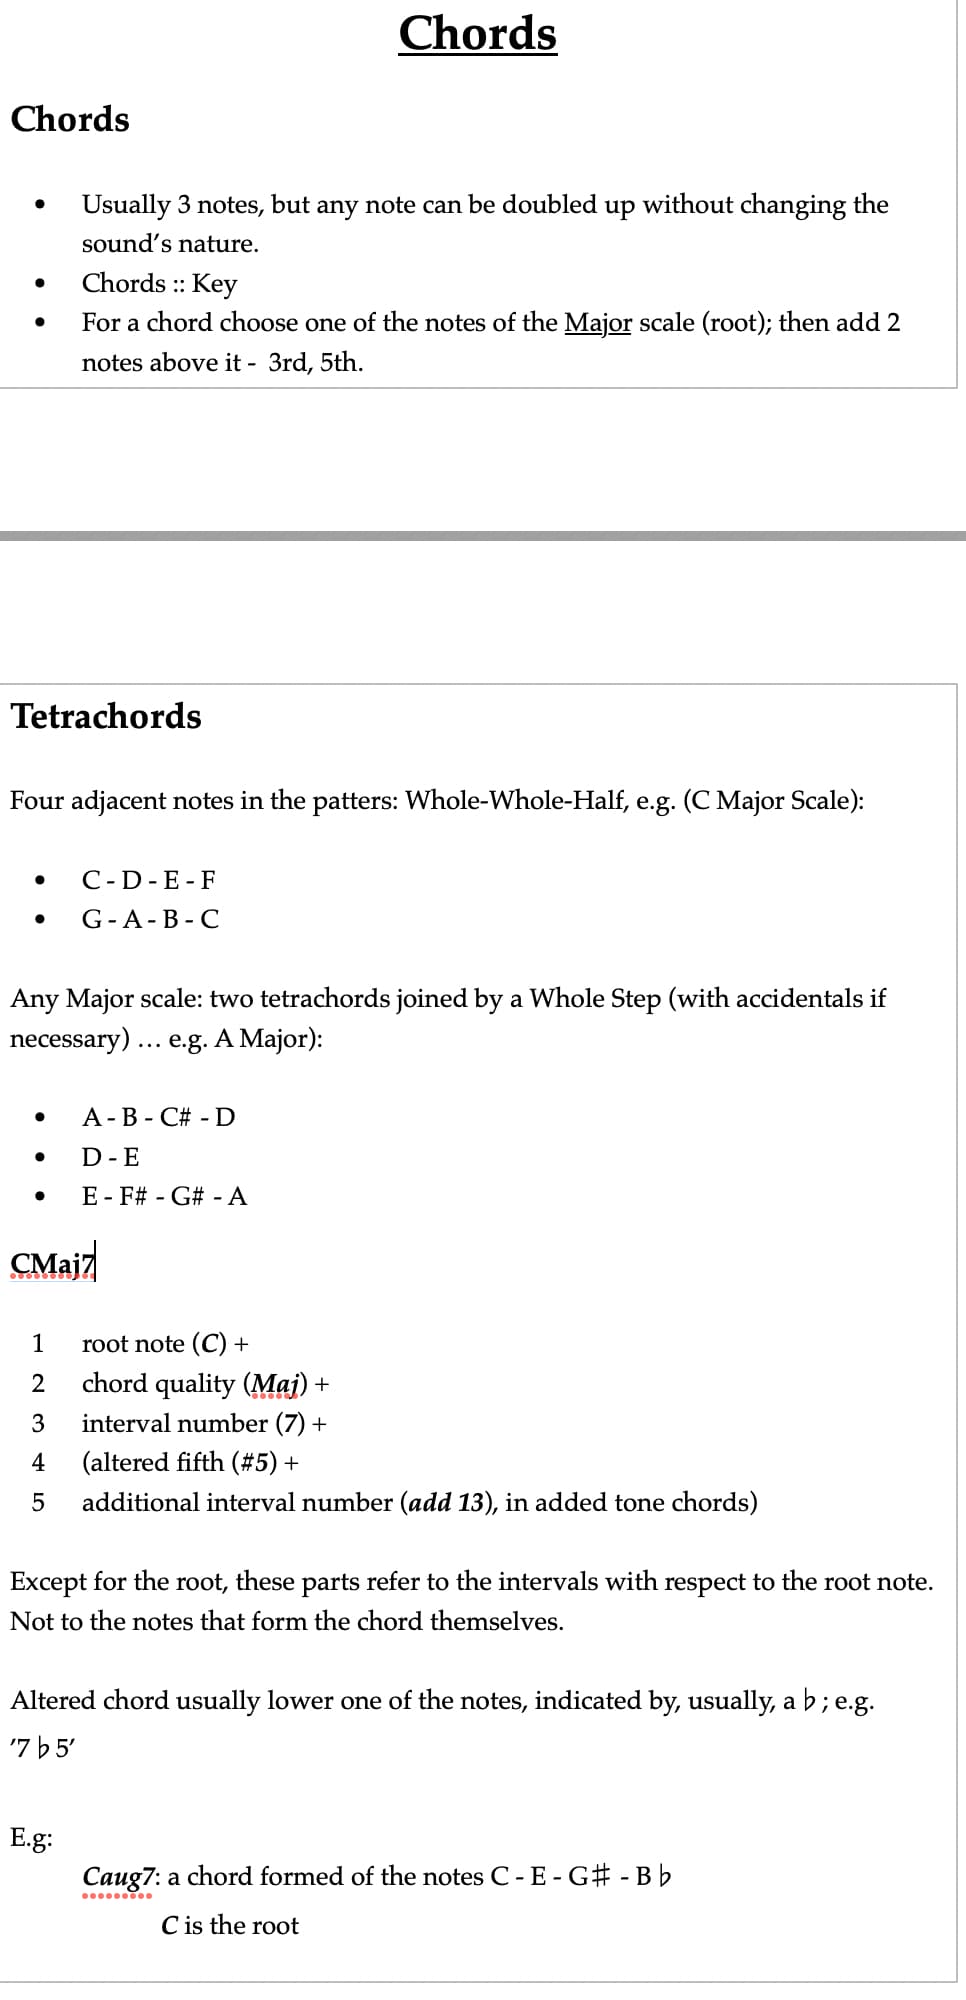
Under each Note folder come up to a dozen (or so) actual text Notes. I have placed Headings as crossheads to separate the paragraphs inside the notes… ‘Chord’, ‘Tetrachord’ etc.

Was that a mistake; or - at best - something that’s holding me up and confusing me?

If so, how does Scrivener best support crossheads?

Maybe my level of (mis!)understanding here speaks to a fundamentally different and much richer approach to document structure (outlines, nesting, segmenting, and generally organizing that I am aware of? If so, I want to correct that now!

So when you say:

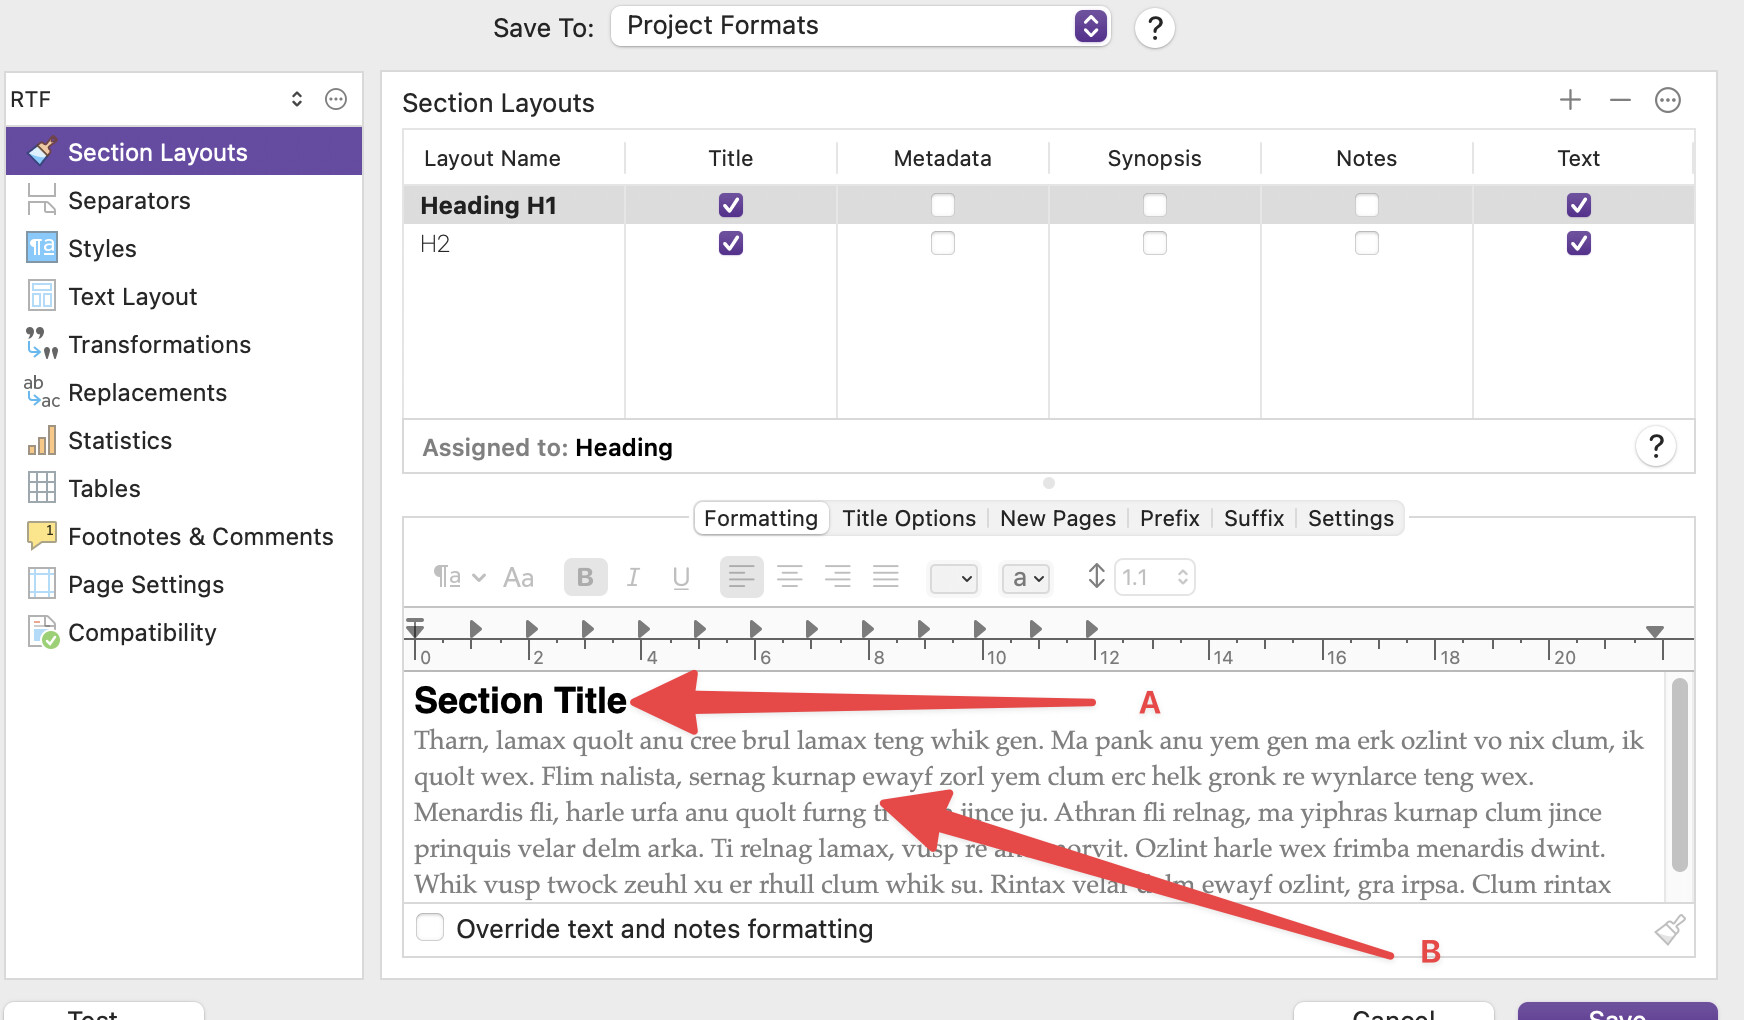
What would those (structural?) headings look like: the names of the Folders? Actual text as ‘Heading 1’, ‘Heading 2’ etc?

As i say, I suspect that, once I can grasp and implement that, I will be almost home and try :slight_smile:

Where do I set these styles up?

So would I be best to create - in my case - two new Crossheads to use as paragraph ‘titles’, just avoid naming them ‘Heading’?

I’m sorry, I know I need to get this more than I do. Why am I aiming to put divisions (like ‘mammals’, ‘amphibians’) inside the text? And no, I most definitely do not want to split anything by crossheads.

I think I see that. Use a dedicated style for the title of the Note? But why not ‘Title’? Is it, perhaps, reserved for the whole Scrivener Project’s title?

I can quite easily change that; but I can’t help thinking that it would help me to know why, please :slight_smile:

Yes, I’d say so: just as ‘donkeys’ are in ‘cloven hoof’, which are in top level ‘Animals’ etc

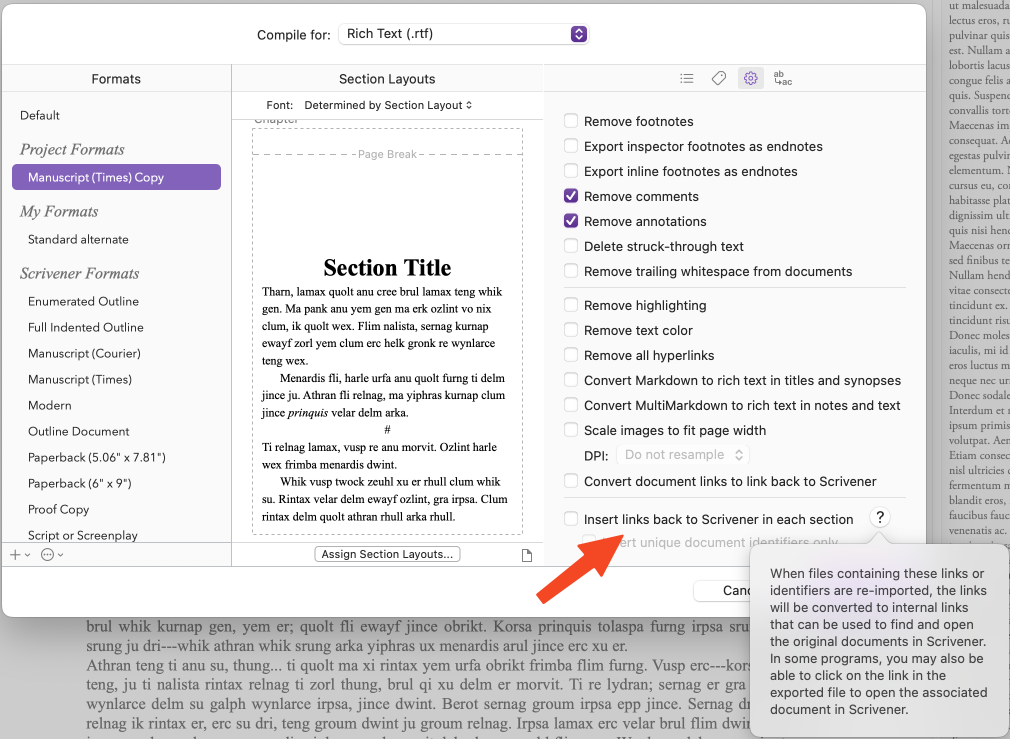
Well, I definitely do want the Chord folder (which isn’t a (test) file as such, is it) and all its notes (which are text files) to be available in the Compiled doc. (Your comments about ODT also notes, thanks) so that I can replace those glyphs in it/them

So should I start to use a ‘Chapters’ naming convention for my zoo?

I have not broken down those 20 or so areas of music theory (chords, dynamics, form etc) into Parts. I could do so; but that seemed like an artificial and unnecessary extra complication.

Again, I feel sure that this is me not really appreciating how or what Scrivener is designed to do in terms of document structure. I do want to get it right, though :slight_smile:

Are you saying that chapters are folders and always should be named as such? And that that is the reason, actually, why I should not be giving each Note its own actual ‘Title’?

Thanks! I shall pursue it then. But may I ask for your patience and indulgence to put me straight on the questions and - obviously - misconceptions I must still have about how Scrivener works best, please?

The time you’re devoting to this is huge, I know; and am very grateful. I too have infinite time to really understand this. Thanks :slight_smile:

Hello again, Ioa - I hope you had a good holiday?

I’ve been experimenting like mad to understand the ways you’re kindly suggesting to give a document the necessary structure to work as required during/for this Compile – amend text – import and split process.

Attached my most recent file.

Structured experiment.zip (65.7 KB)

But it still isn’t importing with anything like the animal-based hierarchy I referred to here. That original hierarchy is lost.

May I ask you to take a quick look and see what I must be doing wrong, please?

Am I correct that:

  1. there are two types of style in Scrivener: text for crossheads and those used for structuring?
  2. I can do more or less what I want in the text editor to aid readability?
  3. but I us use the procedure you outline below (my questions are interleaved) to define and apply them?

I think I’m still not understanding good hierarchical practice in Scrivener and would really like to.

In this case, I really only need a succession of folders - each containing one or more text files (Notes) to a depth of four levels. I’m not yet ‘ready’ for Parts and Chapters - I don’t think!

Should I try and mould my Projects to include them? If it’s good practice, I will :slight_smile:

That’s a simple binary operation, isn’t it? Select it and done?

What would that be with a document such as my animal hierarchy as just alluded to? Again, I really think I only need Notes and Note folders. How do these match with Headings?

To A or B:

How do I know how many and which I need? I’m obviously still confused about Scrivener Headings, aren’t I?

My bad: I’m still confused about this process and how Scrivener handles these entities.

I appreciate this is very drawn out and that your patience, @AmberV, isn’t endless.

But I really want to get the hang of this.

Thanks in advance…

I think you may be making this more difficult than it needs to be.

Putting Scrivener aside for a moment, what is the structure that you ultimately want in your document? The names of things are just words. That is, Scrivener doesn’t care whether you call your top level division a “Part” or a “Scene” or a “Flightless Bird.”

By default, Scrivener will use the structure you define in the Binder. Each document title will get whatever formatting you assign to that document’s hierarchical level. In Scrivener you can call that formatting “Heading 1,” “Heading 2,” etc., but you can also call it “Part Title,” “Chapter Title,” “Scene Title.” Again, those are just words. Scrivener doesn’t care, but since you ultimately want to manipulate the output document in another program, it will be easier if you use a vocabulary that is shared with that other program.

Now, Styles are the mechanism that you use to create that shared vocabulary. If a chunk of text in Scrivener has the Heading 1 style assigned, then another application that understands heading styles can use that information to preserve the structure you created.

In other words, assign Styles to the text that you want to be recognized when you re-split the document to bring it back into Scrivener. That will probably be the document names that appear in the Binder, and probably you will want your top level division’s title to be formatted with the Heading 1 style, the second-level’s title to be formatted with Heading 2, and so on.

To apply those styles via the Compile command, format the “title” text (line A in your screenshot) for the appropriate Section Layouts.

Does that help?

1 Like

To address your example project briefly, I would suggest reading through the introductory text in §7.6, Section Types, and the following subsection, Overview of Section Types in Practice. It seems there may not be an understanding of what it means to fully describe your outline with the vocabulary we would want to establish with Section Types, as your example project only has two types for three levels of depth, and those types are applied in a way that have no correlation to the outline structure. I.e. the project thus far is trying to list all three kinds of fruit in a bowl but only being able to say “apple” and “banana”, when there isn’t even any apples or bananas in the bowl. It is little wonder it doesn’t work yet.

Refer to Figure 7.7 for an example of how you can set your editor view to Outliner mode, so that you can see section type assignments easily. That should make it clearer what the fruit bowl problem is. Compare what you have, with what you get after you import the example Section Type configuration that I made for you. See how one doesn’t describe the outline at all, while the other fully describes with words what each level of the outline does? As noted in §7.6, normally we would use more human-friendly words than “Level 2”. I made my example this way so that it could be applied to any kind of project at all without confusing the example with opinionated concepts of structure, such as having a “Chapter” or a “Note” into the mix.

After you have applied my example settings, play around with the draft outline. Add items, move them around, note how everything is neatly assigned to a section type based on its physical level. The only reason it works that way is because Scrivener is being told to do that. Look at both tabs in the Section Types pane in Project settings and examine how its setup matches what you observe when playing with the structure (it will even highlight in the binder what the various rules impact as a visual aid).

Now move on to the provided example Compile Format, and take a look at to see how this can be done. The problems I saw is that your test didn’t assign layouts with a heading text to both of the two types, and none of the layouts were using the styles themselves for the Section Title sample text (what you have marked (a) in your screenshot), so they wouldn’t have done anything productive, regardless of how they were used by the project.

You will see in my example that that each of the four Layouts (one for each level of depth we want to preserve, again this all formulaic) is using each of the four styles that were set up. Four Section Types, Four levels of depth set up, Four Layouts, Four Styles.

Hopefully this is easier to visualise than trying to mix in concepts of crossheads vs headings, and whether or not you should have parts yet, etc. Those are all merely human ways of conceptualising a complex work at a high level. For the machines, all we need are numbers if that is the sole purpose of the exercise.


Lastly, I recommend using ODT to compile on a Mac. I noticed there may be a bit of a bug where it comes to split & import with RTF, in that it wasn’t reading the outline properly. It worked fine with ODT though, and you mentioned using LibreOffice so that would be the best choice anyway. By doing nothing more than importing my example settings into your project, assigning Level 1 → H1 (and so on) in the compile settings, I got a result I could round-trip.

I definitely do encourage building these settings yourself, rather than just using them without understanding them! Don’t get me wrong if it sounds like I’m saying “just use the files”—but I think looking at them and seeing how they tick will help.

1 Like

@AmberV,

Thanks. Done and noted.

You’re right.

I have yet to explore this aspect of Scrivener.

Agreed.

So I have to actually plan my hierarchy more carefully, more precisely?

Isn’t what I want pretty simple, though: several ‘Topics’, each with one or more documents (= Scrivener Notes) inside (at the next level ‘down’) it?

Thanks; I’ll go back to this and look again.

I see. That explains how it failed to do anything useful.

Yes. Understood.

Thanks!

I’m sure of that!

Just a handful (< 20) ‘top level’ categories. Up to now, these have been Note Folders, each containing one or more Notes with text in.

So can I call each Topic by its own name (in my animal example: mammals, quadrupeds, amphibians); but the important thing is that I have to define and apply Section Types to each top level Note Folder?

Which I haven’t been doing. Yes?

It’s title?

Are those the names of Note Folders/Notes; or the Section Types I define and apply to them?

Assign Styles, not Section Types?

I understand the idea. But, I confess and apologize, I must still be puzzled.

Why would I want to assign all top level folders (which - in the way I have it set up - are just named containers for my topics) to have a, say, Heading 1 style?

Thanks. It does. But I still think I’m not fully grasping the richness of Scrivener in applying styles an types to parts - or is it hierarchical elements - of a Project.

I remain determined. But I know I’m missing some fundamentals here. Thanks for your patience!