I am trying to figure out how to use tables in Scrivener.
I have had a look at the 4-minute tutorial, but several questions remain unanswered. If someone could either answer them or guide me to some tutorial which answers them…
I am using small tables, such as 2x3, which only take about 1/3 of the width of the page. I have no idea how to centre the table in the middle of the page. Following the logic of Scrivener, I suppose that this is done in Compile, but I can find no trace of this in the options concerning tables.
I have tried to make a table with no borders around the cells, so they should be invisible, but when I exported to RTF, then DOCX, they do appear.
Is it usually better to insert tables in Scrivener, or is it more manageable to make it in Excel or Word and then import it? If so, in what format? Impossible to edit it afterwards, I suppose.
If I do need to import it in some form of image format, then it raises another question: how to correctly import images?
I have one which I have imported, and it looks fine in the editor, but it is way too wide when compiled.
For this last question perhaps a separate thread would make more sense.
I have had a look at this thread, but it’s 12 years old, to begin with, so I am not sure if it is still valid… and I am definitely using <$hn> counters, so creating special sections for each table is not really an option, I think.
Surely there is also instructions in the Scrivener Manual, but I didn’t look there.
As an aside, when I do Tables, I usually do them in Excel and/or Numbers and use the more powerful formatting features of those tools which are geared for tables. Then I copy/paste the image (PNG usually) into the Scrivener project. You can control the size of the image in Scrivener by using the Scale Image feature available if you right mouse click on the image.
Thank you for your answer.
Yes, this article is clear. It is the first I read, actually, before even watching the video.
However, it does not answer the issues I have. For example, they suggest adding “as is” sections, but as I said, I cannot do that because I am using <$hn> counters.
As I said, I don’t know how to centre it. I could decide, as you said, to simply import it from Excel as a .png and resize it. However, resizing only tells me what it looks like in the editor, not how it will be compiled, so how can I make sure it will be centred in the end? The issue is the same for an image as for a table. Do you just do trial and error, like resize / compile / resize / compile / resize / compile…?
I have tried again today to compile the table which is supposed to have no borders, but it does have borders when compiled, so this might be a bug. It should be solved if I import all my tables from Excel.
You have definitely answered this question, and since there are 2 “likes” apart from mine, it seems others agree with you that making the tables in Scrivener is not the ideal way
(see issue 1 about resizing and final appearance when compiled)
I don’t understand. This is not what they say in the discussion I referenced in my first message.
If I add an additional section with just a table between two other sections, isn’t Scrivener going to automatically number it as an additional chapter/subchapter?
Compiling as-is means the text format isn’t overridden in Compile. Using placeholders like $hn is entirely unrelated to text formatting. The two are independent of one another.
There must be something I am missing here, but I don’t know what.
The placeholders count the sections and number them. Right?
If I want a table to be formatted “as-is,” I need to put it into a separate section, which I will then tell Compile to compile “as-is”. Right?
If I create an extra section just for the table, for example in the middle of part 3.2, this means the numbering will detect three sections where I only want to have one. I will have:
part 3.1: the beginning of part 3.1
part 3.2: the table
part 3.3:… which should be the end of part 3.1
Have I understood anything wrong?
… unless, of course, it it possible to ask compile to choose ONLY the table and compile it as-is, without creating an extra section for it.
If that is the case, I have just had a look, but I cannot see how to do it.
I hope this is clear, so that you–or someone–can at least understand what it is I don’t understand.
This works fine for the table. The only issue is that what is part 3.2 should normally simply be the continuation of part 3.1.
So I tried something: embedding this section too and treating it like the preceding one: assigning it the same section type. This works, except that all the formatting I use for my text is lost, obviously, as this section type is as-is.
So… I am thinking of creating a section type for tables, one for illustrations, and one called “continued section,” for these embedded sections which are the continuation of the same chapter. I have the impression that this would be the right way to work.
I am now doing these tests on a duplicated version of my work, as it it about 300 pages already and I really don’t want to mess it up. Before I apply it, could you please tell me if this is the right way to do it?
In which case, in Compile, is there a way to duplicate the layout I use throughout my work, so I can create a version of it, simply deleting the title prefix <$hn>?
This would save a lot of time and, more importantly, avoid mistakes, but I have not found how to do it.
Without knowing any details of your project structure, my immediate thoughts are:
I don’t think you will need separate section types for illustrations and tables, as presumably you will assign “As Is” section layout to both. If for any reason there are significant differences between the two, you’ll need both and will have to create the appropriate section types and section layouts. What you call the type is unimportant as far as Scriv is concerned, it merely helps you to keep track of things.
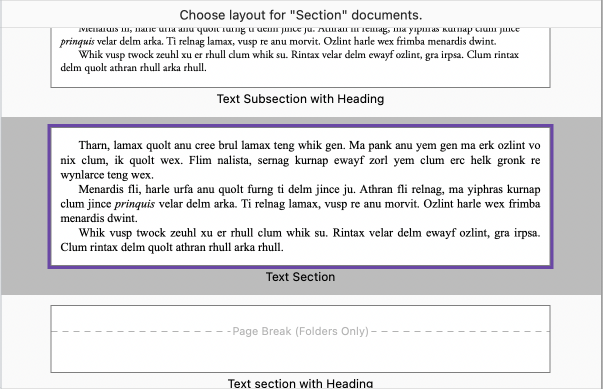
Make a “Continuation” section type for those like you say where you don’t want headings, but want them to be formatted like the rest of the text, and assign it the section layout “Text Section” (I assume that is one of your options!)
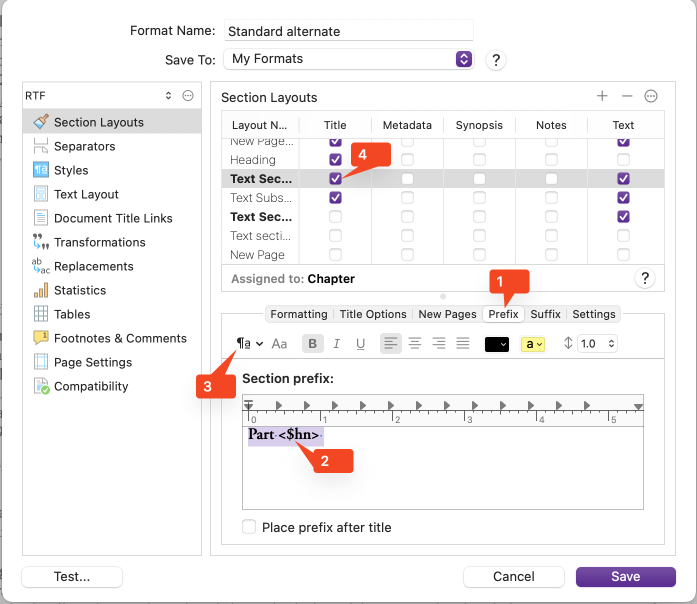
Have you typed the <$hn> and any preceding prefix like “Part” in the binder title? If so, it would be better to clear it out and enter it in the Prefix tab in the compile format editor. You will need to do this for all your sections with numbered headings:
Type in the <$hn> and any other text you need at 2—note the space at the end after the “>”—and then select it all;
At 3, choose the appropriate heading style for that level of document (I typically have up to four levels of headings).
Now if you only want whatever you’ve entered into the prefix to appear in the compiled document, turn off the “Title” at 4; that means the binder title will not be included. The other option is to delete the binder title, at which point it will be populated by the first few words of the text, though that will not be included as a title in compile. Personally, I’d simply switch off at 4.
If you do that, then you can move your documents around in the binder without being so concerned about numbering.
Remember, what is really important is assigning the right section layout to each section type; names are only a convenience for you as is binder hierarchy from a technical point of view. I structure my binder consistently as that makes it easier to “read” the structure, but I actually assign section types manually as again it helps me to keep things/me under control.
I have been trying a few things while I was waiting for your answer, and I think it might be much simpler to import Excel tables as .png and put them in the middle of the text.
I have found how to format the images (centre…). The rescaling is a bit trial and error, but it’s manageable.
So I guess I may not need to have as-is sections, after all.
In any case, all your explanation have taught me a little more about how the numbering functions, among other things!
Thanks a lot!
I think you are completely right: treating tables and illustrations differently is probalby not necessary, so I can have just one section type.
Understood.
Thanks to the very good advice I have had earlier on this same forum, I did type the counter in the prefix… but the complementary information you have given me will be VERY useful too. Crystal clear!
The more I understand about Scrivener, the more I love this tool, really. Just fascinated by the possibilities. So well designed!
Glad you are making progress. When I insert images I try to keep them about 400 ox wide to fit on paper and rest of document. Depends of course your target output format.
Jean-Charles, I’m glad to have been of help, and happy that you are finding your way forward. Each of us has our own preferences as to way of working and structuring or projects, but we can all learn from each other.