I cannot figure out how to structure my binder so that my folders are markdown heading 1 and then the other heading levels nested underneath. I choose text compile, titles as markdown levels…but just titles? It does not appear that the compile converts hashes as headings either when I try to import into IA Writer for IOS. Ultimately I want this to work so that the headers are intact, so I can do a good export to Word from IA Writer (thus enabling a document outline for Word)
I found a good resource: Compiling: Placeholders, headers and footers - ScrivenerVirgin
Other than that, figuring out that every nested folder is recognizable as a header level with markdown formatting output settings is helpful.
Sorry, but I’m a bit confused here. Are you compiling in Scrivener for iOS, or in Scrivener for MacOS/Windows? Compile in iOS is completely different! I did a quick compile in iOS and was able to get your desired Markdown headers, but I needed to modify the compile “appearance” (again, a completely different thing from the compile “format” in MacOS/Windows). I’d be happy to post a step-by-step how-to for iOS, if that’s what you need. Otherwise, for MacOS/Windows, Scrivener Virgin looks like an excellent resource.
It was Scrivener for iOS but I own the Windows version of Scrivener 3 too; I just wasn’t near my desktop for days and was trying to figure it out only on my iPhone.
This is what I did for my iOS version, but I can’t help but wonder if there is something I’m missing. Like the duplicates of the heading titles is annoying but what is a better tag?
Title: Palatino Book Markdown
Author: DHCross

Default Font Family: Palatino
Default Font Size: 12pt


Folder Titles:
  Level 1: <$title>
  Level 2: <$title>
  Level 3: <$etc>

Text Titles:
  Level 1: <$title>
  Level 2: <$title>
  Level 3: <$etc>

Folder Title Format:
  - Font size: 24
    Line Spacing: 1.2
    Paragraph Spacing After: 24
    Alignment: Center
    New Page Options:
      - No First Page Header
# Remove the "#" from the following line if you have parts folders with titles that should go on their own page.
#      - No First Page Footer
      - Start Recto
  - Font Size: 20
    Line Spacing: 1.2
    Paragraph Spacing After: 24
    Alignment: Center
    New Page Options:
      - No First Page Header
      - Start Recto

Text Title Format:
  Alignment: Center

Text Format Overrides:
  Font Family: Default
  Font Size: Default
  Alignment: Left
  First Line Indent: 0.25in
  Line Spacing: 1.2

Title Page Format Overrides:
  Font Family: Default

Folder Page Padding:
  Level 1: 14
  Level 2: 10

Text Page Padding:
  Level 1: 10
  Level 2: 10

Document Breaks:
- Page Break Before Folders
- Line Break After Folders

Header Format:
  Alignment: Left
  Recto Alignment: Right

Footer Format:
  Alignment: Center

Transformations:
- No First Line Indents
- No Links
- Alignment Ignores RC Text

Facing Pages: Yes
Nope, AFAIK you got it. You have to set up both text and folder titles for this to work. You could shorten the cascade by putting the <$etc> tag on Level 2: at which point you don’t need level 3.
What is a way to remove the redundancy of the chapter/section title that is added into addition to the folder or doc title in the compile without deleting every occurance in advance?
Huh. Don’t know. It might help me if I saw a screenshot of your output illustrating the redundancy. I don’t use Scrivener for non-fiction (at least not very often) so I really don’t use interior titles/headings much… Book title, parts, chapters, that’s it…
Hold the phone… do you use headings INSIDE your documents? Scrivener is pretty much set up to use titles as headings, expecting you to split your documents as tiny as needed for that to happen. If you’ve got a document/folder entitled “My Big Section” you do not need to have “My Big Section” typed in as a heading inside that document—it’s in fact counter productive, as you seem to have discovered. This would indeed result in redundant headings. The solution is to remove the redundant headings from the inside of the document/folder.
My profound apologies if I’ve misunderstood you about this.
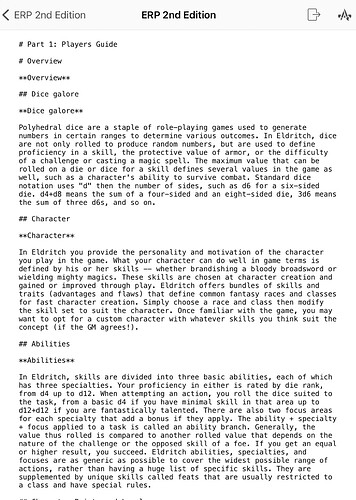
It’s just the name of the folders were derived initially from the headers of a Word document, which I split upon import. So now it looks like this on compile…
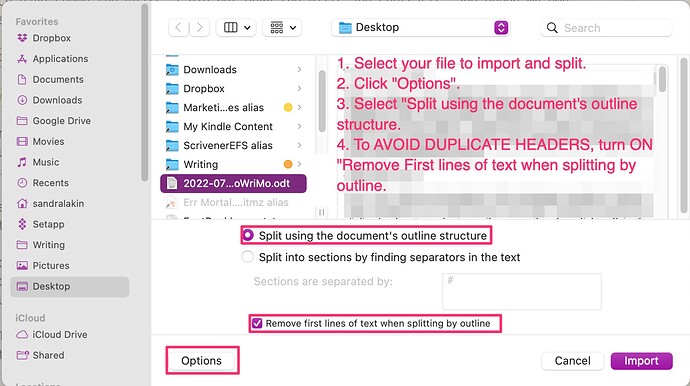
Actually, that was very helpful! To avoid those duplicate headers in future, you’ll need to change how you import Word documents. When you import and split by outline, be sure to turn on the “Remove first line of text when splitting by outline” option. (See screenshot below.)
Unfortunately, the only way to get rid of them in your current project is to either manually delete the first line of text each place a duplicate appears, or re-import from Word. Remember that inside Scrivener, a “folder” is just a text file that’s displayed differently. Think of the “Folder text” as scribbling on the outside of a paper folder. To see and edit it, on the Mac just click on the folder in the Binder, then use cmd-1 to display its text (you may need to use cmd-1 twice to get out of Scrivenings mode.) On your iPad, tap on the folder title in the binder. If you see the corkboard, tap on the little “page” icon in the header bar. Since iPhone has no corkboard, just tapping on the title in the binder will do.
Hope this helps!
Yes, very helpful!
Also, this process, in conjunction with exporting to IA Writer and then using that program to export again to Word, has been a wonderful workaround because Scrivener does not make it easy to export to a file while retaining bookmarks for later PDF, etc.
I was not aware of this shortcut, cool to know!
Also, while I was away from my desktop/windows machine, I could not get that list of placeholders in Scrivener. I searched the web and came up with only directions to get it from the help menu on the desktop version of the software. Now that I am home, I grabbed it, and I’m going to paste it here. I think the company would help its users by having it accessible online, too, for those running around with just an iPad.
I’m glad you’ve found a workflow that meets your needs so well!
I agree that the list of placeholders should probably be Yet Another Appendix in the Scrivener Manual, so that the place one goes for Everything About Desktop Scrivener will have Everything About Desktop Scrivener. (Yes, that’s a request, @AmberV ![]() though Heaven knows there’s enough stuff in there already!)
though Heaven knows there’s enough stuff in there already!)
It looks like you’ve found the iOS Appearances Help as well. It’s for some reason not in the iOS Tutorial, though everything else is. It’s useful because it contains all the iOS Appearances commands available. It’s also useful because if I’m not mistaken iOS doesn’t implement all the placeholders that the desktop versions do; I believe that only the ones in the iOS Appearances help will work on iOS. But in case you haven’t found it yet (or in case someone else comes along and wonders how to find it):
- Bring up the iOS Compile dialog.
- Tap on the Appearance line. This brings up the Appearance dialog.
- Tap the “Edit” button that shows up in the top right corner of the Appearance dialog.
- It you don’t have an Appearance of your own yet, select one of the Scrivener formats and tap the duplicate button (second from the right in the bottom of the dialog).
- Tap the Info button next to any Appearance that has such a button. This brings up the Appearance Editor dialog. (If there is no such Appearance, see Step 4.)
- Finally, tap the Question Mark button near the top right of the Appearance Editor dialog.
Finally, finally, Appearances Help displays! You can copy all of it and put it in a text in your project’s Research folder (I always do; I do this with the desktop Placeholders reference as well.) And why we have to jump through so many, many hoops to get to the Appearances help… well, I don’t know. It seems to me that this is essential information that darn well ought to be in the iOS Tutorial (described as The Only Reference for iOS Scrivener—except it’s not.)
Happy writing!
How can I compile to a markdown file that ensures Scrivener actually sees carriage returns? It seems to work as I want when compiling in IOS but on desktop it compiles without recognizing the carriage returns, producing huge slabs of text with no breaks.
Good question. Let me play with it a bit. Keep in mind that I’ll be trying stuff on a Mac, so it may only be a rough guide to Windows…
Okay, then. I took the trouble to check the Windows manual and it looks similar so this should work.
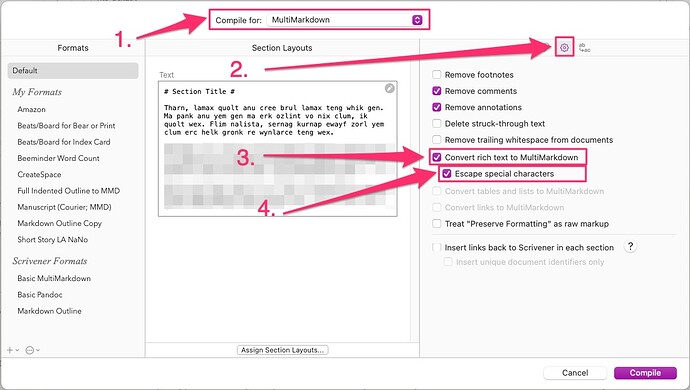
I’m assuming that you’re compiling to MMD, like no. 1. in the screenshot below. I’m also assuming that you have suitable layouts assigned to your section types—a reasonable assumption since you seem happy with your compiles, aside from the “uni-paragraph” problem.
Finally, I’m assuming that the text in your project is rich text, since you’re importing it from Word. In other words, italics show up in the pre-compiled Scrivener text as italics, and not as *italics.*
So, here’s what worked for me trying this with such a project:
- Click on the “gear” icon in the Compile dialog (no. 2. in the screenshot below.
- Turn on “Convert rich text to Multimarkdown” (no. 3. in the screenshot.) This should get your paragraphs to break as they should.
- Optionally, turn on “Escape special characters” (no. 4. in the screenshot.) This should get things like asterisks and angle brackets to show correctly in your output.
Hope this helps!
That worked great. I am glad you mentioned having suitable layouts assigned to your section types. I knew I needed to do so, but had forgotten to change regular text sections to sub-headings in my structure. Once I did that and checked off those boxes about converting rich text and escape special characters" I was in great shape to export. IA Writer did the magic for Word Export so that my headers came out perfect in Google Docs as well.
Thank you!
By the way, if you install Pandoc and reload Scrivener, you will find a new set of Markdown export formats added to your Compile for drop-down menu, at the very bottom. Pandoc → DOCX is one of the, which would save you the step of having to load the .md file in another software, and then use its interface to export again to another file type.
Pandoc’s DOCX files have proper heading styles as well, so you’d get a structured document in a word processor. Perhaps you prefer iA Writer’s output though, there are plenty of options out there for the step of turning .md files into end documents. But I figured I’d mention that you can reduce this down to one-click in Scrivener if that’s of value to you.
Also, just for the sake of any future readers—you do not have to switch to using RTF as a writing style if you want to avoid the use of Markdown-style double-spaced paragraphs while writing. It only takes a few switches in the compile settings to enable paragraph spacing conversion. This post was written to someone writing LaTeX instead of Markdown in Scrivener, but for the purposes of changing word processing-style paragraphs to plain-text style paragraphs, there is no difference in the 2-step procedure described in that post.
That is very interesting and useful to know as well. This journey began when I discovered that compiling directly to PDF never included bookmarks that followed the heading structure. Then I learned that I could use RTF export and then convert to PDF using word or LibreOffice or whatever. But I was happier with the results of exporting first to Markdown. And now I for sure will check out Pandoc!
The problem with the Markdown export wasn’t the double spacing; and it was that all of my paragraph carriage returns were ignored and I ended up with huge paragraphs all squished together. That was because I forgot to ‘escape’ the carriage returns, right?
The problem with the Markdown export wasn’t the double spacing; and it was that all of my paragraph carriage returns were ignored and I ended up with huge paragraphs all squished together. That was because I forgot to ‘escape’ the carriage returns, right?
There is a bit of an overlap in jargon here. In plain-text terminology, or to speak of how we type in text, “double spacing” refers precisely to how you created two paragraphs here on the forum just then (which is also using Markdown): you pressed the Enter key twice.
Now on the forum if you don’t do that, it won’t create as much of a wall of text as a more formal Markdown parser, like Pandoc or MultiMarkdown will. It allows for “sloppy” returns, so that those less familiar with the approach don’t get as tripped up.
They won’t quite be paragraph breaks.
As you can see here,
…more like a list.
But in Markdown proper, to do the above you’d need to indeed escape the returns in some fashion to achieve that, either with a “\” at the end of the line, or by leaving two spaces—otherwise all three lines would end up in the same paragraph. You don’t have to do that for normal paragraphs, just informal lists.
It’s actually a nice “feature” if you think of it as one, as being able to write sentences one per line is an interesting way of keeping yourself from writing overly long sentences. With word processing you’d have to clean it up afterwards, but with Markdown you can just leave it be.
By all means, continue using Scrivener’s RTF → Markdown conversion checkbox if you want. That does handle paragraph spacing conversion for you, and is all around the easiest way to get into some of the more high quality output Scrivener supports (particularly for technical and non-fiction writing), without having to learn much of anything about Markdown.
I just wanted to point out that one can still write paragraphs “normally” if they choose, without having to resort to that all-in checkbox, which makes any kind of Markdown-based writing more difficult to do. For those like me, that actually prefer writing in Markdown itself to using word processing tools, using that checkbox would make life harder. Something in between might be better, where some things are converted, but not everything.


