It will be hard if you want exact WYSIWYG, as markdown does not always represent the document in the same way that RTF will. In your example, Scrivener is generating some markdown like this:
# Searching
To search for documents in the project:
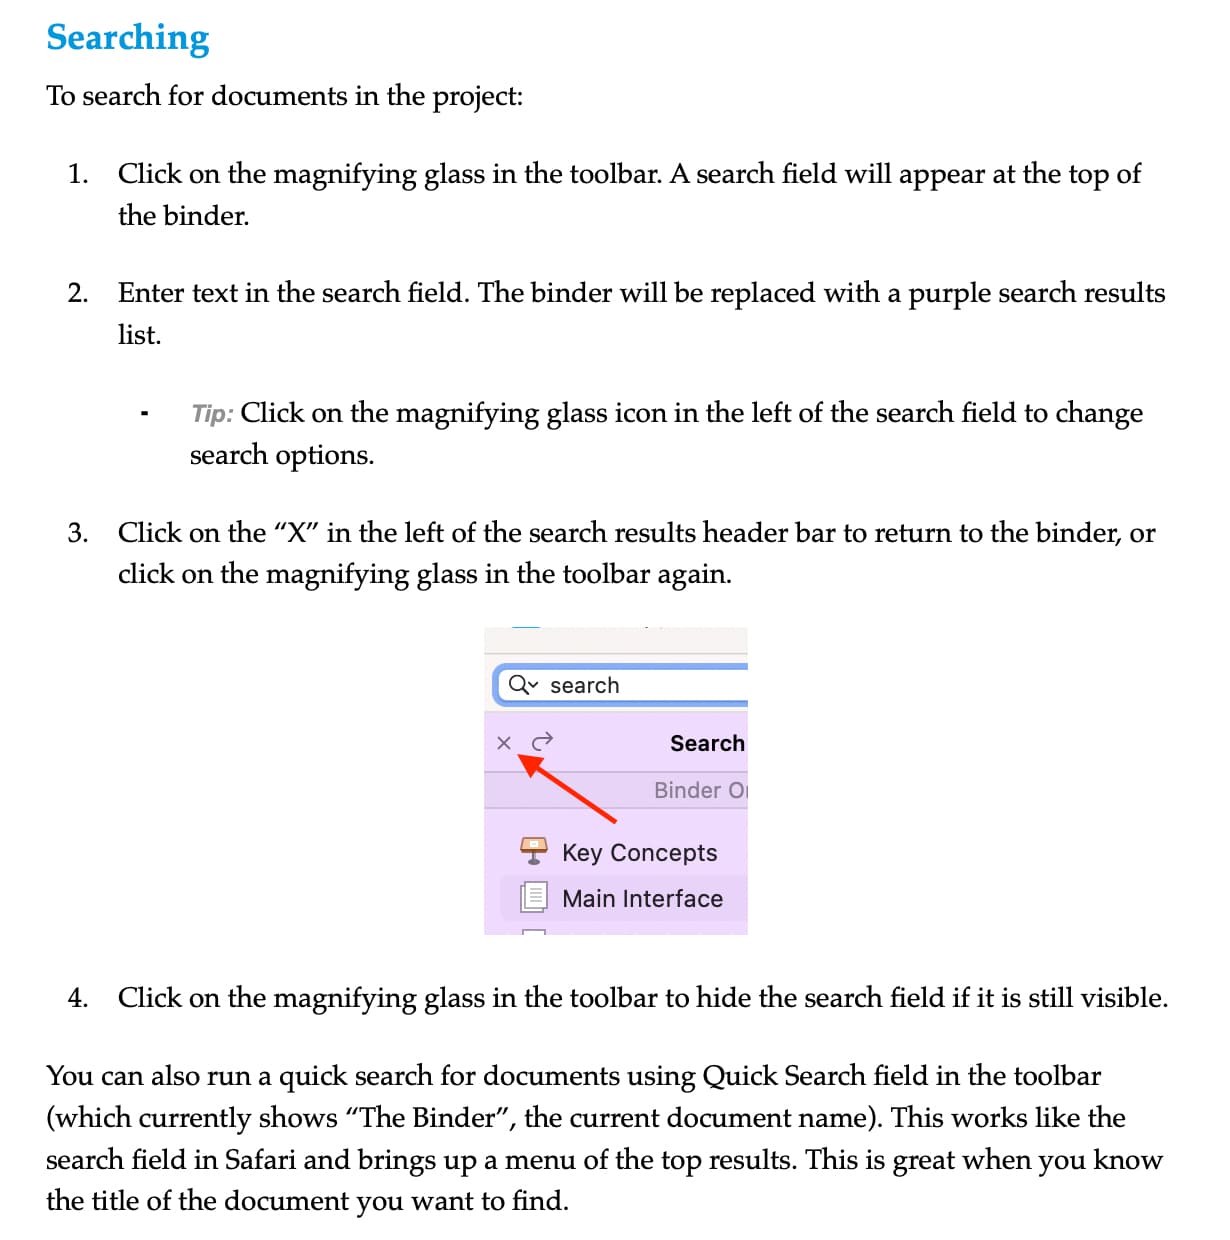
1. Click on the magnifying glass in the toolbar. A search field will appear at the top of the binder.
2. Enter text in the search field. The binder will be replaced with a purple search results list.
* ***Tip:*** Click on the magnifying glass icon in the left of the search field to change search options.
3. Click on the "X" in the left of the search results header bar to return to the binder, or click on the magnifying glass in the toolbar again.
![][CloseSearch]
1. Click on the magnifying glass in the toolbar to hide the search field if it is still visible.
Note the list is split by the Scrivener editor as it puts the figure in-between, and the figure has no formatting information, so centering is not defined thus why Pandoc uses its default. I think the broken list is an inevitable result of the Scrivener compiler (you could change the way the figure is inserted in the document to stop it becoming a block figure). The uncentered figure is tweakable (Pandoc uses an captioned figure style you can change to centered using a Pandoc docx template)
Please read Section 21.4 of the manual, where broadly we can identify 3 ways to use Scrivener with Markdown:
Purist – you write the markup directly, no RTF or Scrivener tools.
Hybrid – you use Scrivener RTF and other tools, but tweaked with Styles and Section types to improve the markup conversion.
Incidental – you write RTF and provide minimal guides to convert to markup.
You example used (3) and there will be edge cases with some things not translating, but this is the easiest to setup. Why
I tend to recommend (2), you still write using RTF (via styles) and use Scrivener links / tables / lists / footnotes / figures / crossrefs — but each has a clear conversion step. This requires some setup of the Scrivener editor and compiler rules. You can see an example for figures from my hybrid sample workflow:
In this workflow you use Multimarkdown output and run Pandoc with post-processing, rather than the premade Pandoc → DOCX option. You can see my figure is centered, as I customised my Pandoc DOCX template – it is important to understand that even if I change the editor alignment it wont impact the DOCX, I would need to use specific styles that are translated. This is not WYSIWYG, but WY–WANT–IWYG. Styles are semantic holders to drive the visual output.
Thanks for the reply and example. I will try to use it in my writing. Is there guidance on changing the Pandoc DOCX template? Where is it located on disk? Having a two-step compile: first to MarkDown and then to DOCX from there via Pandoc is not a serious impediment.
Looks like scrivomatic and your workflow example can help to set things up. I will look this over carefully.
To change the default look, use pandoc --version on the command-line to have it print out where your data configuration folder should be. On my system, it defaults to ~/.local/share/pandoc. It probably won’t exist yet, so run mkdir -p ~/.local/share/pandoc to build the directory structure in one shot.
Next, use cd ~/.local/share/pandoc to change directories to the data dir, and use this command:
Open that in your word processor, and design the look you want by modifying the styles it provides. Pandoc advises not changing the boilerplate text, but it’s okay to add your own styles, which you can make use of as markup, or modify styles that are in the document but not previewed (e.g. to design the ToC which may be stylesheet driven; at least it is in ODT, not sure about DOCX).
Calling it “reference.docx” will change the default for all new .docx files you generate with Pandoc. So to use this you don’t have do anything other than selecting Pandoc → DOCX in the compile window.
You can make your own templates in this same folder as well, just change the name after the -o in the command above. You would then call upon this with: pandoc --reference-doc=name-of-template.docx, which is something you can insert into your Processing pane, in the compiler to automate that straight out of Scrivener, rather than having to compile to .md and then use the command-line after compiling.
Thanks @AmberV – looks like another, perhaps streamlined approach.
I am an example-driven learner and so is there an example somewhere where I can learn to “make use of as markup”.
Concretely, using the tutorial example I started with, the “defect” I observed was that the figure image was not centered in the compiled docx file but it appears as centered when I look using Scrivener.
Does the figure within Scrivener have a style that I can markup to cause the figure in the generated docx file to be centered? Perhaps after changing a style in the reference.docx file. Of course I will want all of my book figures to all be captioned and have the caption text be centered as well. The tutorial images in general are all not captioned.
If the Scrivener user manual has an example of this, please point me to the section where it does.
After posting this request for an example, I went back to the tutorial Scrivener document, compiled to docx, and observed the styles in the document.
If the figure had a caption, then the docx style for the figure was Captioned Figure and the docx style for the caption was Image Caption.
So in the reference document I made both of these styles to be centered and saved the reference document.
Then I compiled the tutorial document again to docx with pandoc inside of Scrivener and then the figure AND the figure caption were centered, thus achieving my expected behavior.
Now I need to figure out how to generate figure caption prefixes that will converted to text like:
Figure n.m
Where n is the chapter number and m is generated as consecutive figure ordinals for figures in the chapter.
And of course then be able to have cross-references in the text that resolve to the right figure label after compiling.
But I think I saw some user manual content that should help with this.
Thanks again for making the suggestion to create a master reference document for my style choices.
Yes, that makes sense! Pandoc and MultiMarkdown both treat images with captions in a special manner, as stand-alone figures. Everything else gets inserted more like an inline image would be, using normal paragraph settings.
I would reiterate what was said above though, that the Tutorial is probably not the best place to test Markdown. It has no styles applied to it, and thus the vast majority of it is going to be handled as plain-text. It was not designed to be used as an example of this workflow.
The user manual project will be much better for that. It is a Markdown project to its bones. Though it is tailored for LaTeX output rather than word processing, at least it is starting from the right place in the source text. The other quirk is that it is MultiMarkdown-based rather than Pandoc. In practice I think there are only a few things where that would be problematic, and they could be looked around. So long as you aren’t trying to make the actual PDF you see in the Help menu with Pandoc that is, and are just seeing how things can be done, in theory, you should be fine.
And of course then be able to have cross-references in the text that resolve to the right figure label after compiling.
I’m actually not sure what the best approach is for Word, as I rarely use that format and am not much of an expert in that area. As noted above, I use LaTeX and it handles all of the detailing like figure numbering, and referencing that number from cross-references for me. All I have to do is give the name of the image while I’m writing.
I would venture to guess that using a more specialised system built on top of Pandoc, like Quarto, is probably the right way to go if you need stuff like that in Word. It’s another layer of learning on top of Pandoc, but not much, until and if you get into tweaking how it works.
I took a look at the Scrivener user manual in Scrivener and it looks quite complicated to learn simple things from like figure references and citations to them.
I was going to ask about the colored text blocks in the Tutorial document source and how to make that happen in Word with perhaps some style adjusting. The user manual has these kinds of elements as well. Here is what the Pandoc compile does out of the box:
Oh sure, the user manual project is not a gentle ramp, I will admit. You don’t end up with a PDF that looks like that, with one click of the compile button, without a few tricks. This project stresses the limits of what Scrivener can do, to the point that features were in fact added during early development to let it do what it does. So from that standpoint, it’s a showcase for some more advanced approaches.
I was going to ask about the colored text blocks in the Tutorial document source and how to make that happen in Word with perhaps some style adjusting.
Have a look at the documentation for custom styles. Styles are of course how box designs will be done, and this is something you would implement into your reference.docx file.
As for how to do that with Scrivener, paragraph styles can have a prefix and suffix around the whole range of text using that style (multi-line), so this ::: {etc} line followed by a closing ::: line is what you would want to insert around such a styled range of text. (Use Opt-Return to insert newlines into the style prefix and suffix fields.)
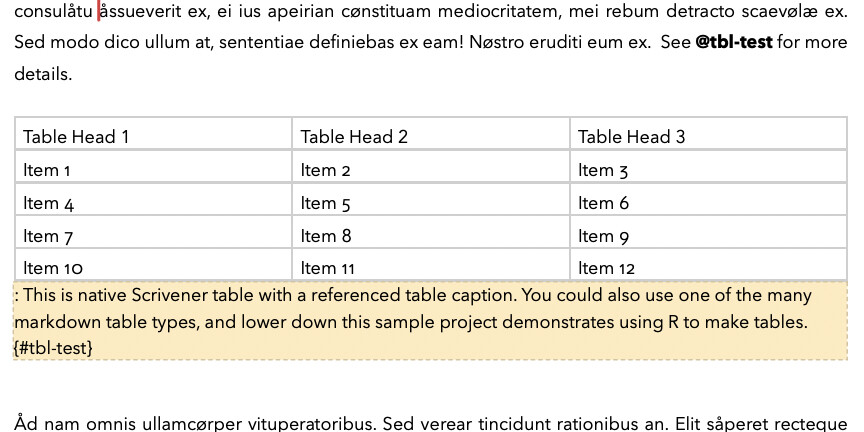
As for the tutorial, you’re getting a broken table because the tutorial uses a single cell table to simulate a natural call-out box (Scrivener itself, having no such feature). Markdown has no idea what to do with a single cell table I guess, and I can’t really blame it. It’s a hack.
You can see in my example above that the scrivomatic workflow shows you how to do this using the native referencing. You see the id-label!fig(map) in the figure caption and the cross-reference#fig(map) in the text. Download the scrivomatic project and you will see that there are replacements in the compiler to turn this short syntax into the Scrivener native cross references.
In fact there are tons of options for cross-referencing:
Scrivener’s native system – I tend to use this for most Pandoc work, basic features only.
– I don’t use pandoc-crossref myself but I do use the custom script I developed for the next solution:
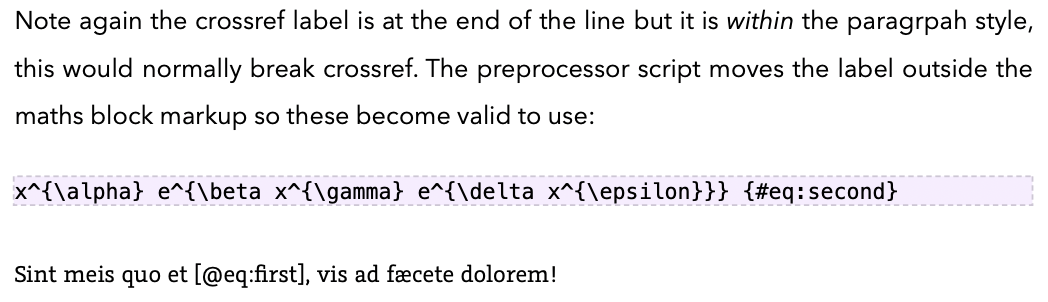
Quarto – Quarto uses a customised pandoc-crossref filter in their setup. My Scrivener + Quarto project uses their system which uses {#tbl-text} syntax for the label and @tbl-test for the cross-reference.
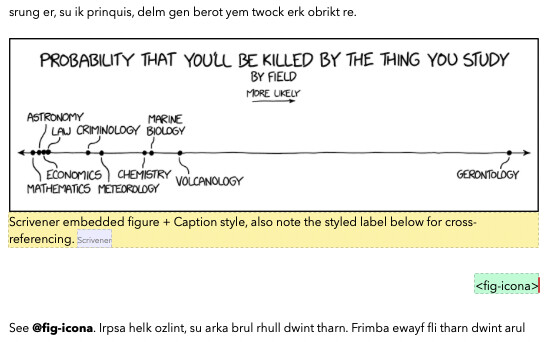
Non-DOCX solution: Typst – this is a great new layout engine but its final destination is PDF. As you may have guessed I also have a Scrivener+Pandoc+Typst workflow that demonstrates how to use Typst’s cross-referencing system. . The labels sit below the content to be referenced, I could move the using a post-processor like I do for Quarto, but I don’t mind this writing style personally. I include this more as an example to show you how flexible your options are once you embrace the Scrivener hybrid approach…
Note that although there are a bunch of option (choice is mostly good), the writing workflow is pretty similar, it is more the compile options that differs. It would be possible to abstract all the different styles and have a single Scrivener document with styles and the compiler would adapt to each solution.
For your usecase these are the questions I’d ask:
Can Scrivener’s native solution work for you (i.e. you only have basic requirements).
If NO then if you want maximum control use Pandoc + pandoc-crossref directly, if you want a lot of hand holding, then use Quarto. Both use a silimar syntax so you can switch between them.
For simple, non hierarchical, figure references this syntax works:
Figure <$n:figure:InspectorTop>: This is a another caption
where the figure id is InspectorTop.
Is there $c or something for an autogenerated chapter number? Or can you give a chapter a symbolic name like you do for figures and this name can be used like: $n:chapter:myChapterID and then use the concatenated numbers for chapter followed by figure.
Right, my first example generates this syntax at compile time, as I find writing !fig(InspectorTop) a bit less noisy than <$n:figure:InspectorTop> – you can even use something like ««InspectorTop»» that looks even better – the compiler will convert them to the <$n:figure:...> syntax…
Check the Scrivener documentation for <$hn>, <$ahn>, <$aon>, <$hn_0>, <$hn_levelN> and related tweaks for Scrivener’s system. For pandoc-crossref use the chapters option. For Quarto: Quarto – Cross-Reference Options
The forever brilliant xkcd: xkcd: Dangerous Fields – and a free tip, always hover xkcd images as the hidden alt text is often just as great:
Your !fig syntax is for your workflow, right? Doesn’t work using Pandoc within Scrivener to compile the docx file. At least it didn’t work for me when I tried it that way.
Is there an example Scrivener project file where the placeholders are used effectively? Having trouble figuring out how to set things up.
As I mentioned the !fig(label) syntax is a replacement, so you need to add this to the compile format you want to use (i.e. it can work in any compiler format but you need to make this change):
This converts e.g. !fig(first) to Figure <$n:figure:first> to create the number and #fig(first) becomes Fig. <$n#figure:first> as the cross-reference. You don’t need these replacements, they are optional for the Scrivener placeholders, but IMO are nicer to write with. You can do this for tables or other elements as needed.
The example comes from the scrivomatic workflow project, you can download that to test. It uses Scrivener + Pandoc to generate a DOCX, you can see the workflow.docx sample it generates here: scrivomatic/sample-output at master · iandol/scrivomatic · GitHub — that workflow also deomonstrates how to use <$hn>, which is used to generate the chapter numbers:
Pandoc can also generate chapter numbers.
What I find helpful: make a test Scrivener project, build the features you want or need, if you can’t get it to work, zip the project and post it here and we can tell you where you are going wrong. There are a few moving parts and several ways to do similar things, but it is all straightforward once the moving parts and choices are made.
I think I figured out the chapter number concept using <$hn> for subsections but I seemed to need to use <$n> for top level chapters – wanted to have hierarchical auto-generated numbers for chapters as well as sections that have their own headers. What I have now:
Ideally I want to have groups of chapters organized as parts of a complete book. I want the parts folders in Scrivener to contain the chapters but I don’t want the parts to themselves be auto-numbered. I was getting an extra level of sub-numbering when I tried to do this.
This help info was confusing (the $hn version with the _levelN):
Is there a compile process/step where the compiled Word document would be able to link to figures in a folder external to the Word document rather than as an embedded figure?
I ask because the editor I will be submitting to expects images in a folder and I can deal with that at the Scrivener source level but once compiled I loose reference to file names unless I place them in the caption itself. I expect I will need to adopt some multi-step workflow to have the folder of images be used and preserved in the compiled docx file.
If there is pandoc help information on this, and using from scrivener, please point me in the right direction.
I don’t entirely understand what you want, but what if you create numbered and unnumbered Section Types/Layouts and assign them as you want?
I don’t know of any way to do that. I never even tried to link figures in Libreoffice/Word, and I’ve never seen this as an option for DOCX/ODT
Now, Scrivener does export the figures as files with filenames defined by the binder name (as this is used by the Markdown intermediate) so you could use this name alongside an annotation /comment / inline text to tag the figure block. That will get you the named files and their references. It saddens me that editors still require such antiquated formats and workflows…
I’m pretty sure it is possible in Word make Visual Basic “macro” to cycle through the DOCX file and export each “found” embedded image to an external file while retaining a link back to this newly created external image file. Do this to the DOCX file after all the processing by Scrivener and pandoc. I don’t think it would be complicated.


 . The labels sit below the content to be referenced, I could move the using a post-processor like I do for Quarto, but I don’t mind this writing style personally. I include this more as an example to show you how flexible your options are once you embrace the Scrivener hybrid approach…


