Using the Compiler

Well, I done did it for the fifth year in a row. Completed NaNoWriMo. Scrivener claimed I had 85,179 words. Word said I had 85,123 words. And the validator thing-a-ma-bob at the NaNoWriMo website said I finished up at 85,560. I believe this is the longest one to date. I averaged around 3100 words per day. Now if I could just manage to roll out 15,000 words a week on the main story line… AND get them back from the co-author!

Anyway. Using the compiler.

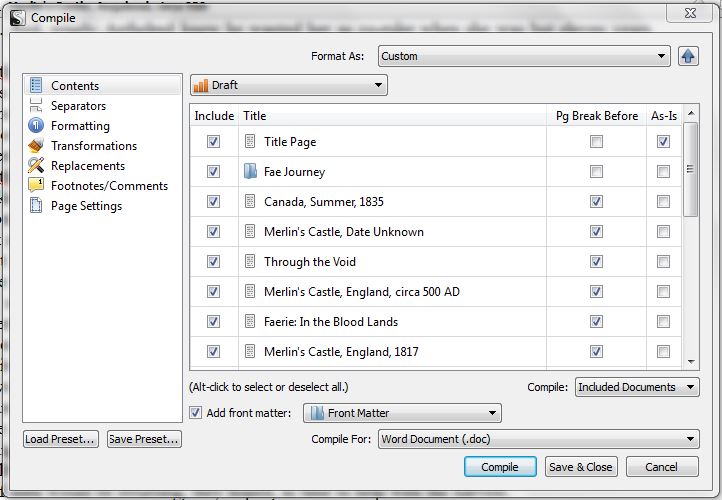
I did File => Compile =>

and tried a number of the formals. Proof was NOT what I wanted. Nor was Times 12 Pt With Bold Folder Titles. I tried a custom, and it was definitely not what I wanted since I couldn’t find any way to set the Custom to the settings I wanted.

Clearly, I do not understand Compile, and am missing something.

Everything I output is dreadful, and will require massive amounts of reformatting to be useable.

This makes Compile virtually useless to me, since the idea of having this all set upis to be able to generate a fairly clean copy which only needs a few tweaks to be right. Not something I have to spend a day or more fiddling with.

I thought I would try generating a e-book, as I find it easier to spot mistakes when it’s not on the familiar computer screen.

Well, Compile with a selection of mobi output tells me that to output this, I need to install KindleGen, a free tool from Amazon, and that to do so, I should follow the directions in the extended Compile dialogue.

Uh, what dialogue? Where? OK, finally found it, just that the video was confusing because it opened directly to a detailed menu. On my machine, I had a small box, and it wasn’t until I thought to click the small arrow next to the “Custom” that I found the extended dialogue. (Yes, it’s in the manual, but I was trying to follow the video.)

I’ve gone and watched three Compile Videos, and I can see how incredibly useful Compile can be.

But I’ve watched the videos, and I’ve read the manual section on Compile and I can’t figure out how to get it to do what I want.

I’ve been doing page layout since Wordstar 3.3 on an Osborne 1. I’m really frustrated at not being able to figure out how to do this.

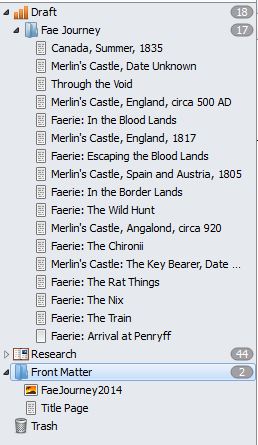
I set up a “Front Matter” Folder.
I have a Title Page.
I do not have a cover. (NOT an artist!)
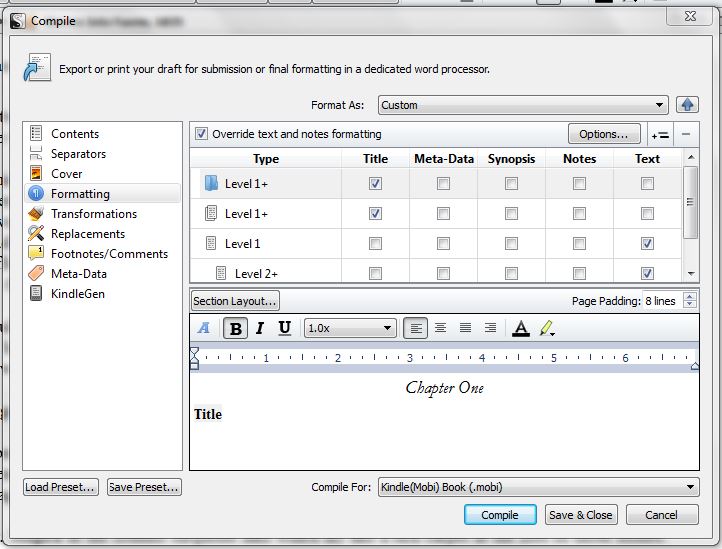
I want my folder Titles to be flush left and bolded, with a blank line between them and the text.
I want each folder to have a page break before it.
I want a page size of 5.5" x 8.5 inches, with .7" margins all around.
I want paragraph first lines indented by .4"
I want all text except the folder Titles justified.

And I can’t set it up.

Since no one else caught this, I’ll take a shot at it. Note that not everything you might want is available to accomplish via the compiler; you should be able to get most of the way there, and hopefully, the remainder of the work will be easy to accomplish in a word processor.

I’m assuming here that you want to compile to either a PDF or a word processing output like RTF or Word. Choose one of those as the “Compile For:” option to reveal all relevant compiler panes.

(Note: having read through and tested out my answers, I realized that you need to start in an odd place to make #7 work. Go to Tools->Options->Editor. In the lower right area of that window, there’s a “Ruler Units” drop down list. Make sure it’s set to “Inches”. Then edit the “Ruler Snap Every” to some fraction of .4 that will be useful to any other setup you might use. I tried “.050 inches”, and that worked out well for me.)

First, I’d suggest starting with the compile preset “Paperback Novel” or similar. This is your starting point, but don’t choose it again unless you want to wipe out the changes you’re about to make to those compile settings.

  1. Go to the Contents pane of the compile window. Near the bottom, there’s a checkbox labeled “Add front matter”. Check it and then choose the front matter folder you have prepared.

  2. The title page should be in your Front matter folder, and the “as-is” checkmark should be set for that document, so that centered text, font settings, and other stuff remain untouched by the compiler. If you have to close the compile window to do that now, click the “Save & Close” button on the compile window, or you’ll have to do #1 over again.

  3. If you don’t need a cover, then no problem. If you do, then you need to make one, or hire/beg someone to make one for you. There might be some stock photo images available for cheap with the appropriate rights if you want to add the text over that.

  4. In the Formatting pane of compile, select the row with the folder there should only be one, with the label “level 1+” next to it. Make sure the Title checkbox is checked. In the example below where the word “title” is shown, select it, then use the text styling tools to align it left and bold.
    Click the Section Layout button and add a carriage return to the title suffix area to add the line between title and text.

Edit: For the blank line after the title, but before the main text, you could instead use the Separators pane. Select the “Single Return” value from the drop-down list in the “Folder and Text Separator” section.

  1. Assuming you have scene documents organized in chapter folders, then the compile settings should already be set to put a page break before each chapter folder. This is controlled in the Separators pane of compile. “Page break” should be selected for the “Text and folder separator” to put one between the end of one chapter and the beginning of the next.

  2. Go to the Page Settings pane of compile. All the settings there for you to customize. Start with the “Paper Size” drop-down and select “Custom”.

  3. Assuming that you’ve set up your Tools->Options->Editor settings as described before this list of answers, just do the following. If not, then click the compile window’s “Save & Close” button and then go update those settings now.

In the Compile window’s Formatting pane, select the “Level 2+” document row. Then click the “Lorem Ipsum” text and adjust the paragraph indent slider on the ruler; it should show a tooltip as you adjust it, telling you how many inches it is indented to.

  1. Still in the Formatting pane, on the Level 2+ text, click the button that shows 5 parallel lines, representing paragraphs that are right & left justified. There are 4 such buttons for left, centered, left & right, and right justification.

Once you’ve compiled with these settings, this compile setting will be saved to your project. Once you’re done tweaking the settings, open the compile window again and click the “Save Preset…” button to create your own “Format as” compile preset for use with other projects.
Hope that helps!

Robert,

Thank you. I will copy this off and see if I can follow your directions.

I’m sure that once one understand what each piece of the layout for compiler DOES, it is relatively simple.

But it sure is confusing when you DON’T know what you’re doing!

Robert,

Your directions made sense up to the one above. I don’t see a page set-up. Perhaps I am looking in the wrong place?

Anyone who can tell me where the “Page Settings” is?

Page Settings shows up right at the bottom of the list.

Capture.PNG

But whether it shows up depends on which format you’re compiling to. For instance, it doesn’t show up when compiling to .epub or .mobi

To add to SarsenLintel’s point, you also can’t dictate page margins on e-readers, as far as I’m aware, especially not in absolute terms like inches. Imagine 1" margins all around on one of the smaller iPhones…

If you choose another output type (like Word or Rich Text), then you should be able to see the Page Settings panel. Scrivener hides irrelevant settings based on the output destination.

Thanks to both of you. I’ve got a much better output at this point.

Except that I have evidently STILL done something wrong, as there is “Chapter One” and then no more chapter headings. There are page breaks between the files, just as I wanted, but no header.

There are two ways that the “Paperback Novel” preset (your starting point) handles “CHAPTER ___” headings. First, it’s with “Level 1” folders. If you have a folder for every chapter break, and files in those folders representing scenes in the chapter, then you should be seeing each chapter automatically numbered.

The other way it handles this is if you write one chapter per file, and all those files are “level 1” files.

Understanding what “level 1” versus “level 2” means, and what constitutes a file icon in both the binder and the Formatting pane of compile is important to understanding how to get the output you want.

Do you understand these “levels”? Do you understand how a file or folder indented under another file or folder changes the “level”? If not, then that’s where we need to clarify. If you do understand, then a screenshot of your binder, showing the first few chapters would be helpful to figuring this out.

I am beginning to understand, but I am not sure I do.

I have realized that I am going to have to rename my projects before I do the final compilation because the header which Scrivener is putting into the file is the project name, not the actual name of the work.

(We are working on a series, and to keep the folder structure correct in Word, the folders for each novel have been named things like 01Slipping, 02Roads, 03Strands, 04Shades, 05Shadows. I have similarly created Scrivener projects with those same names, plus “Scriv” so I know what folder I’m looking at.)

I attach a snip of the binder for the current project.

ScrivenerBinder_2014-12-12.JPG

The snapshot you gave is very helpful, but first I need to know what some of these folders/files are to your book…

Is “Fae Journey” a container for your whole book, a part title, or a chapter title? Is it some other divider that has nothing to do with the structure of your book?

Are Canada…, Merlin’s… and so-forth chapters, or are they scenes within a chapter?

FYI, what you have here is a level 1 folder (Fae Journey), and a series of level 2 files. They’re level two because they’re indented a level “above” the level one folder (if you tilt your head to the right).

Think of “levels” the way you they are in traditional outlines, where the roman numerals are at level 1, the captial letters indented under them are at level 2, and so-forth.

Edit: BTW, the title of your project can be changed by going to the Project->Meta Data Settings menu. No need to create a new project just for compiling a different name from the project name.

Fae Journey is the title of the novel – this was my NaNoWriMo project this year. It’s about 85K. I did 3100 words a day, roughly.

No, these are sections – Chapters, I suppose. Some of the longer ones have sections which I didn’t bother to break out. Basically, each one is a change of viewpoint character and change of location.

Well, I’m doomed if I have to think of outlining, because I don’t. I always used to just write, and then go back and create the outline after I’d finished the project.

That I found and corrected.

Well, you’re going to have to decide if they’re chapters, because we’re working on putting “Chapter X” at the beginning of each of them. Of course, you can change what it says in front of the numbers, or just have it present the bare number. But that’s getting ahead of things.

No problem. Not suggesting you have to fill out an outline, only that the idea of outline indents can help contextualize what “levels” mean.

So, assuming your “Chapters, I suppose” are going to be “chapters, for sure,” here’s what to do.

In the Contents section of the compile window, there’s a kind of button (a drop-down list) that reads “Manuscript”. Click it, and from the list that appears, select Fae Journey. This will make the documents inside it act as if they are “level 1” folders. Sorry, this makes the whole “levels” thing confusing, but this will work. Now click compile, and you should get numbered chapters for each of the documents under the Fae folder.

By the way, if you would like to keep other books in the same Manuscript folder, you can. Just select the book you want to compile in the contents pane as described above.

No, don’t need more than one book in the same Manuscript file.

Once again, I’m not finding what you are describing. I attach a clip of what I saw when I clicked on Compile and then Contents.

Sorry to be so slow about this.

Sorry, I didn’t check your screenshots from earlier, and assumed you were using a Novel template, which renames “Draft” to “Manuscript.” Follow my instructions in the previous post, but wherever you see the word “Manuscript” mentally substitute “Draft” for the name of the folder in question.

OK, mental substitution is no biggie. I found it.

Except it’s still not coming out the way I thought it would.

Fae Journey is listed to the left as the name of Chapter One, except it should be Canada, Summer, 1835.

And there is no name for Chapter Two.

I’m sorry. It looks like there’s an extra option on the Mac version to exclude the container (the Fae Journey folder) from the compile list, and therefore to elevate the documents under it. It appears that there are just two ways around this limitation on Windows. Pick the one you like best…

METHOD ONE

  • Click the first document (Canada…).
  • SHIFT-click the last document.
  • Use the menus Documents->Move->Left
  • Remove the Fae Journey folder from the Drafts folder

Now if you compile, the files should all be treated as “level 1” documents (Because they well and truly ARE level 1s).

METHOD TWO

Go back to the Contents drop-down, and select the Draft folder again, just to reset everything where it belongs. Un-check the “Fae Journey” folder’s “Include” checkbox in the list of documents there.

Then, in the Formatting pane, do the following:
Select the level 2+ document row.
Click the “-” button in the upper right corner of the pane, to the right of the “Options” and another button. This should delete the Level 2+ row, which was treating each of your documents (at level 2) as scene files in a chapter folder. With the Level 2+ row gone for that kind of document, the “Level 1+” document row will also format Level 2s (and 3s, and 4s… essentially, the 1+ means “level 1, plus all similar documents above it”).

Ah hah! That devilish Mac/PC dichotomy! Strikes again!

(Y’know, that was the problem I had with all the videos, which were well-done, but… on a Mac. Nice machines, Macs, but alas, certain software I need for other things isn’t available for Macs.)

This method got me exactly one page… my title page. So… I went back and removed the folder Fae Journey altogether, leaving the Chapters directly under Draft.

This got me a close-to-right print out, with the text document names centered under Chapter One, etc.

It was reading this which gave me the idea to try removing Fae Journey as a folder altogether, and just have the Chapter files under Draft.

So I actually ended up using parts of both methods.

It took me a bit to realize that by removing the Level 2s, I could then go into the level 1s and make sure the text would be justified.

I note that there does not appear to be a way to change the size of the font for “Chapter One” to something slightly larger than the title? (Not that it would be hard to go through and reformat it in Word, but if I don’t HAVE to…)

This is ALMOST what I’m after! Finally… you must be about at the point where you log in to L&L and groan, "Oh, no… ANOTHER post from HER! But I do profoundly thank you for the amount of time you’ve put in to helping me with this!

I plan to go through and make myself a step-by-step with screen shots for future reference.

Is there a way to put a bookmark at the start of each Chapter for ease of navigation in the Word document?

Actually, it’s so simple and straight-forward, that it seems impossible. Seriously. In the formatting pane, click on the appropriate row (I’m assuming at this stage it’s the Level 1+ document row). Click on the “CHAPTER ONE” sample text in the text area below that. Click on the blue slanted “A”. Choose your font size (and a different font if you prefer). Similarly, you can alter how the Title text is formatted by clicking on it and then the “A”.

I’m glad we’re getting it sorted out. If I were solely a Windows Scriv user, I would more likely stop “helping” so much and let the real experts chime in. But no matter the circuitous route to the solution, all’s well that ends well. :confused:

I’m not so sure about bookmarks… I mean, you can do a CTRL-F and search for CHAPTER, and then subsequently hit the F3 key to repeat the search. You can create a clickable table of contents though, if that’s of use to you. To do that create a file into which you’ll paste the ToC. Then select all the documents in your Draft folder, and go to Edit->Copy Special->Copy Documents as ToC. Then go to your empty document and paste that in.

Beyond that… I don’t know Word very well, but I’ve seen people mention that you can search for text formatted a particular way (say 18 point comic sans) and automatically apply a Word text style. With that in mind, I think you can make Word auto-generate a ToC that is available no matter where you are in the document. :question: If that’s possible, then the in-Scrivener ToC generation may not be necessary.

The default compile settings should have RTF bookmarks enabled, so you may already have this set for the start of each document. In the Formatting pane of Scrivener’s compile, you’ll see a checkbox just above the format bar to “Include in RTF bookmarks”. You can set this for each row in the table above, so e.g. you could turn it on for folders but leave it off for single text files. In your case, if I skimmed correctly, each text file in the binder is a separate chapter, so you’d want this on for the text documents, and it’s probably already enabled. The bookmark should use the document’s title when you view the list in Word.

RTF bookmarks are supported when compiling to RTF, to PDF, DOC and DOCX using the Microsoft Office converters, and to DOC using the RTF-Based converters. You can set which converters are used in the Import/Export tab of Tools > Options by clicking “Export Converters”, then choosing the format from the left drop-down menu and the converter from the options in the right drop-down.