Using the Compiler

D-uuuh! The problem is that I did SEE the A, but when I clicked on it, nothing happened. It was inactive. Because I didn’t have any text selected.

My method of working in Word is to select the formatting I want, and then apply it to the text, rather than blocking the text first, although it can be done either way. It never occurred to me that the control would be inactive without text selected to apply it to.

As long as we get there in the end. Like I said, I intend to make myself a guide from all this and then see if I can duplicate, step by step, the formatting of another project, AND getting a .mobi file out of it as well.

Erm, okay… I’m half asleep at the moment. I think I’ll try that one when I’m more awake. I had a Beagle and a Dachshund hunting (I think) an opossum at four ye ghods ay em this morning… not wishing to wake the neighbors, I had to get dressed and go out and haul the noisy pair in and shut the critter door.

Well, MM has stepped in with a comment, and I checked, and the book marks are already there, so, no worries!

I’ve been a Word user now for twenty years. Before than, it was WordStar. I’ve done things with both in terms of formatting and output that the creators of the programs thought wasn’t possible. But oddly, an automated ToC wasn’t one of the things I ever did.

I will still have to do some tinkering with the formatting if I decide to go with Smashwords to publish an ebook of any of several items, as they have a specific format required which calls for using styles. And of course, Scrivener isn’t set up to output things with Word Styles.

I believe I’m correct that I can compile a single file or files as opposed to exporting them?

You’ve been extremely helpful, and I want to reiterate that I am truly appreciative of your time. It’s especially amazing given that, from your comments, your primarily a Mac user.

Yes! They are there! This is another “D-uuuhh!” in that I didn’t even LOOK for the bookmarks. I just assumed they weren’t there, and I should know better than that when dealing with Scrivener. It has so many cool features and capabilities, and I know I’m barely scraping the surface with it.

It’s just that the way Scrivener achieves something, and the way Word does it are typical of the two different mindsets of the respective programmers / companies – different philosophies, different methods of working.

I worked with WordStar under CP/M and then DOS for ten years, then Word 6 for nearly ten years, and I’ve been using Word XP for 12. It’s taking me a little bit to rattle the habits of thought out of their accustomed ruts and get on with something new.

Okay, I decided to try this on this bright, chilly morning.

I created a blank document just as you said. (I keep looking for that under “Documents” and not under “Project,” although if I could just remember Ctrl+N, I wouldn’t have to remember that New Document isn’t under Documents at all.

Since ToCs are usually (except in E-books) at the beginning of the book, I put it in the Front Matter Folder after the Title Page.

It came out as shown in the first clip below – I found and fixed the problem there, as I had not clicked Page Break Before for that text document.

ScrivenerCompile_2014-12-17b.JPG

But the ToC is now labeled as Chapter One, and the real Chapter One is now Chapter Two, and so on. My Binder currently looks like this second clip.

ScrivenerCompile_2014-12-17a.JPG

I’m assuming I’ve missed yet another item?

Click the “As-Is” checkbox for your ToC document. That suppresses the addition of stuff like titles and title prefixes (the CHAPTER ONE bit).

Argh. That’s a “Well, duh!” yet again.

This one came out better, except that the page numbers run off the edge of the page.

ScrivenerCompile_2014-12-18a.JPG

I tried setting the right hand side of the text to 4.1" which would be the width of the text on the paper between the margins, and that did not help.

This… I’m not so certain about. You could edit the ToC so that the font is smaller, or it has fewer dots between chapter name and the page number… So much for whiz-bang-easy-peazy, eh? :confused: 
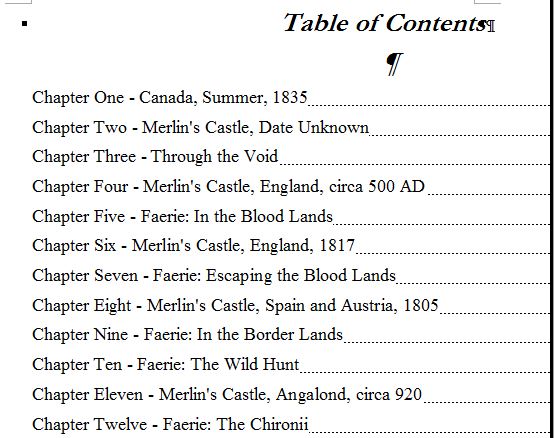
I think this is an opportunity for the developers to make an enhancement; tailor the width of the auto-generated ToC to fit the page settings.

Do note that the ruler settings in Scrivener start (on the left) reletive to the margins on the output. So the zero mark in the margins is zero + whatever the left margin is in the Page Settings tab. I think the right indent in Scrivener is also like that. You probably want to calculate how many inches of space you have between the margins, use that as a guide to how wide your ToC ends up.

Another hint: If you added a chapter in there somewhere, the ToC page wouldn’t update itself, so this feature is only really useful for after you’ve done all your final edits, and have settled on chapter titles (if you’re using them), etc…

Tried editing the ToC. THe dots are one “character,” if you will, and if I place the cursor directly to the left of the code for the page number and do a single back space, ALL the dots disappear.

In Word, I would set a tab to the point at which I wanted the page numbers to appear, and then tab to that point for the page number.

Now, I’ve been tinkering with this, and, in point of fact, in the Compiled document, if I select the ToC itself, and set the second tab to 4.1", I have the page number area on the page. Similarly, I was able to reposition the “Table of Contents” header which is actually part of the page.

But take a look at the clip here from the document: the page numbers are all “3” or “2”. They did not auto update in the Compile. Is that a result of having the ToC at the beginning of the file, rather than at the end as seems to be done in e-books?

And, the first one I edited lost the dots, but the others did not, and, in fact, have TWO sets of dots.

ScrivenerCompile_2014-12-18c.JPG

Right. It will be 4.1" You just confirmed what I thought it might be. My page is 5.5" wide, and the margins are each .7" for 1.4" of margins, leaving 4.1" for the text.

I did figure that part out – that if I edited in Scrivener and rearranged the Chapters, or added or subtracted a Chapter here or there, it would be necessary to re-do the generation of the ToC.

I was thinking that what I needed to do was to set the formatting of the Scrivener page to 0 and 4.1 for that page. I tested it, and got the same off-the-page numbers.

Bug? Feature? Not sure… this is kind of weird.

Addendum: I experimented with moving the ToC up to the end of the Draft to see if it affected the pagination. It did not. All Chapters still generate 2 or mostly 3.

The attached clip shows the ToC in Word after I went in and added a tab stop at 4.1". THat immediately brought the page numbers back onto the page.

The Word dialog shown is the formatting on title. Take a look at the right hand indentation. Scrivener set it to -2.4", but if I change that to 0, the ToC header will be properly centered on the 5.5" wide page with .7 margins.

Now I’m really at a loss. I’m afraid this stuff is so far outside my wheelhouse that it’s treading water. :neutral_face: Maybe someone else can chime in?

Good luck!

OK! At least it doesn’t seem to be me missing the obvious which has happened several times already.

And I do thank you once again for all your time. I have learned quite a bit during the course of the thread. I even managed to get MOST of a decent compile out of another Project, although I have to go back over the notes and figure out what I did wrong!

Okay, you’re on the right track. As in Word, you just need to set the tab stops for the TOC document in Scrivener to be 4.1. Ctrl+Shift+R will toggle the ruler in the editor; select all the contents list and drag the tab stop from its current position (probably 6.25) to 4.1.

Normally the “Table of Contents” text in your document would be centred between the margins when compiled if it was centred in Scrivener’s editor, but possibly you’ve set some specific indentation for that in Scrivener which is compiling as-is and thus moving it off to the right? You could try setting all the indents for that line to “0”, or alternatively specifically set the right-indent to 4.1, in line with the right margin, so that the text is centred between the first-line and right indents.

All indents are set to zero.

The difference is, I’m using a page which is 5.5" wide and 8.5" long, half of a letter page. This is slightly smaller than a trade paperback, but prints nicely, 2 pages to a sheet.

Is there some place I can set the ruler without using those d@mn twitchy things? I can never get them to move to the place I want them in. For instance, right now, the ruler will let me have 4.2" or 4.0" but not 4.1".

I do have the ToC looking correct now immediately after the Compile.

However, all the Chapters occur on Page 3.

Right, the default tab setting for the Copy as ToC is too wide for your 5.5inch page width, so adjusting it to the 4.1" setting will place the numbers at the right margin where you want them. You can control the tab stops better by going into the Editor settings in Tools > Options and adjusting the “snap to ruler” setting–if you make it .1, you should have a much easier time snapping the tab stop into place in the editor. For your existing documents you’ll need to use Documents > Convert > Formatting to Default Text Style to put that into effect. You’ll probably want to choose “Preserve alignment” and “Preserve tabs and indents” when you run that on the TOC, so you don’t have to redo formatting.

Have you tried compiling directly to RTF and opening that to check the page number links? That will bypass converter issues, so let’s get that working first to see what’s going on. Which version of Word are you using?

Oh, lord, now I’m going to be confused again.

I have a .4" snap to set so my paragraph indentations will be that, per Robert’s suggestion above.

No, I haven’t tried compiling to RTF.

I am using Word XP (Word 2002). And trying to make sure all my old Word 6 files have been updated. But this Project was composed entirely in Scrivener.

Sorry, not trying to overwhelm. Setting the “snap to ruler” to .1 will let you easily move the tab stop slider or indent slider in .1 increments, so you’ll still be able to easily reach .4.

Also, I was mistaken about the need to use Documents > Convert > Formatting to Default Text Style; that would only if you were actually putting new tab stops into the ruler as part of the default formatting. Changing the “snap to” setting will take effect immediately for the editor, regardless of the document, so you don’t need to worry about any of that. It own’t change your existing tab stops or indentation, to be clear; it just makes it so that when you drag the indent or tab stop marker, you can easily snap to .1 intervals.

Okay, I’m going to see if I can find the snap-to setting. I know Robert mentioned it, but I have to find it. (Edited to add: Found it…)

That’s why I asked if there were a dialogue for all these ruler commands because I simply turned the ruler off in Word. I never used it. I used the styles and so forth.

Also, compiled to RTF… still have everything showing up on Page 3.

BTW, I hope I can save this compilation style so I can use it on other projects…

You can click the “Save Preset” button in the lower left of the compile dialog to save the preset and make it available with other projects. The contents list isn’t saved, nor the “as-is” or “page break before” settings, since these are specific to the given project and the document settings, but everything else–level formatting, paper size, etc.–will be saved.

After you open the compiled document in Word, have you tried the Save As PDF or Print options to see if that sorts out the page numbering? Are the links to the chapters in the TOC correct, and just the page numbers are wrong, or do the links not work either? (In word you usually Ctrl+click the link.)

Ok, great! I think I can manage to remember how to click the “as is”, which files I want, and where to put page breaks. Now I just have to remember what each level IS in my binder!

Remember, Word XP doesn’t have “Save as PDF” but I do have CutePDF which allows me to print to a PDF file… The links work fine – doesn’t matter if I click on them, or use the bookmarks. I also switched it over the .mobi and compiled a mobi file, and that came out REALLY nice, and the clickable links came out just fine. (I did discover that you don’t want an extant ToC in mobi because you end up with two ToCs. So the second time I ran it, I just unchecked the print-mode ToC.)

OK, just ran a PDF print test, and the correct numbers appeared in the printed ToC.

I don’t pretend to understand this, but it appears that whether printing to paper or PDF, that does straighten out the numbering. It doesn’t do it for the Word Document, which would drive an editor start raving bonkers. (Several publishers I know require the submission of a Word.Doc file, not a print out, and they definitely won’t take a PDF.

Now, related question. As you know, I’m going back and forth with my Co-Author on some of these projects. I’ve created a whole slew of character sheets that I want to send her to add to her copy of the project.

I could swear I read this somewhere, either here on Forum or in the manual, that it was possible to import a Word document and have Scrivener break it into pieces on import.

Can I compile a single document from my Characters folder, inserting the “break code,” for splitting (was it a pound sign?) so that she can import that file and have it split up into the separate folders and documents that it was before compilation?

I don’t have access to my machine with MS Office XP on it, so I’m afraid I can’t run specific testing on that at the moment. I forgot it didn’t have the PDF option, sorry about that. It should have a Print Preview though, which ought to run the layout stuff. If you open that and click around a bit in there to view the pages, then close it, does that get the page numbers updated? If not I’m going to need to do a little more testing in that version. Word’s always been a little funky with this–on Mac too–and you need to kind of virtually kick it to get it to run the numbers. I’ve mostly been working with 2010 and 2013 lately, so 2002 might have a different trick.

Yup, just use File > Import > Import and Split… and enter the character you used as a divider. The pound sign (#) is the default, but you can use anything you want, even multiple empty lines. The main thing is just to use a divider that’s unique, so you only get the splits where you want them.

Remember too that although normally you can only compile documents that are within the Draft folder, you can compile text documents in a collections, so if your character items are outside the Draft, you can add them to a “Characters” collection and select that from the drop-down menu at the top of the Contents list in compile. Any collections you have will appear by name at the bottom of that menu.

Hey! It worked! I had it in page view, switched to the Print Preview, the page numbers changed to the correct ones, and they were still there when I shifted back to normal view!

Solution! So, er, WHY does viewing it in Page Preview trigger the correct page numbers?

Yeah, I know Word XP is outdated, but it works, it does what I need, and unless someone wants to gift me with a free copy of 2010 or 2013, I’m going to be stuck with it for awhile yet. Besides, I have it customized up the wazoo to the way I work.

I’m shortly going to be putting my desktop machine back in action, and then I have to figure out how to transfer all the customizations I’ve added to the Scrivener on this lap top onto my desktop, but I think that’s a topic for another thread.

Yes, the Character sheets are outside of Draft, and in a separate folder. So… I select the files and folders I want, go to Documents => Add To Collection => New Collection, and Name It. Then I say Compile => and select the Collection from the drop down menu directly above the Contents.

Except I’m not seeing where I should put the unique character for this. Ought I to develop a separate preset for this?

(I should warn you… I have half a gazillion questions about how to work the Compiler, because I can see how powerful it is and how useful it will be. I did read the manual first, but apparently, I don’t think the way the person who wrote the manual does, because either I’m missing some of the how-tos, or they don’t make sense to me, personally. Then again, I’ve been told I’m a bit strange…)