Hi AmberV,
UPDATED - 10 Nov 2021 … see UPDATED summary of 7 steps below:
Actually, I’ve tested a kludge that will eliminate the endnote in the Endnote-XX Section from showing up in the PDF output file.
-
I prepended the <$include:Endnote-XX> syntax with the text
'\end'
instead to have it appear as:
\end<$include:Endnote-XX>
-
I deleted the text ‘\end’ from the syntax for the endnote in each Section to simply:
note{\,<endnote text>}
so that after the ‘\end<$include:Endnote-XX>’ is replaced with the text in Endnote-XX, the compiled text appears as a complete \endnote:
\endnote{\,<endnote text> }
This way, the whole term ‘\endnote’ does not appear in the Endnote-XX Section which for some reason was triggering that Section to show up in the PDF output file.
Now, with only the word ‘note{’ (and not \endnote{ ) appearing (in the Endnote-XX Section) before the text of the endnote, nothing from the Endnote-XX Section appears in the PDF output file, and the text of the \end + note{\,<endnote text>} appears as endnote at the end of the respective chapter.
Yea! Mission accomplished!! A bit kludgy, but it works!!
Thanks for all your help, including the tip on the <$include:> command.
UPDATED (my apologies) - In summary, to create endnotes in my Scrivener + LaTeX project, I had to:
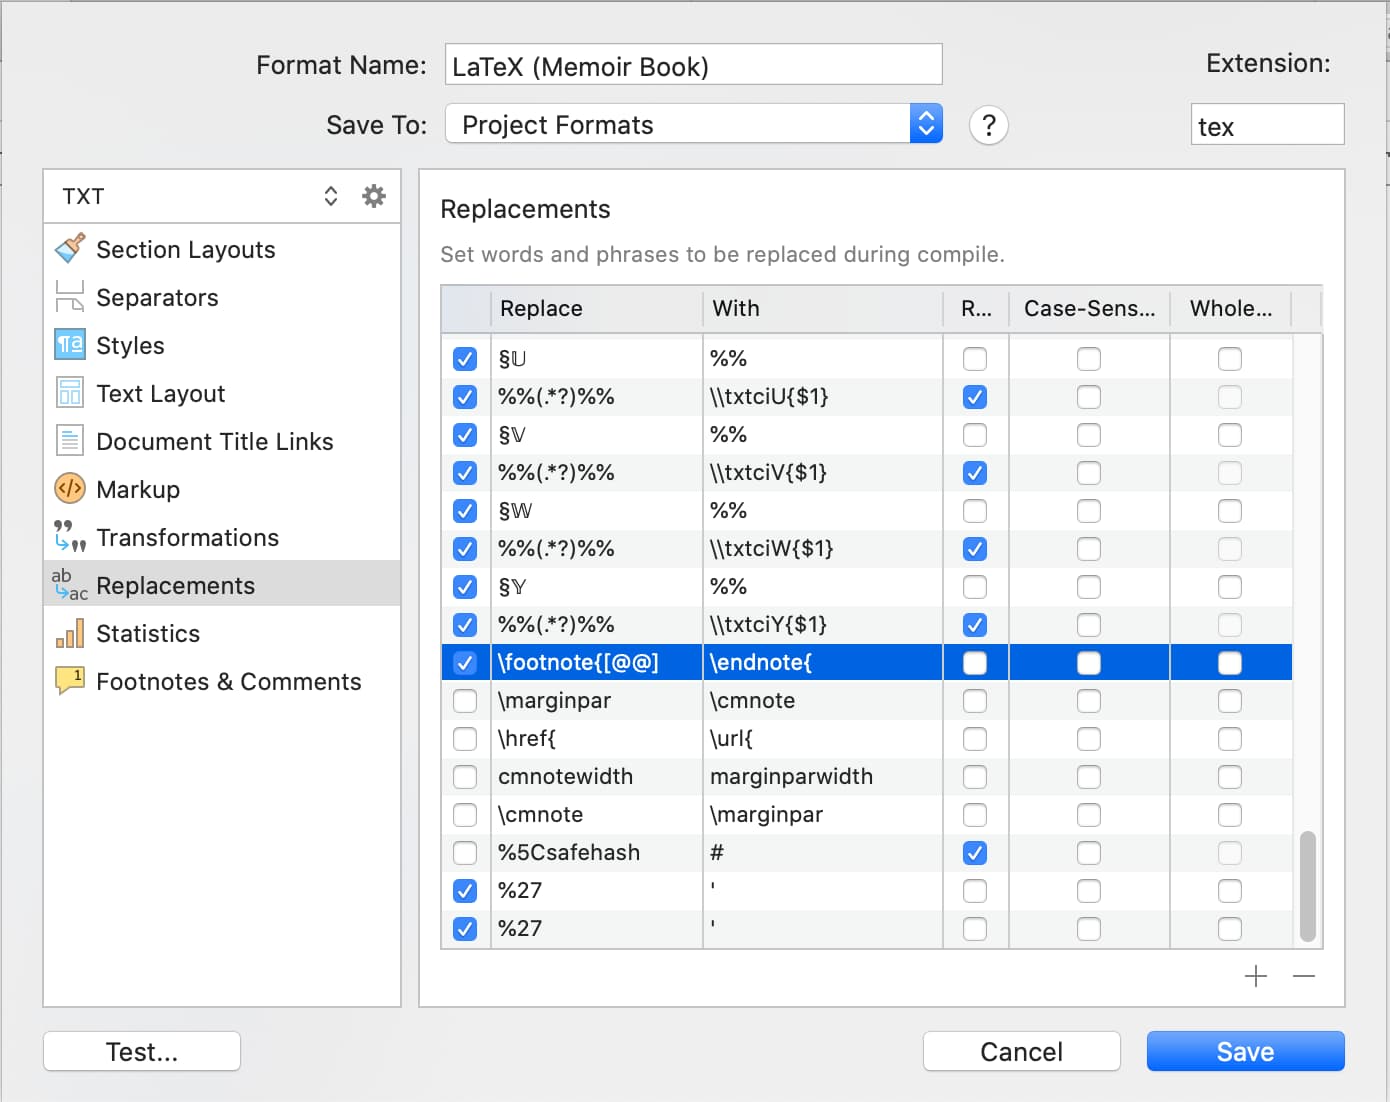
- Move each footnote that I wanted to turn into an endnote from Comments & Footnotes in the Inspector, to a separate ‘Latex Chunk’ type Section (with one and only one endnote per Section) in the Binder.
- Give the ‘Latex Chunk’ type Section in the Binder a unique label such as ‘Endnote-XX’ where XX is a sequential alpha or numeric code for each Section, e.g. Endnote-01, Endnote-02 …etc…
- Prepend the text of each endnote in each ‘Latex Chunk’ type Section with the syntax ‘\endnote{\,’ (the \, is LaTeX code for a narrow space to provide a slender space between the endnote mark, e.g. A, B or C …, and the endnote text), and add a close curly-bracket, ’ } ’ at the end of the endnote text in the ‘Latex Chunk’ type Section.
- In the main body of the text where the endnote mark (e.g. A, B or C…) is to appear, add the following syntax: ‘<$include:Endnote-XX>’. Be sure the sequential alpha or numeric code XX matches what was used to label the ‘Latex Chunk’ type Section as ‘Endnote-XX’ in the Binder, e.g. Endnote-01, Endnote-02 …etc…
- If working with LaTeX, be sure to include ‘\usepackage{endnotes}’ in your Setup Preamble Module, and include ‘\theendnotes’ at the end of the chapter or section where the endnotes are to appear.
- In an attempt to keep my Binder less cluttered (a constant struggle) for those chapters with multiple endnotes, I moved the endnote ‘Latex Chunk’ type Sections into a separate folder just beneath the corresponding chapter.
- A trick I discovered, almost by accident, one that is a bit counter-intuitive for me, is to turn the Include in Compile toggle for the ‘Latex Chunk’ type Sections, OFF!! Yes, OFF, e.g.
 .
.
As long as the ‘Latex Chunk’ type Sections that contain the endnotes are included in the Binder, the ‘<$include:Endnote-XX>’ code WILL find the endnotes and appropriately include them in the compiled LaTeX .tex file, despite the fact that they are not Included in the Compile. Go figure. Don’t ask me how this works, but it does … and it is the only way I found to prevent the endnote from appearing a second time in the PDF output file.
Now, compile, typeset, and enjoy your new endnotes!
Note: For those using LaTeX and compiling to Plain Text (.txt) files, there may be a much less involved, more straightforward way to create endnotes, but I need to further explore what, if any, Scrivener options can be made available to do so.
scrive

P.S. Here is what the endnotes look like after compiling and typesetting using the method above: